Veeam
Intro
Veeam Backup & Replication is a data protection software designed for virtualized environments, such as VMware vSphere and Microsoft Hyper-V. It enables companies to back up, replicate and restore virtual machines (VMs), applications, and data with ease, ensuring business continuity and reducing downtime.
Veeam Backup & Replication helps companies quickly restore critical data in the event of unexpected system failures, disasters, or human error, without disrupting ongoing operations. The software offers features such as automated backup and replication, granular recovery, support for cloud backup, and disaster recovery. It is used by IT professionals and system administrators in companies of all sizes to ensure data availability and resilience.
Veeam Backup & Replication is a very complex software and covers many usage scenarios. Below you will find an index of the various guides available on the different use cases.
Veeam Backup & Replication versions 10 and earlier are no longer officially supported by Veeam. For more information on the lifecycle of Veeam products, you can consult the following page.
VMware Direct Backup
Among the various new features in Veeam 12 is the ability to back up virtual machines, network fileservers, and local files directly without creating a scale-out repository, bypassing the requirement for a physical disk on the network on which to back up. (This was mandatory with Veeam 11 for VM backups instead.)
However, you should keep in mind that by using direct backup to object storage without scale-out, you may lose some of Veeam's advanced features, such as centralized management of multiple repositories or the ability to distribute backups to multiple storage devices to improve performance. In addition, direct backup to object storage without scale-out may not be suitable for scenarios where fast data recovery is needed due to the speed limitations of object storage.
Prerequisites
First, you need to get your access key and secret key, from the Cubbit Web Console or https://console.[your-tenant].cubbit.eu. Please follow these instructions on how to get started with a Cubbit account and generate these keys.
To proceed with the configuration, you will need the following:
- Veeam Backup and Replication software (Version 12 and higher)
- License Veeam Universal License (VUL) or Per-socket (Enterprise or higher)
- (Optional) Virtualization environment (e.g., VMware) when backing up virtual machines.
Veeam Backup and Replication Community e Standard editions do not allow to use of the Scale-out repository functionality. With the Enterprise edition, users can create two Scale-out repositories with three active extensions and unlimited inactive ones (set in maintenance mode). The VUL and Enterprise Plus editions have no limitations on the number of repositories or extensions.
Create an S3 Compatible Object Storage Backup Repository
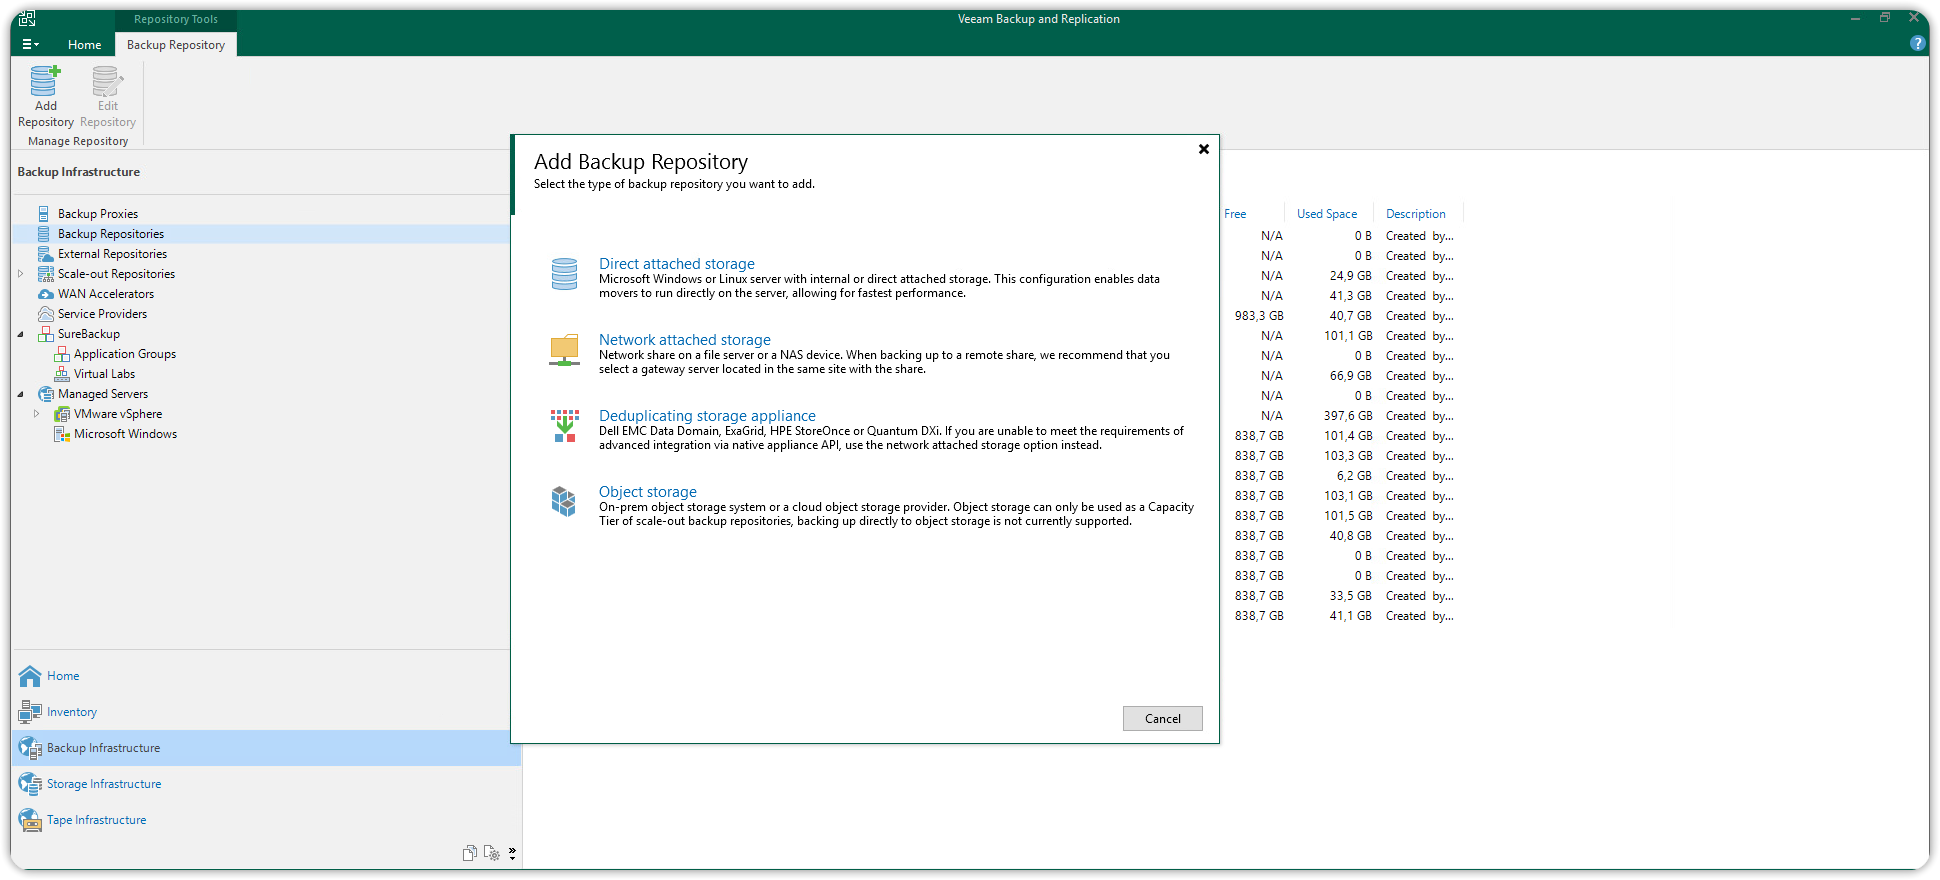
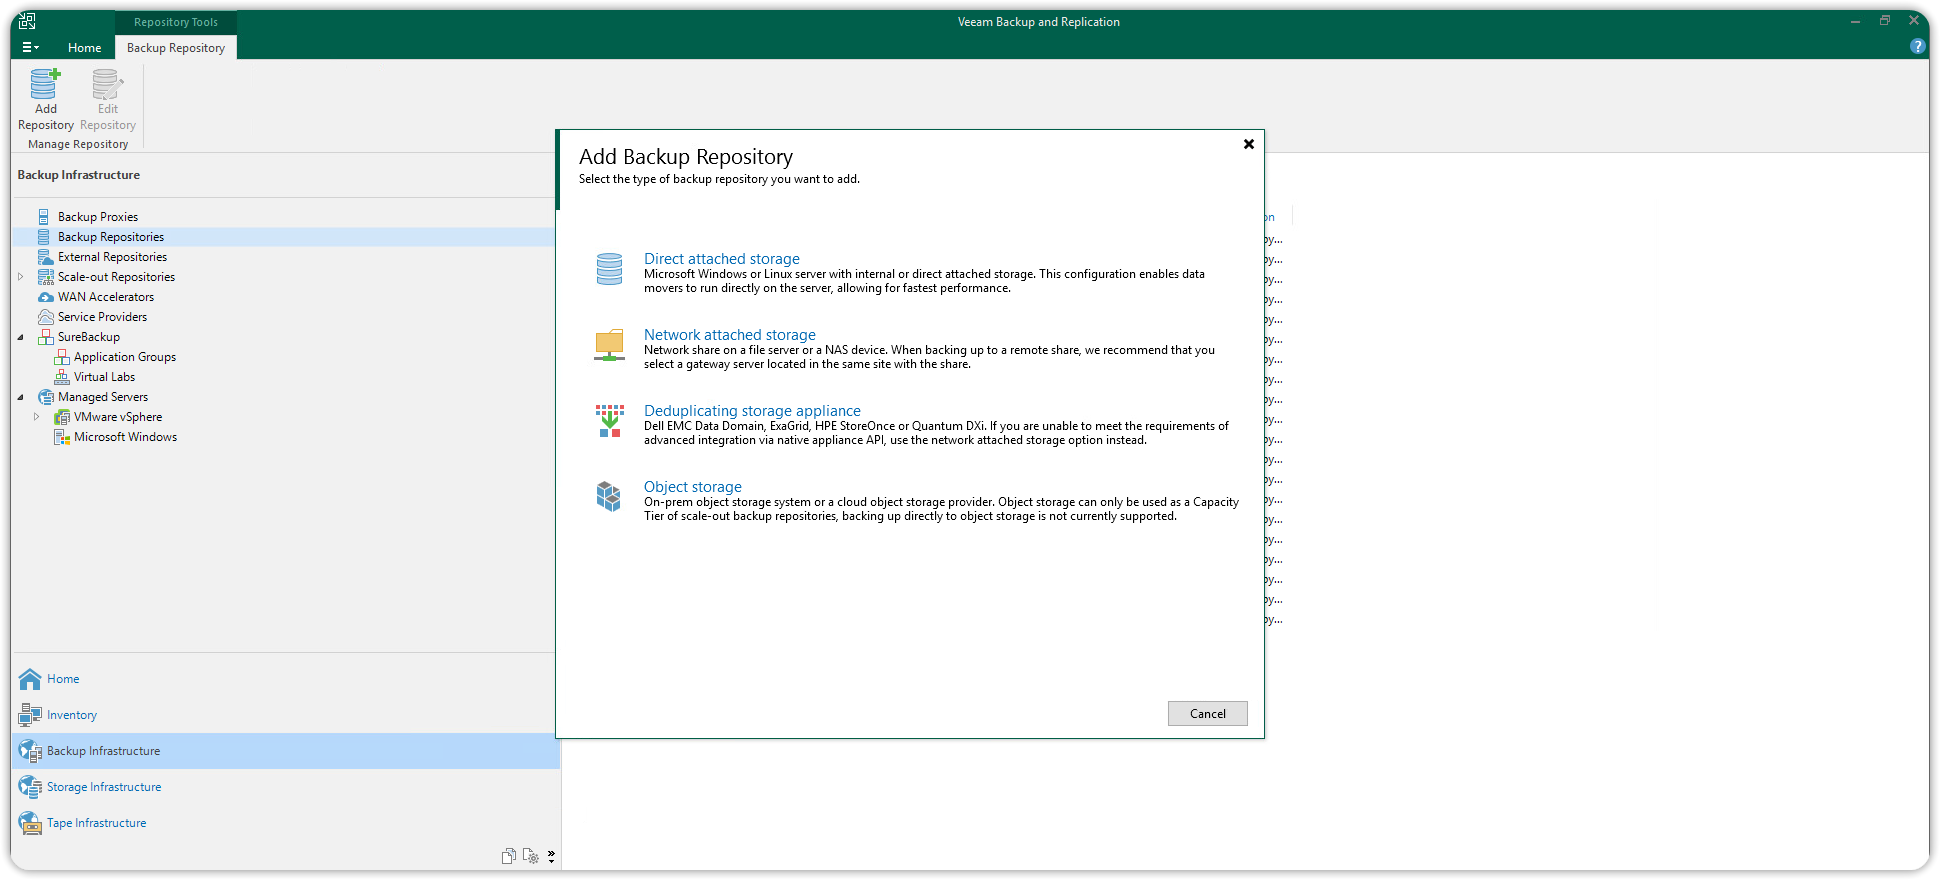
In the Backup Infrastructure view, click on Backup Repositories and choose Add Backup Repository.
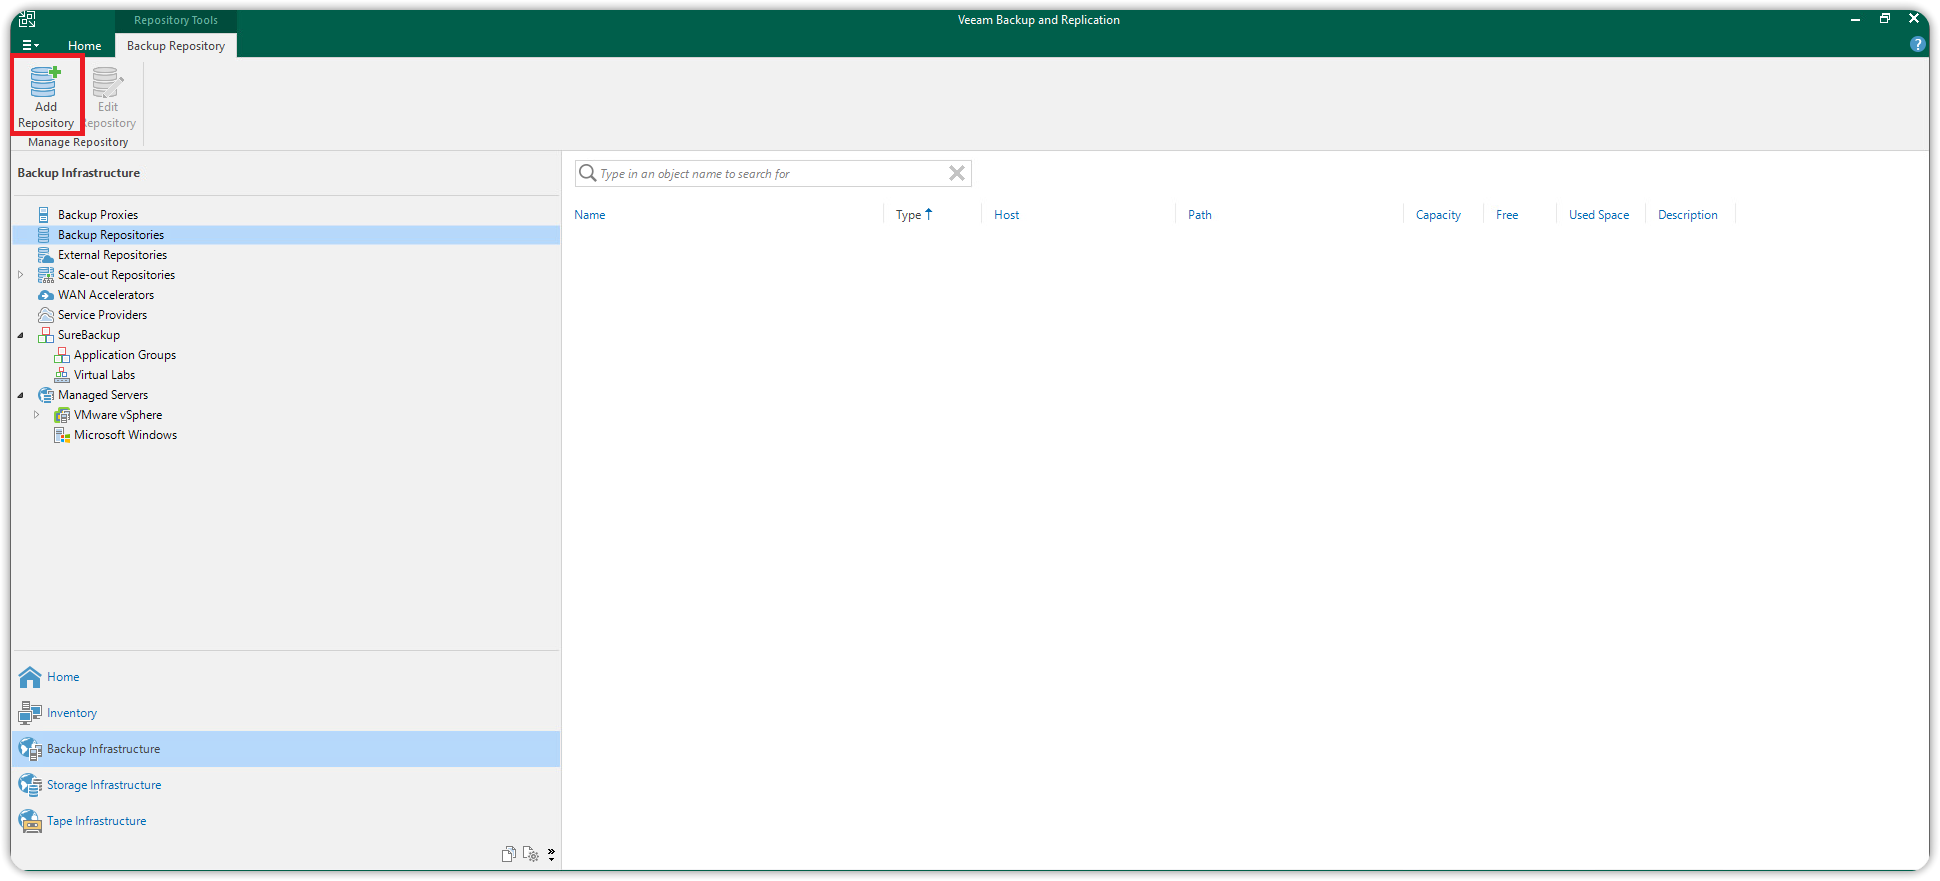
In the Add Backup Repository window, choose Object Storage.
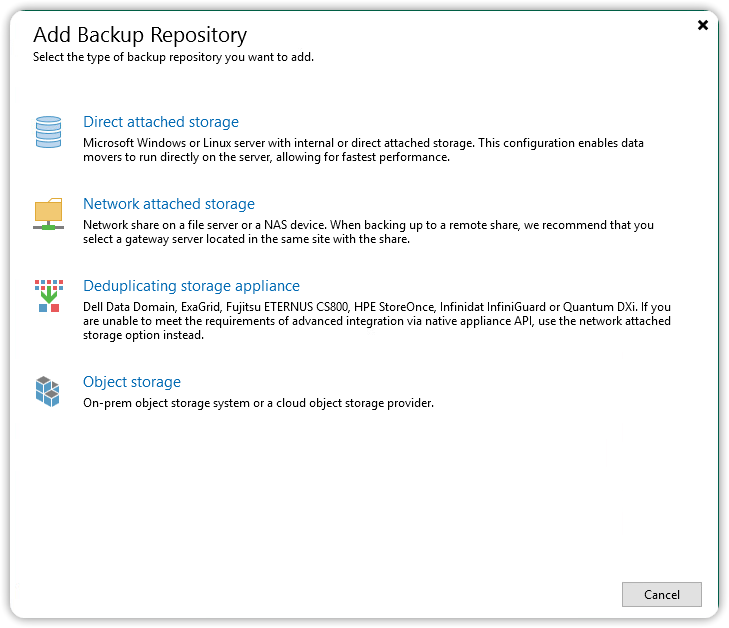
Choose S3-compatible Object Storage to start the Object Storage Repository wizard.
Enter the name and description for the new Object Storage repository and click Next.
In the Account window, enter https://s3.cubbit.eu or if you have a custom tenant s3.[your-tenant].cubbit.eu, in the Service point field and enter the value eu-west-1 in the region field. In the credentials field press the Add button to add the access credentials. In the dialog box that opens enter the Access key and Secret key in the respective fields and press OK.

Before proceeding further you will need to have created at least one Bucket via other S3 clients (e.g. Amazon AWS CLI or Cubbit Web Console or https://console.[your-tenant].cubbit.eu).
Attention: in case of backup to Object Storage via Veeam, the use of S3 Versioning without S3 Object Lock activation (immutability) must be avoided. Without immutability, both the operations required for deletion and the total space used are multiplied, by the total disadvantage of the customer
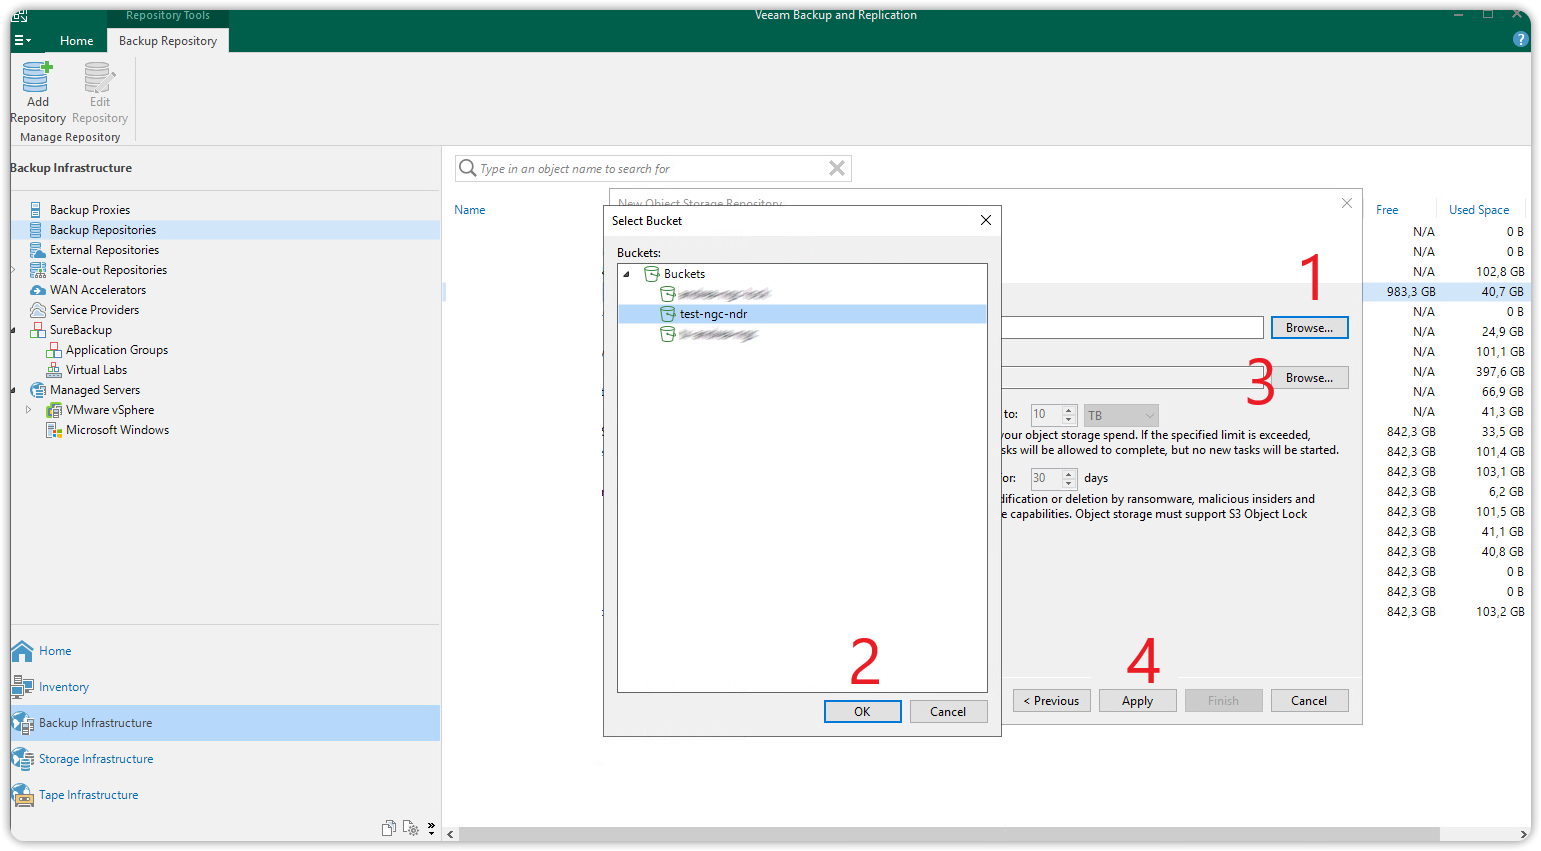
After creating a new bucket from the Cubbit Web Console or https://console.[your-tenant].cubbit.eu proceed to the Bucket section.
This window allows you, via the topmost Browse (1) button, to browse through the buckets on your S3 Cubbit account. After selecting the bucket press OK (2) and close the dialog box.
Likewise, clicking the Browse (3) button further down will allow you to browse through folders within the chosen bucket or create a new one (New folder button).
The chosen bucket and folder will be the destination of the backups. To move forward, select the folder and press OK. Then press the Apply (4) button.
Review the information and finally click Finish to complete this step. The Cubbit Object Storage S3 Compatible repository has been successfully added to Veeam 12, it will be available as a backup repository on the Backup Job that will be created from now on.
Backup Job creation
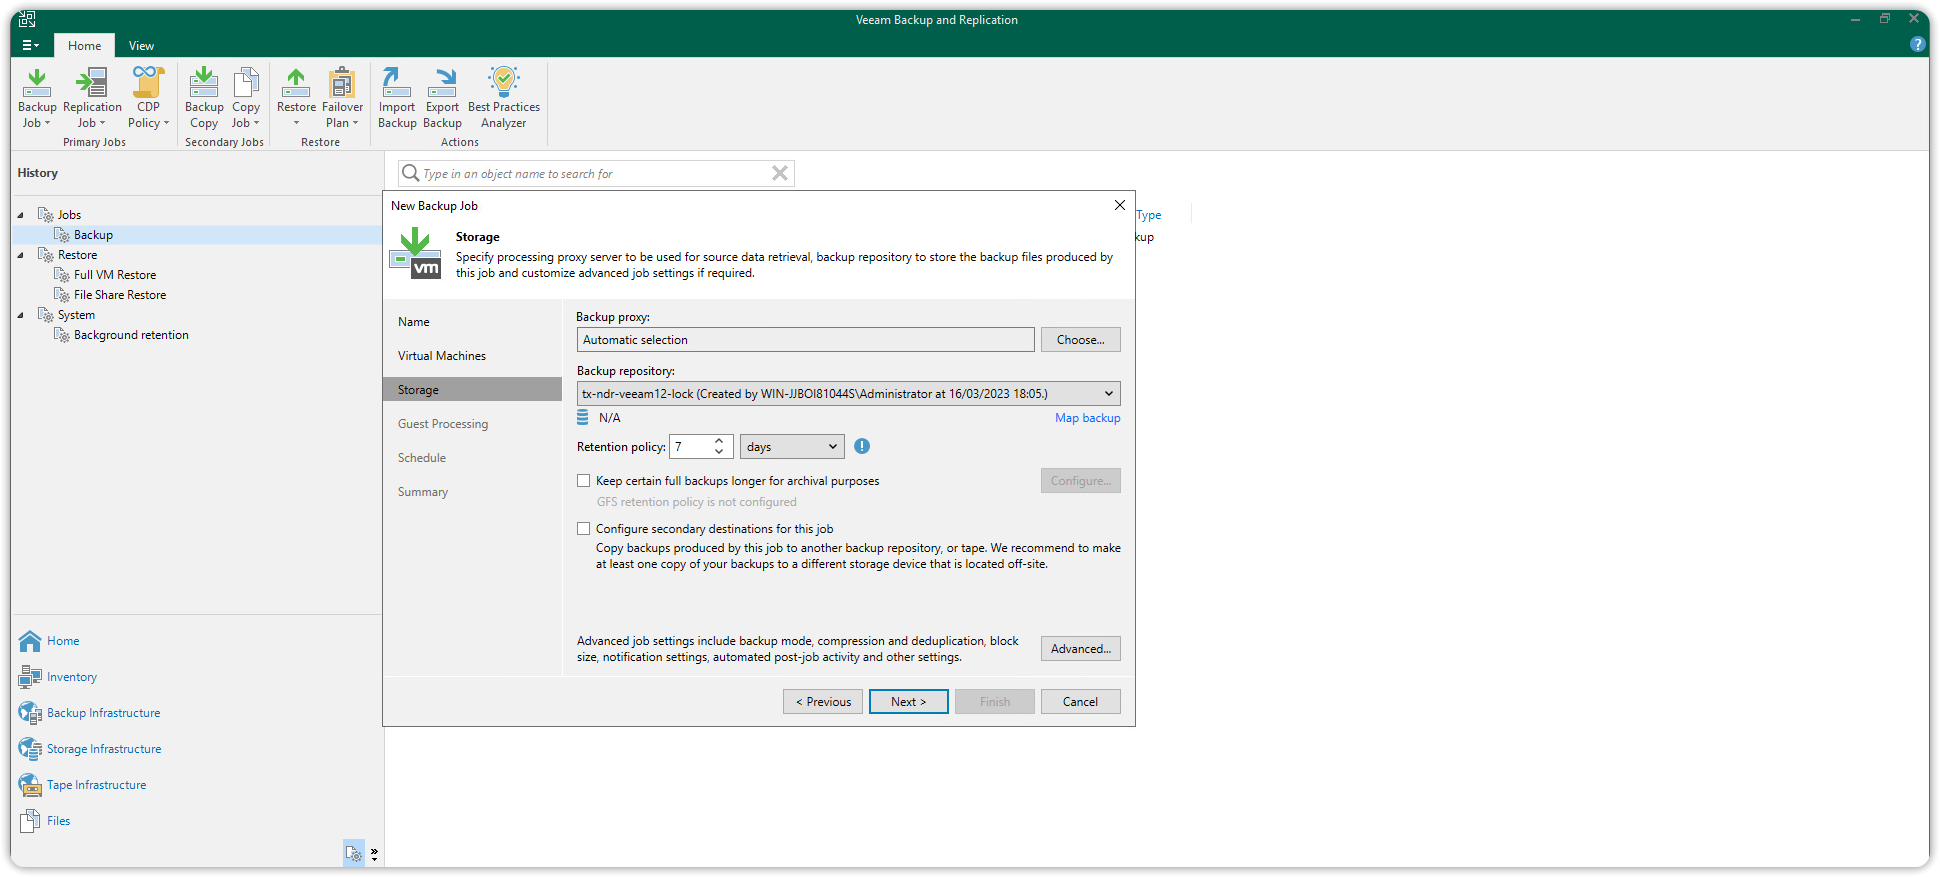
With Veeam 12 you will now be able to create a backup job and directly enter as a backup repository the S3 Object Storage repository that was created at the previous step for virtual machines as well.
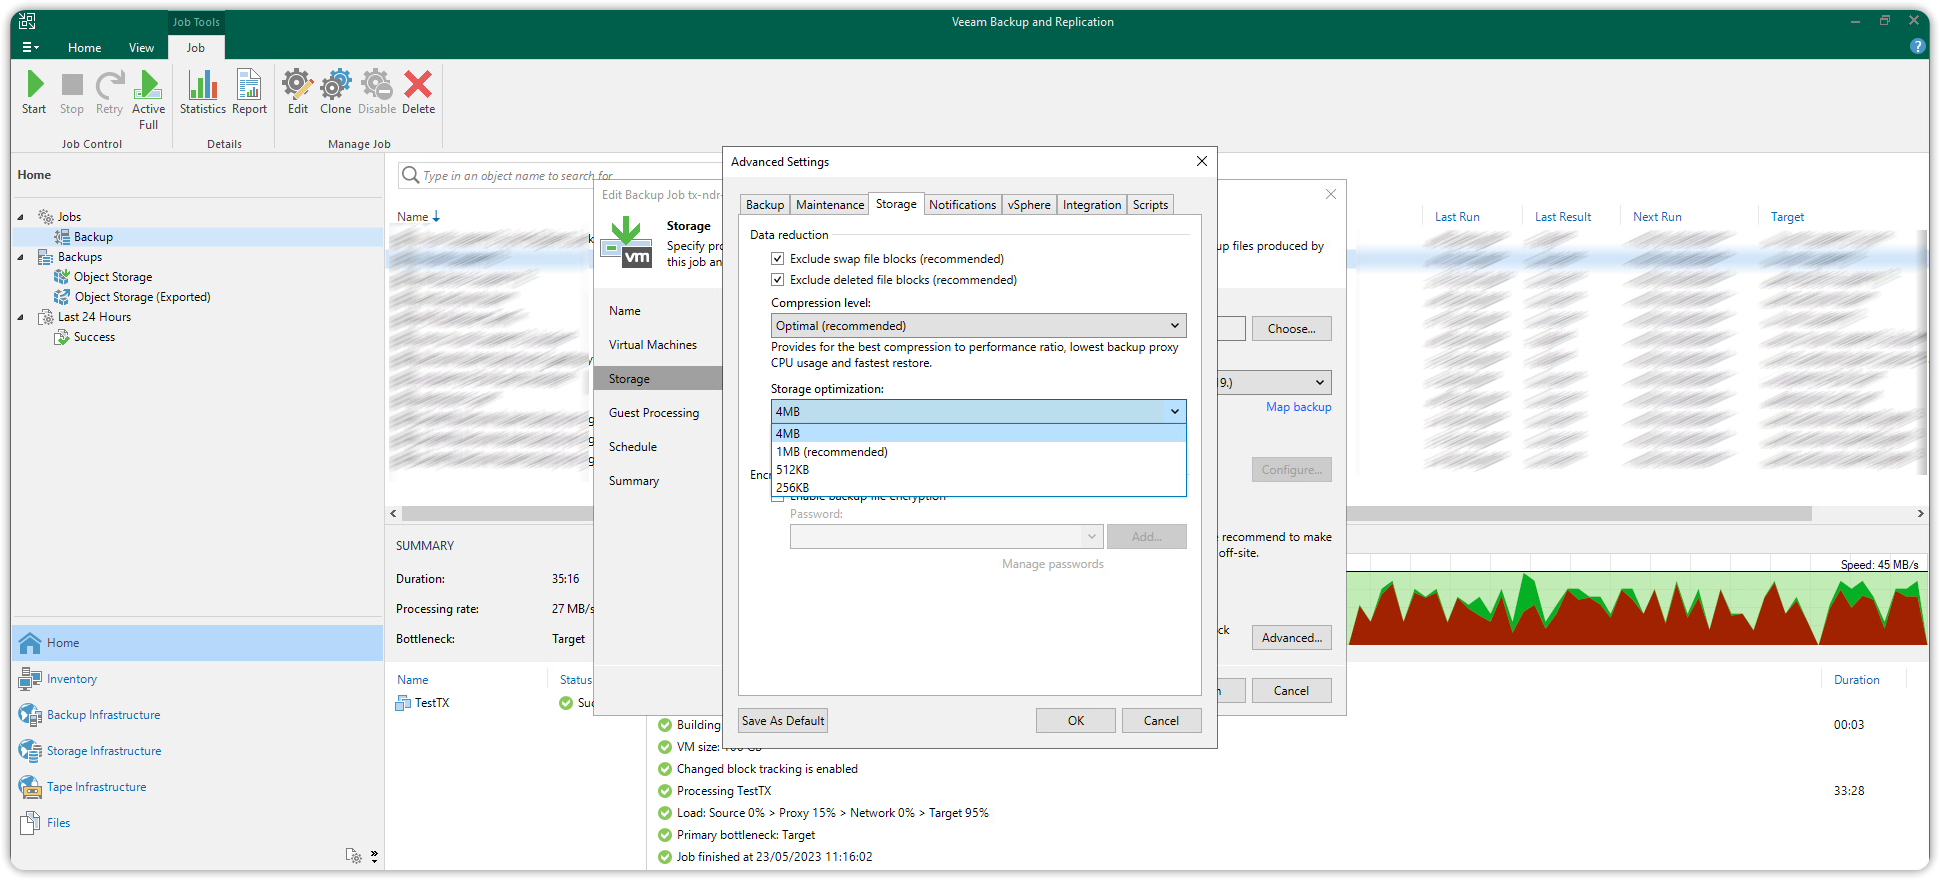
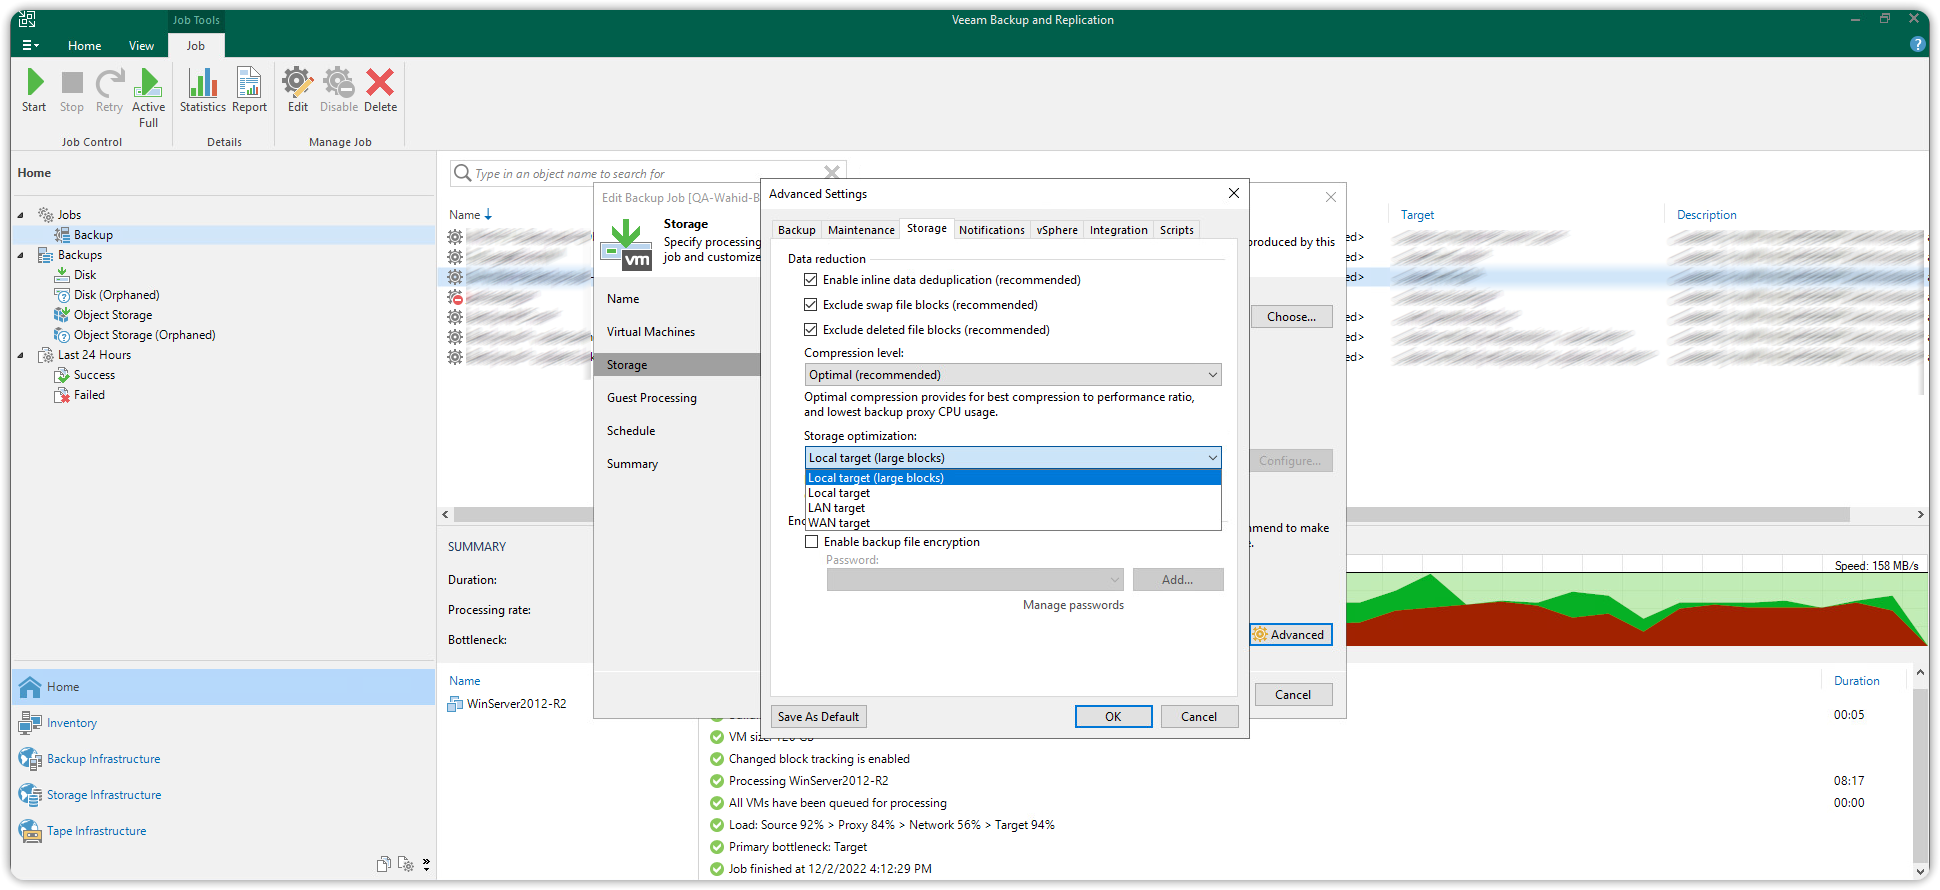
To proceed, simply create a new backup job by choosing the virtual machine you want to back up. As a Backup repository, you will have to select the previously created S3 repository. Then press the Advanced button at the bottom right to enter the advanced configuration.
Select the Storage tab at the top and under Storage optimization: set the value to 4MB and press OK.
Complete the creation of the backup job and launch it or schedule it to start.
For additional information about Veeam Backup & Replication usage please visit the official documentation page.
Immutability
Immutability is a feature of Veeam's data backup and recovery solutions that helps protect data from unwanted changes and possible cyber attacks such as ransomware. Veeam's immutability is based on creating a backup, data, or disk image whose data cannot be changed once created. This means that the data is written to a backup repository or archive that does not allow data to be modified, deleted, or added.
This type of immutability can be implemented using Veeam's object-based storage system, which allows you to set a data retention rule so that data cannot be deleted or modified for a specified period. In this particular case, the S3 Object Lock feature supported by Cubbit S3 Object Storage can be used.
Immutability Prerequisites
First, you need to get your access key and secret key, from the Cubbit Web Console or https://console.[your-tenant].cubbit.eu. Please follow these instructions on how to get started with a Cubbit account and generate these keys.
To proceed with the configuration of an S3 repository and enable the Immutability feature, you must have:
- Veeam Backup and Replication Software (Version 9 or higher)
- The minimum Veeam license required depends on the specific type of backup and use case you intend to take on. Veeam licenses comparison
Create an S3 Compatible Object Storage Backup Repository with active S3 Object Lock
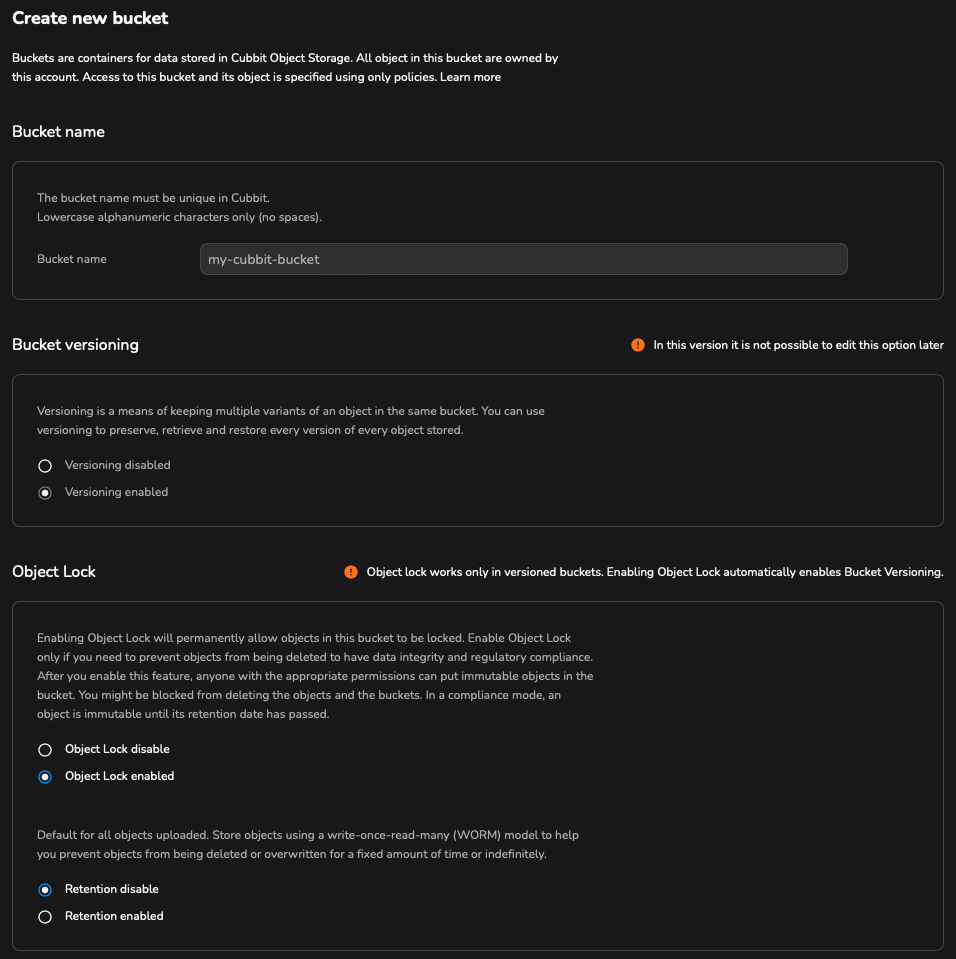
First, you need to create a bucket from the Cubbit Web Console or https://console.[your-tenant].cubbit.eu. You can follow the instructions on S3 Object Lock to activate S3 Object Lock during the bucket creation.
After activating the S3 Object Lock on bucket creation, it is necessary to set the retention to disabled as per the following image. Veeam will then manage the retention policy and configure it. Also, in the case of backups to Object Storage via Veeam, the use of S3 Versioning without activating S3 Object Lock (immutability) must be avoided. Without immutability, both the operations required for deletion and the total space used are multiplied, to the total disadvantage of the customer.
From the Backup Infrastructure view, right-click on Backup Repositories and select Add Backup Repository.
From the Add Backup Repository window, choose Object Storage.
Choose S3-compatible object storage to initiate the Object Storage Repository wizard.
Enter the name and description for the new Object Storage repository and click Next.
In the Account window enter https://s3.cubbit.eu or if you have a custom tenant s3.[your-tenant].cubbit.eu, in the Service point field and enter the value eu-west-1 in the region field. In the credentials field, press the Add button to enter the access credentials. In the dialog box that opens, enter the Access key and Secret key in the respective fields and press OK.
This window allows you, via the topmost Browse button, to navigate through the buckets on your S3 Cubbit account. After selecting the bucket with the S3 Object Lock enabled, press OK and close the dialog box.
Similarly, by clicking the Browse button further down, you will be able to navigate through the folders within the chosen bucket or create a new one (New folder button).
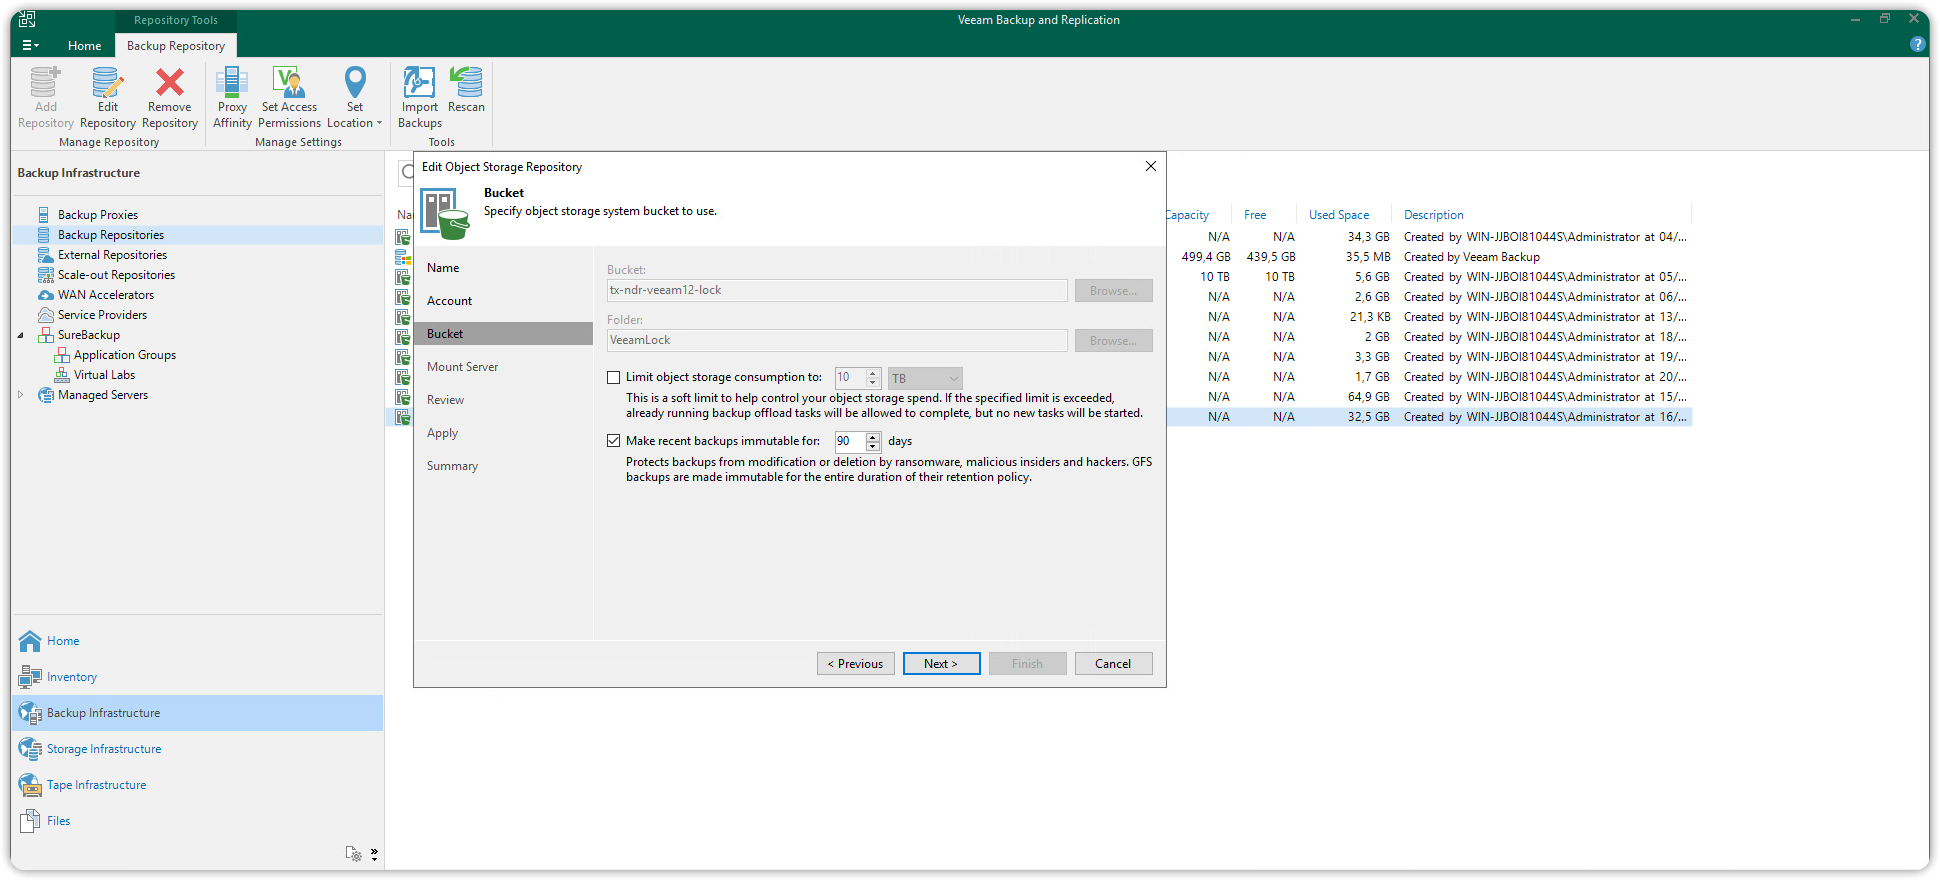
The selected bucket and folder will be the destination of the backups. To move forward, select the folder and press OK. Check the "Make recent backups immutable for" box and specify how many days you want to make the backups on this bucket immutable for.
Veeam Backup & Replication automatically adds 10 days to the value set on this box called block generation period for the initial backup job. For more information, you can refer to the official immutability documentation.
Then click Next.
Review the information, then click Finish to complete this step. Immutability is now set. The Cubbit Object Storage S3 Compatible repository with S3 Object Lock enabled has been successfully added to Veeam, it will be available as a target repository on the Backup Job that will be created from now on.
For more information on using Veeam Backup & Replication, you can refer to the official documentation.
NFS Backup
In this use case, we will assume that we need to back up a resource with NFS File Share on Cubbit.
NFS Backup Prerequisites
First, you need to get your access key and secret key, from the Cubbit Web Console or https://console.[your-tenant].cubbit.eu. Please follow these instructions on how to get started with a Cubbit account and generate these keys.
To proceed with the configuration, you will need the following:
- Veeam Backup and Replication software (Version 11 or higher)
- License Veeam Universal License (VUL) or Per-socket (Enterprise or higher)
- A File Share that meets the requirements listed in Platform Support
- If you plan to use a dedicated backup proxy server or cache repository, make sure these components are added to Backup Infrastructure.
Backup Repository (Capacity tier)
In the Backup Infrastructure view, click on Backup Repositories and choose Add Backup Repository.
In the Add Backup Repository window, choose Object Storage.
Select S3-compatible Object Storage to launch the Object Storage Repository wizard.
Enter a name and description for the new Object Storage repository, then click Next.
In the Account window, enter https://s3.cubbit.eu or https://s3.[your-tenant].cubbit.eu if you have a custom tenant, in the Service point field and enter the value eu-west-1 in the region field. In the credentials field press the Add button to add the access credentials.
In the dialog box that opens, enter the Access key and Secret key in the respective fields and press OK.
Before proceeding further you will need to have created at least one Bucket via other S3 clients (e.g. Amazon AWS CLI or Cubbit Web Console or https://console.[your-tenant].cubbit.eu).
In the case of backup to Object Storage via Veeam, the use of S3 Versioning without S3 Object Lock activation (immutability) must be avoided. Without immutability, both the operations required for deletion and the total space used are multiplied, to the total disadvantage of the customer.
After creating a new bucket from the Cubbit Web Console or https://console.[your-tenant].cubbit.eu go to the Bucket section.
Use the topmost Browse (1) button to navigate through the buckets on your S3 Cubbit account. After selecting the bucket press OK (2) and close the dialog box.
Click the Browse (3) button further down to navigate through folders within the chosen bucket or create a new one by clicking on the New folder button.
The selected bucket and folder will be the destination of the backups. To move forward, select the folder and press OK. Then press the Apply (4) button.
Review the information and click Finish to complete this step. The Cubbit Object Storage S3 Compatible repository has been successfully added to Veeam, you can use it for various types of backup jobs with Veeam.
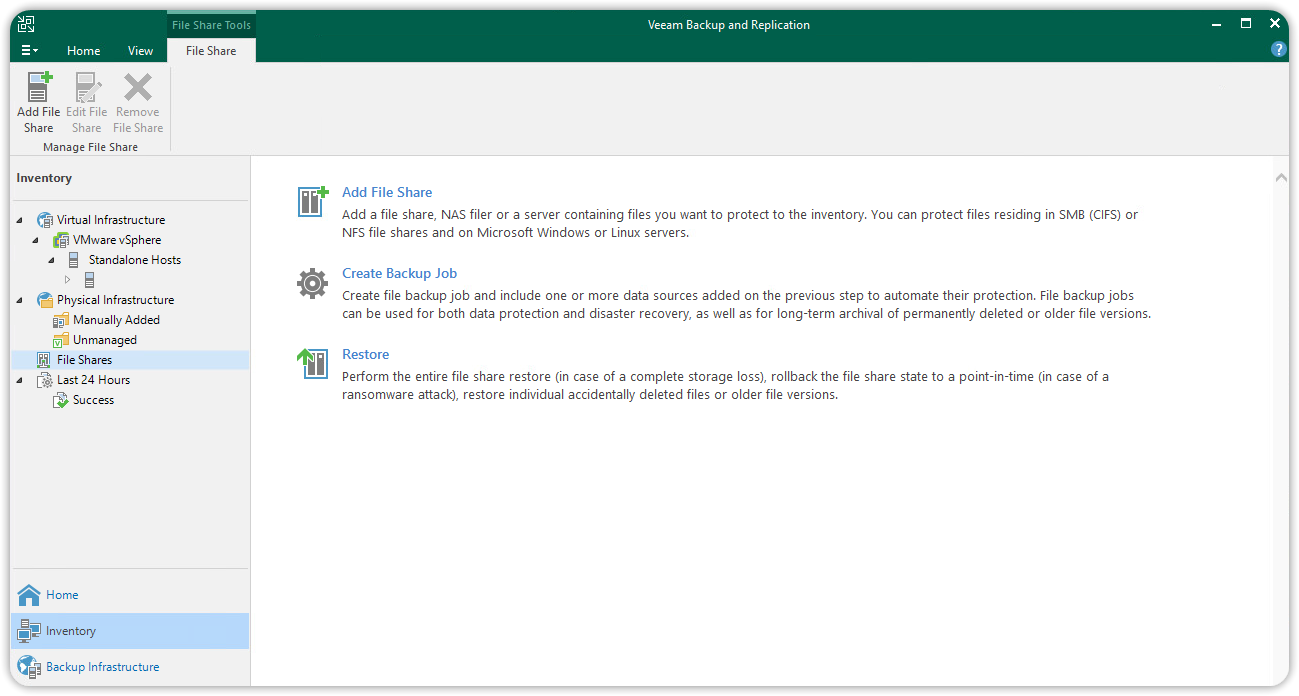
Adding File Share (NFS)
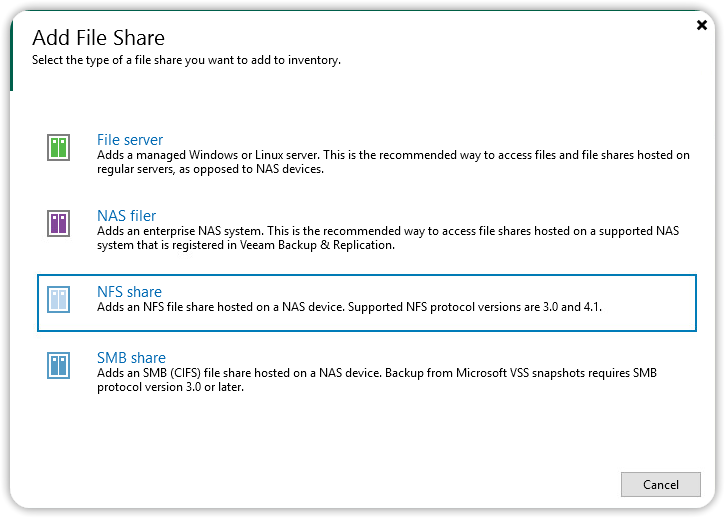
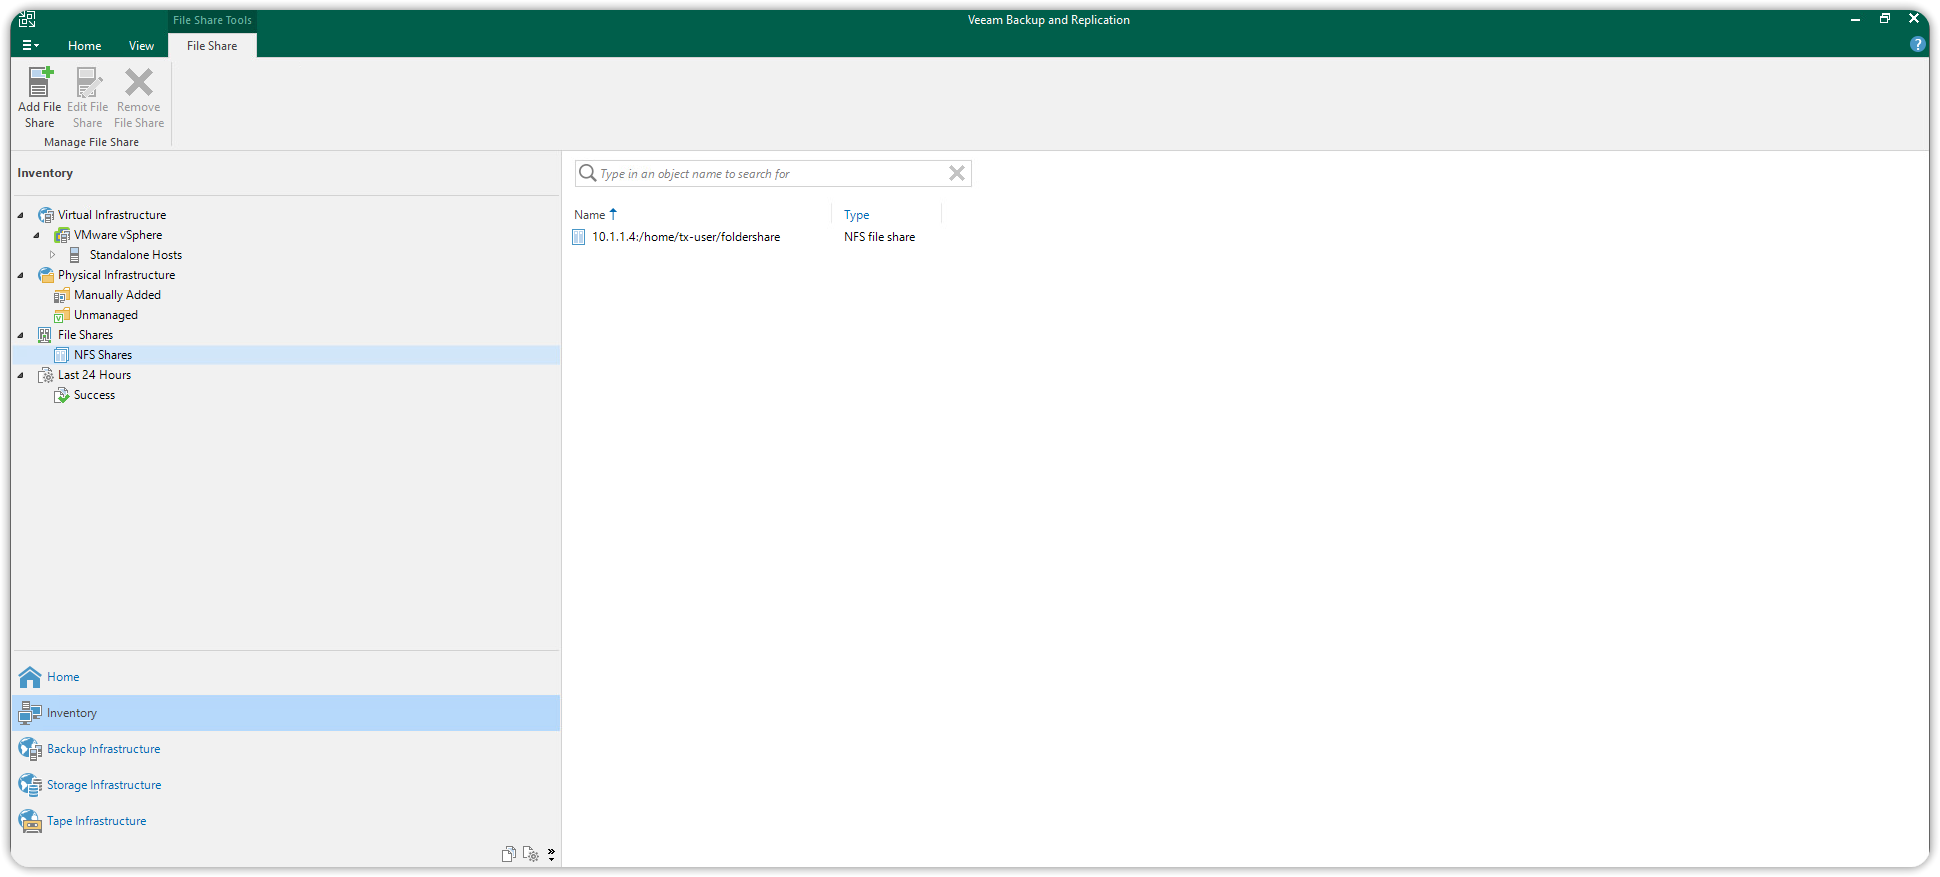
To add an NFS share resource, go to Inventory > File Shares and click Add File Share.
In the Add File Share dialog box, select NFS Share to continue.
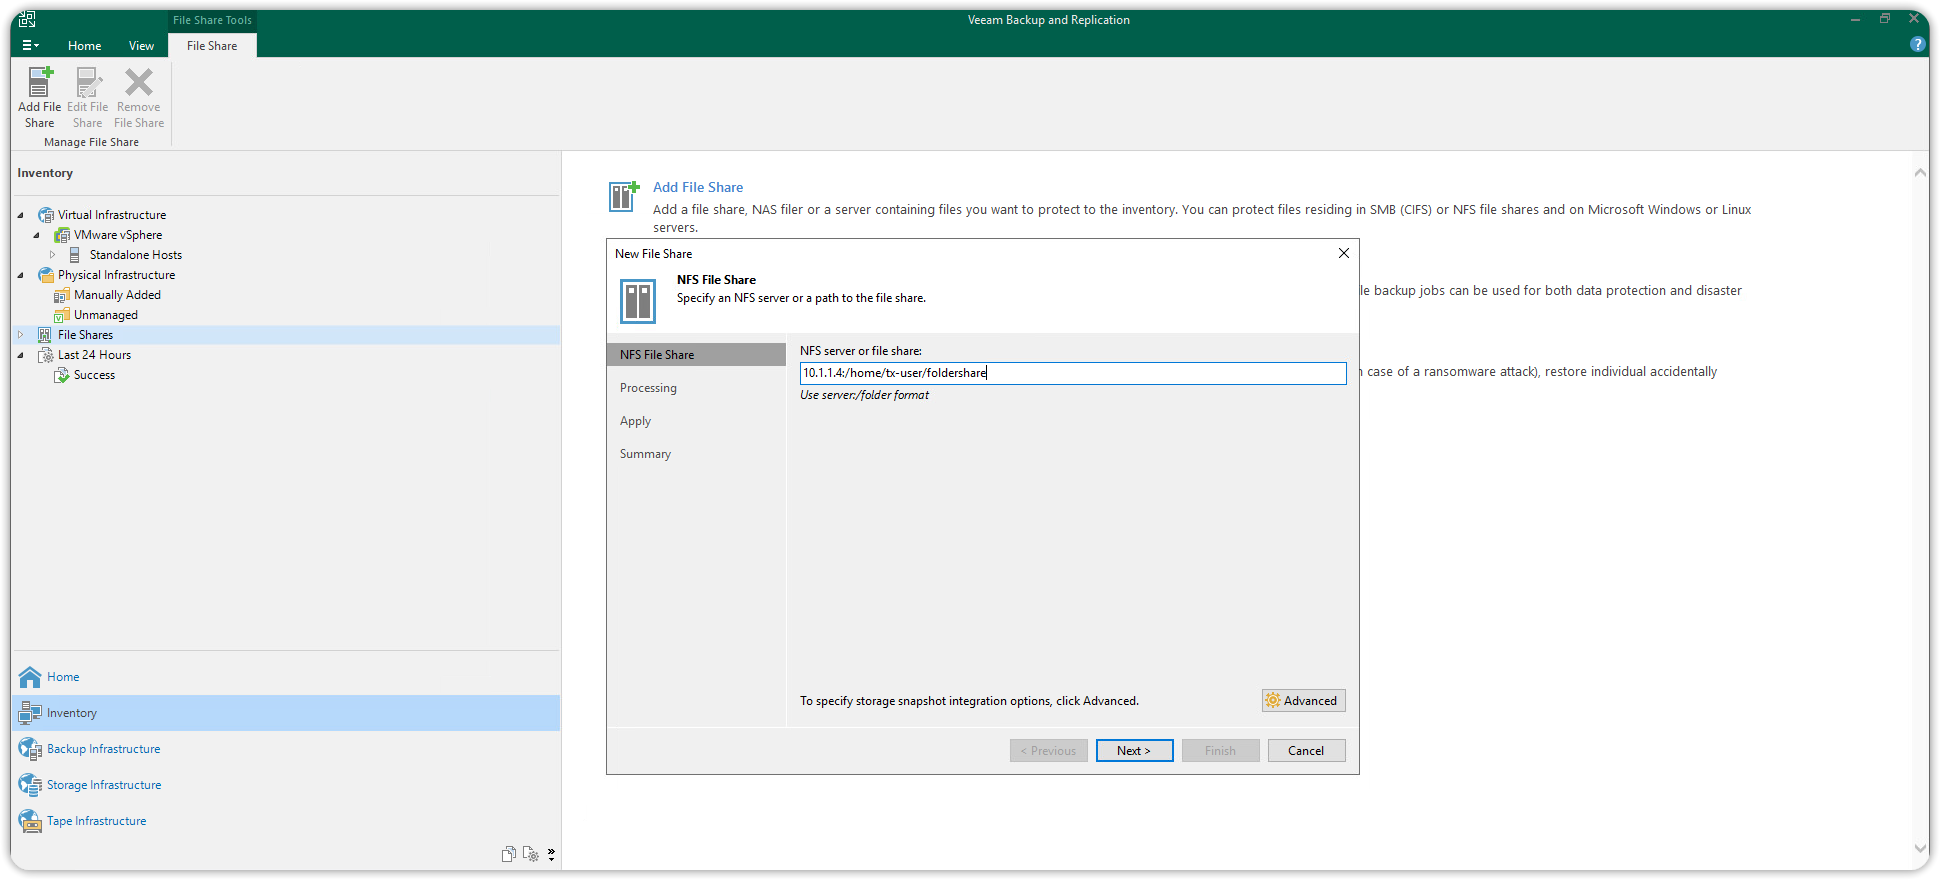
In the NFS File Share section, add the IP address and path to the NFS share in the format <IP address>:/path_to_share, then click Next to continue.
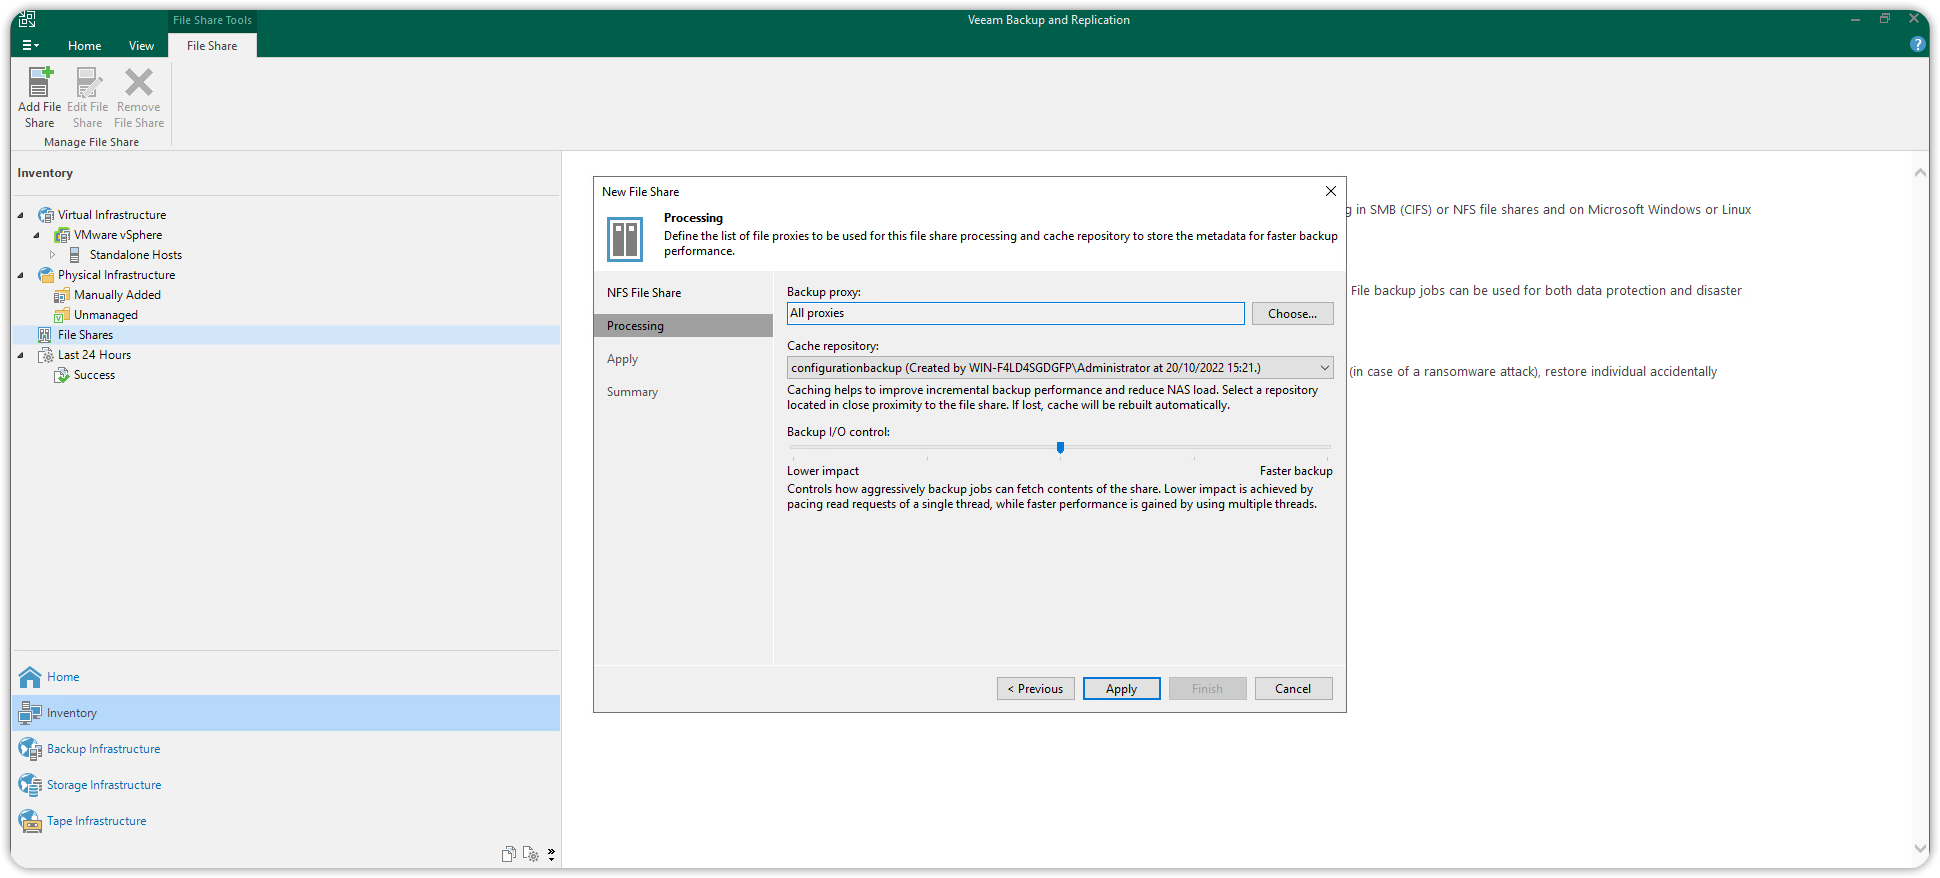
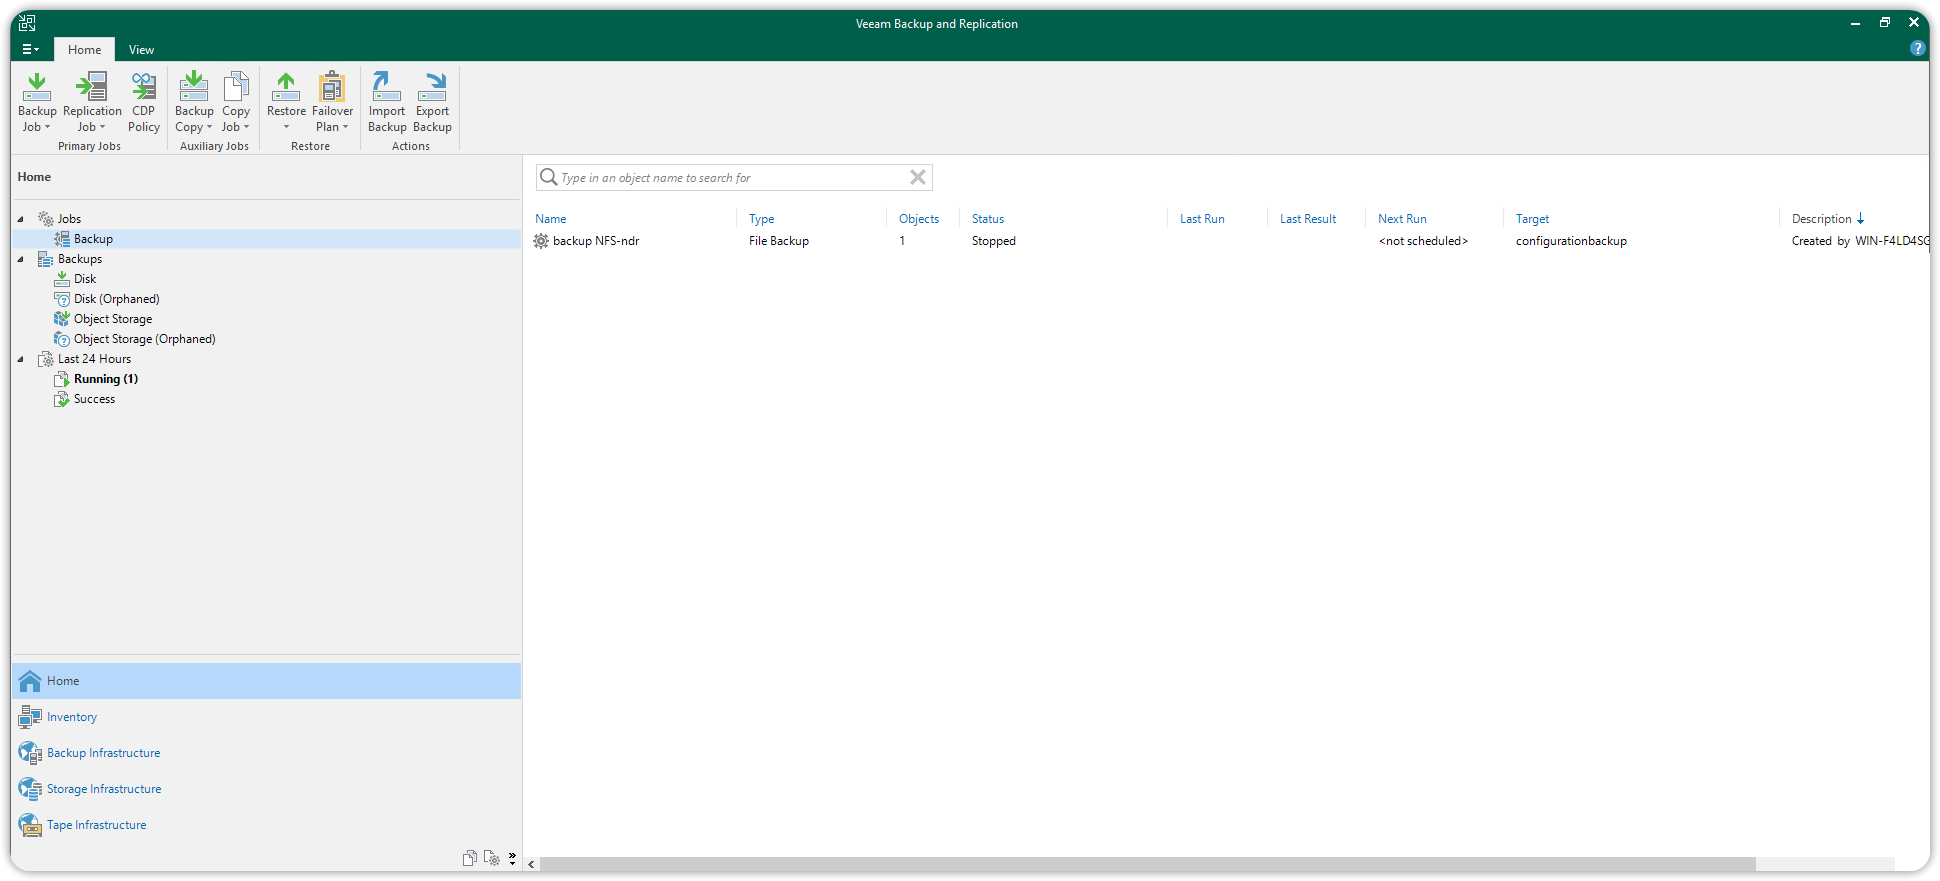
Make sure the Cache repository points to the Default Backup Repository (in the screenshot below it has been renamed configurationbackup), and click Apply to add the NFS File Share network resource.
Then press Finish to close the wizard. The new NFS File Share resource will be listed under File Shares > NFS Shares in the Inventory section.
Backup Job Creation
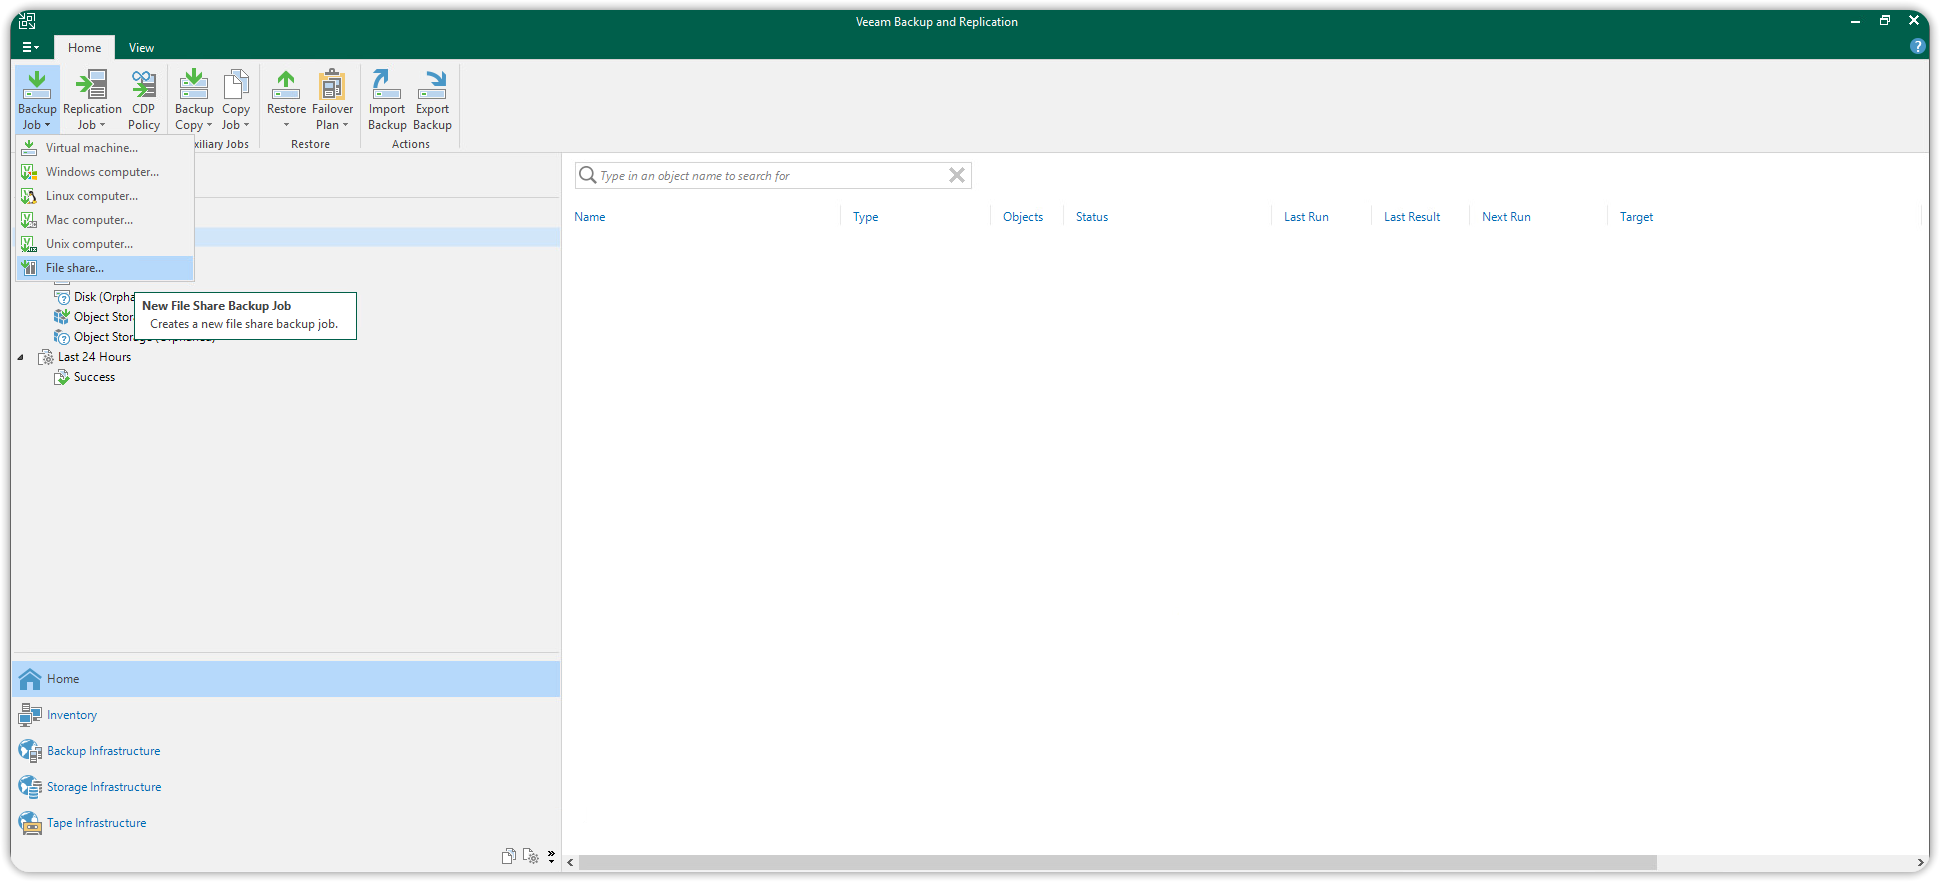
You can now proceed with the creation of the Backup Job. Select Home from the navigation panel on the left, press the top left Backup Job button, and then select File Share.
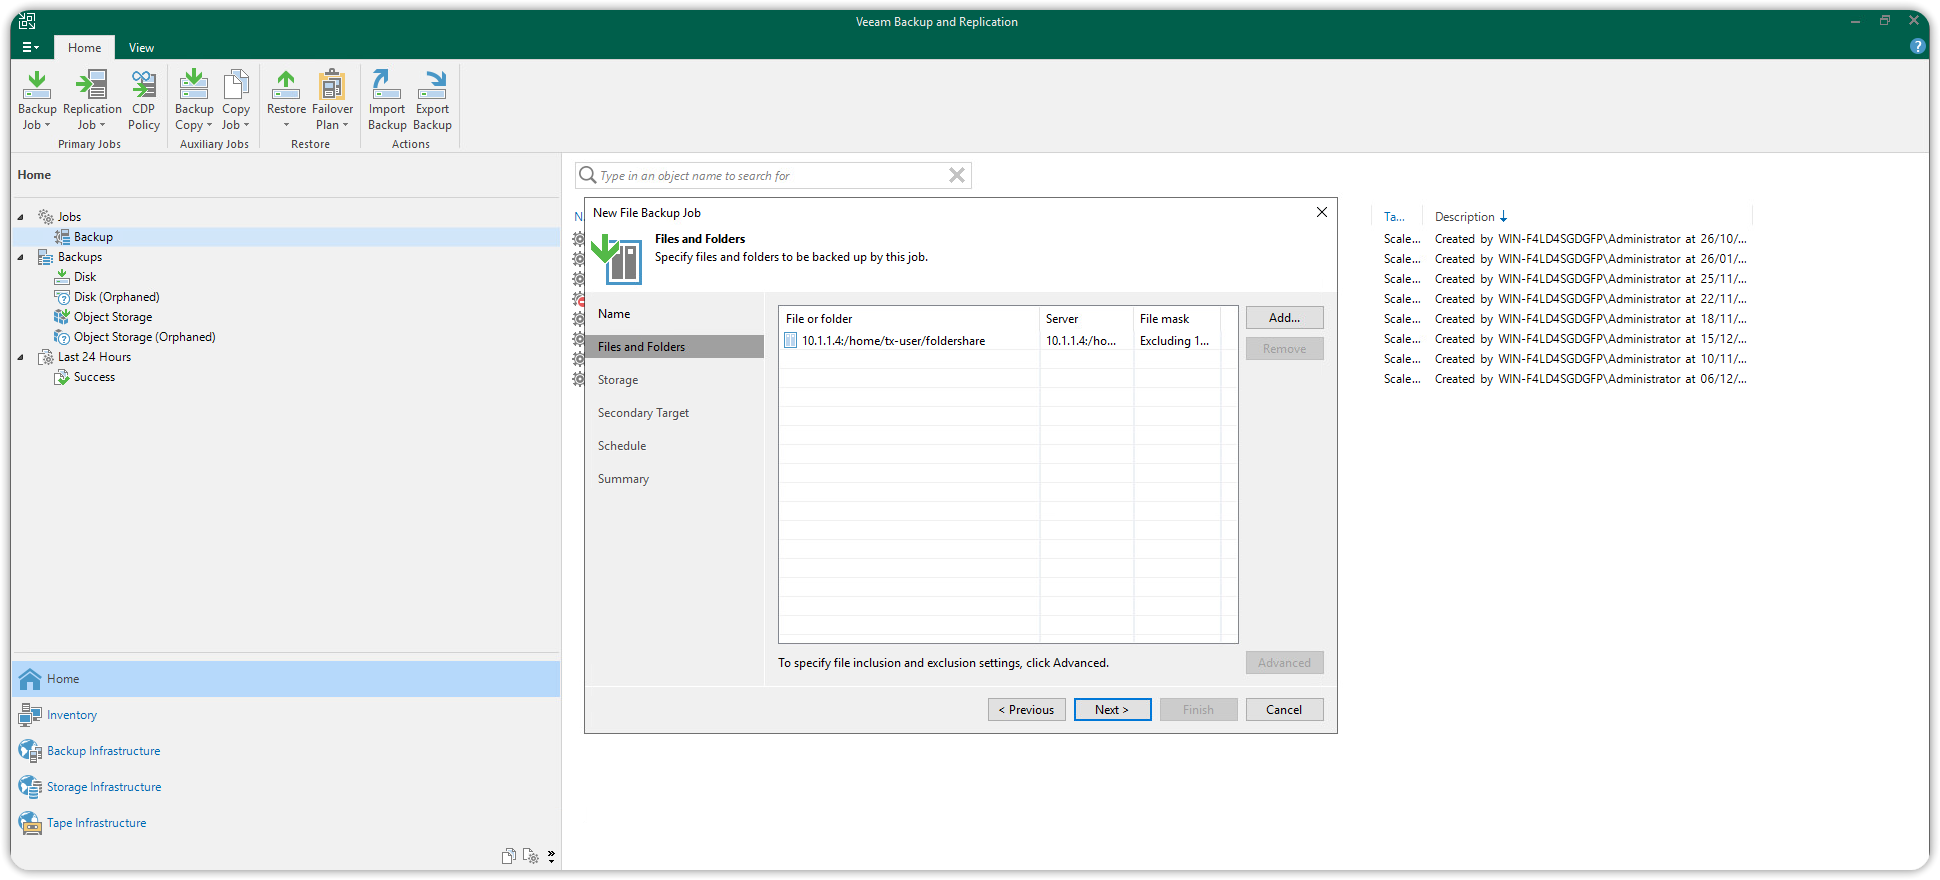
A wizard will open to help you create the Backup Job. Choose a name of the Backup Job and specify the path of the files and folders to back up.
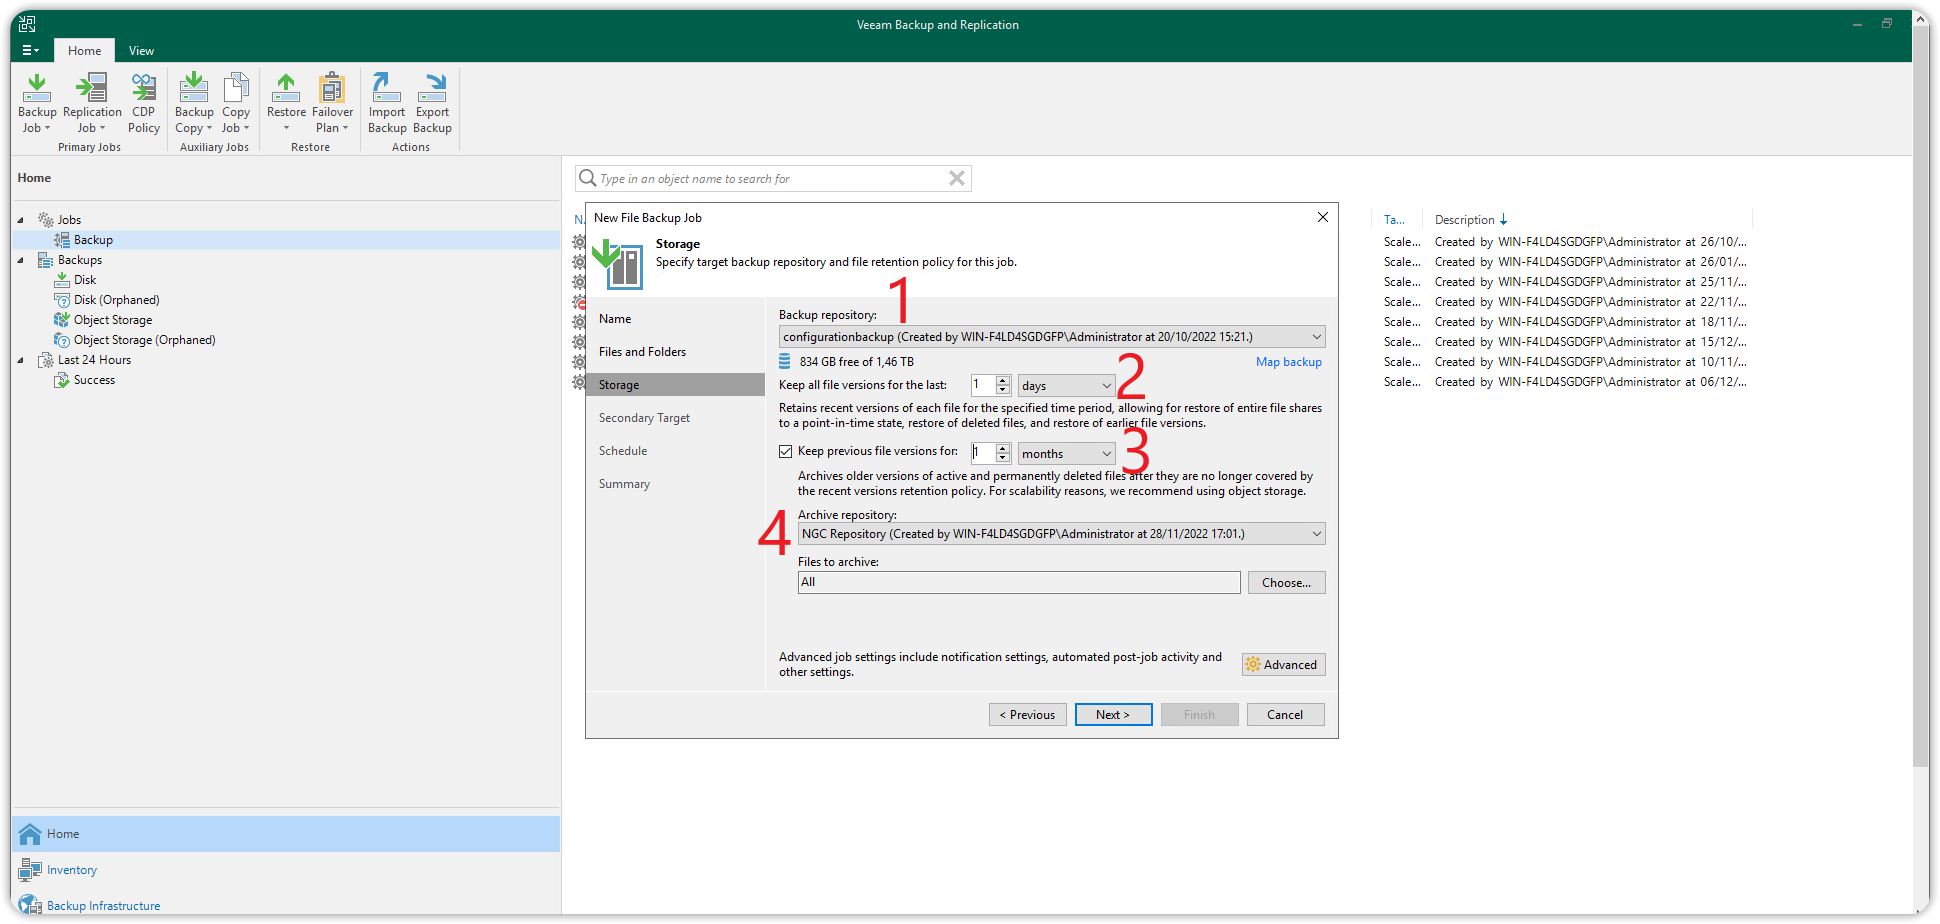
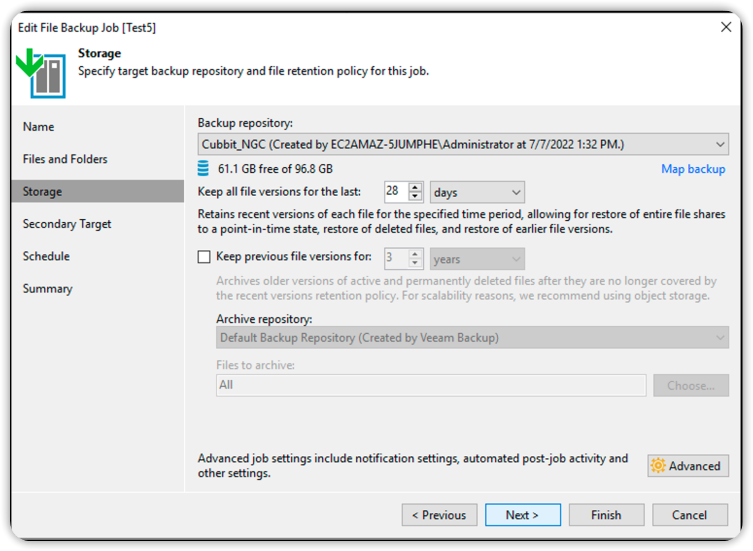
In the Storage section set up the following:
- The Backup repository where files will be allocated.
- How long to keep the latest versions of files locally.
- How long to keep previous versions on the Cubbit S3 Archive repository.
- The Cubbit S3 Archive repository (as previously set up) where previous versions of files will be stored.
Press Advanced in the lower right corner to enter the advanced configuration.
Select the Storage tab at the top and under Storage optimization: set the value to Local target (large blocks) and press OK.
Leave the Secondary Target section blank and press Next. In the Schedule section set the date and schedule for the Backup Job, and press Next. Review the information entered in the Summary section and check the box if we intend to immediately start the newly created Backup Job. Finally, click on Apply.
The Backup Job for the File Share (NFS) will be added to Veeam's list of available Jobs and can be started directly if needed.
For additional information about Veeam Backup & Replication usage please visit the official documentation page.
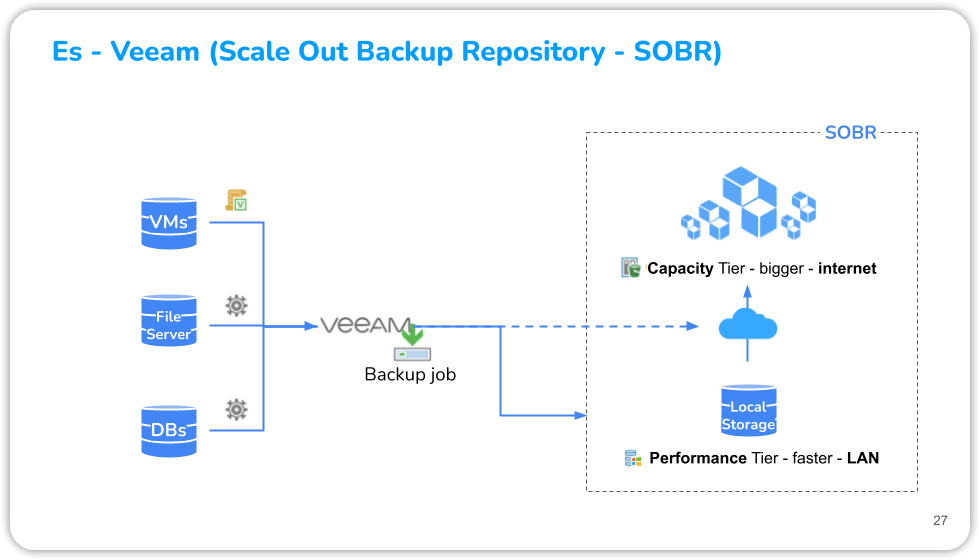
Scale-out backup
Veeam Scale-Out Backup supports file servers, virtual machines, and physical backups. To enable scalability for multi-level data storage, a Scale-out repository is required for virtual machines and other backups.
This type of repository system provides horizontal scalability support for multi-level data storage. One or more backup repositories can be used to extend another. Typically an S3 Compatible object-storage repository is used as an extension of a local disk-based primary repository, with the S3 Compatible repository being the Capacity Tier and the local one the Performance Tier.
The steps to create such a configuration are described below.
Scale-out backup Prerequisites
First, you need to get your access key and secret key, from the Cubbit Web Console or https://console.[your-tenant].cubbit.eu. Please follow these instructions on how to get started with a Cubbit account and generate these keys.
To proceed with the configuration, you will need the following:
- Veeam Backup and Replication software (Version 11 or higher)
- Veeam Universal License (VUL) or Per-socket license (Enterprise Plus or higher)
- Virtualization environment (e.g. VMware)
Veeam Backup and Replication Community e Standard editions lack Scale-out repository functionality. With the Enterprise edition, users can create two Scale-out repositories with three active extensions and unlimited inactive ones (set in maintenance mode). The VUL and Enterprise Plus editions have no limitations on the number of repositories or extensions.
Scale-out Backup Repository (Capacity tier)
In the Backup Infrastructure view, select Backup Repositories and then Add Backup Repository.
In the Add Backup Repository window, select Object Storage.
Select S3-compatible Object Storage to initiate the Object Storage Repository wizard.
Enter the name and description for the new Object Storage repository and click Next.
In the Account window, enter https://s3.cubbit.eu or https://s3.[your-tenant].cubbit.eu if you have a custom tenant, in the Service point field and enter the value eu-west-1 in the region field. In the credentials field press the Add button to add the access credentials. In the dialog box that opens enter the Access key and Secret key in the respective fields and press OK.
Before proceeding further you will need to have created at least one Bucket via other S3 clients (e.g. Amazon AWS CLI or Cubbit Web Console or https://console.[your-tenant].cubbit.eu).
In the case of backup to Object Storage via Veeam, the use of S3 Versioning without S3 Object Lock activation (immutability) must be avoided. Without immutability, both the operations required for deletion and the total space used are multiplied, to the total disadvantage of the customer.
After creating a new bucket from the Cubbit Web Console or https://console.[your-tenant].cubbit.eu proceed to the Bucket section.
Use the topmost Browse (1) button to navigate through the buckets on your S3 Cubbit account. After selecting the bucket press OK (2) and close the dialog box.
Click the Browse (3) button further down to navigate through folders within the chosen bucket or create a new one by clicking on the New folder button.
The selected bucket and folder will be the destination of the backups. To move forward, select the folder and press OK. Then press the Apply (4) button.
Review the information and finally click Finish to complete this step. The Cubbit Object Storage S3 Compatible repository has been successfully added to Veeam, you will be able to use it for various types of Backup Jobs.
Performance tier SOBR (Primary Repository)
From VMware vCenter (or the VMware Workstation client), right-click on the Veeam server and select Edit Settings. Click on Add hard disk and select a hard disk from the drop-down list.
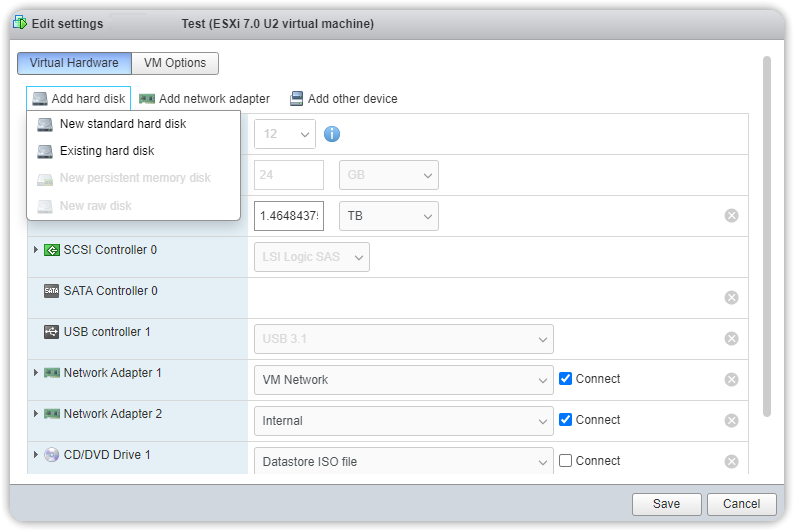
The hard disk must have sufficient capacity to accommodate the primary backup data. Note that the file size of the Veeam full backup may differ from the backup itself.
On Veeam Backup & Replication open the Backup Infrastructure section, click on Backup Repository and then click Add Repository. In the window that opens select the connection type of the Direct attached storage primary repository (in this case a disk directly connected to a Microsoft Windows or Linux server).
Choose a name and description for the new primary repository and click Next. A dialog box will open, in the Server section press Populate and then choose the disk to use as the target of your primary repository.

In the Repository section disable the option Limit maximum concurrent tasks, to allow more concurrent tasks.
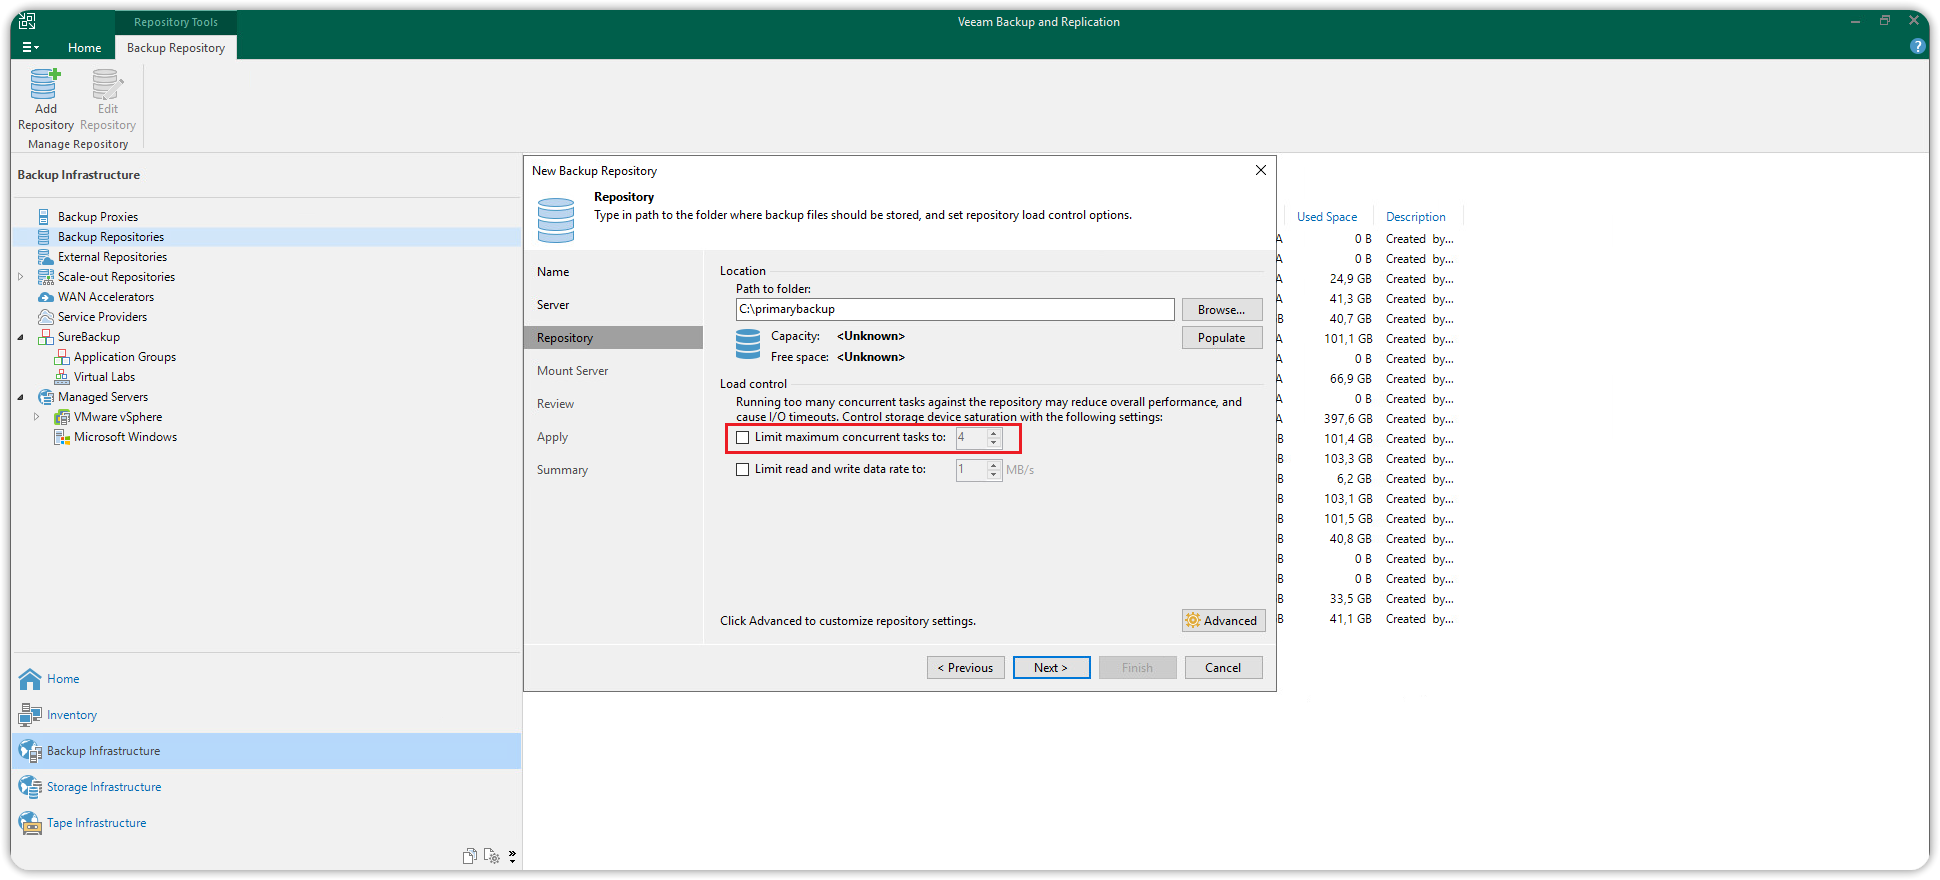
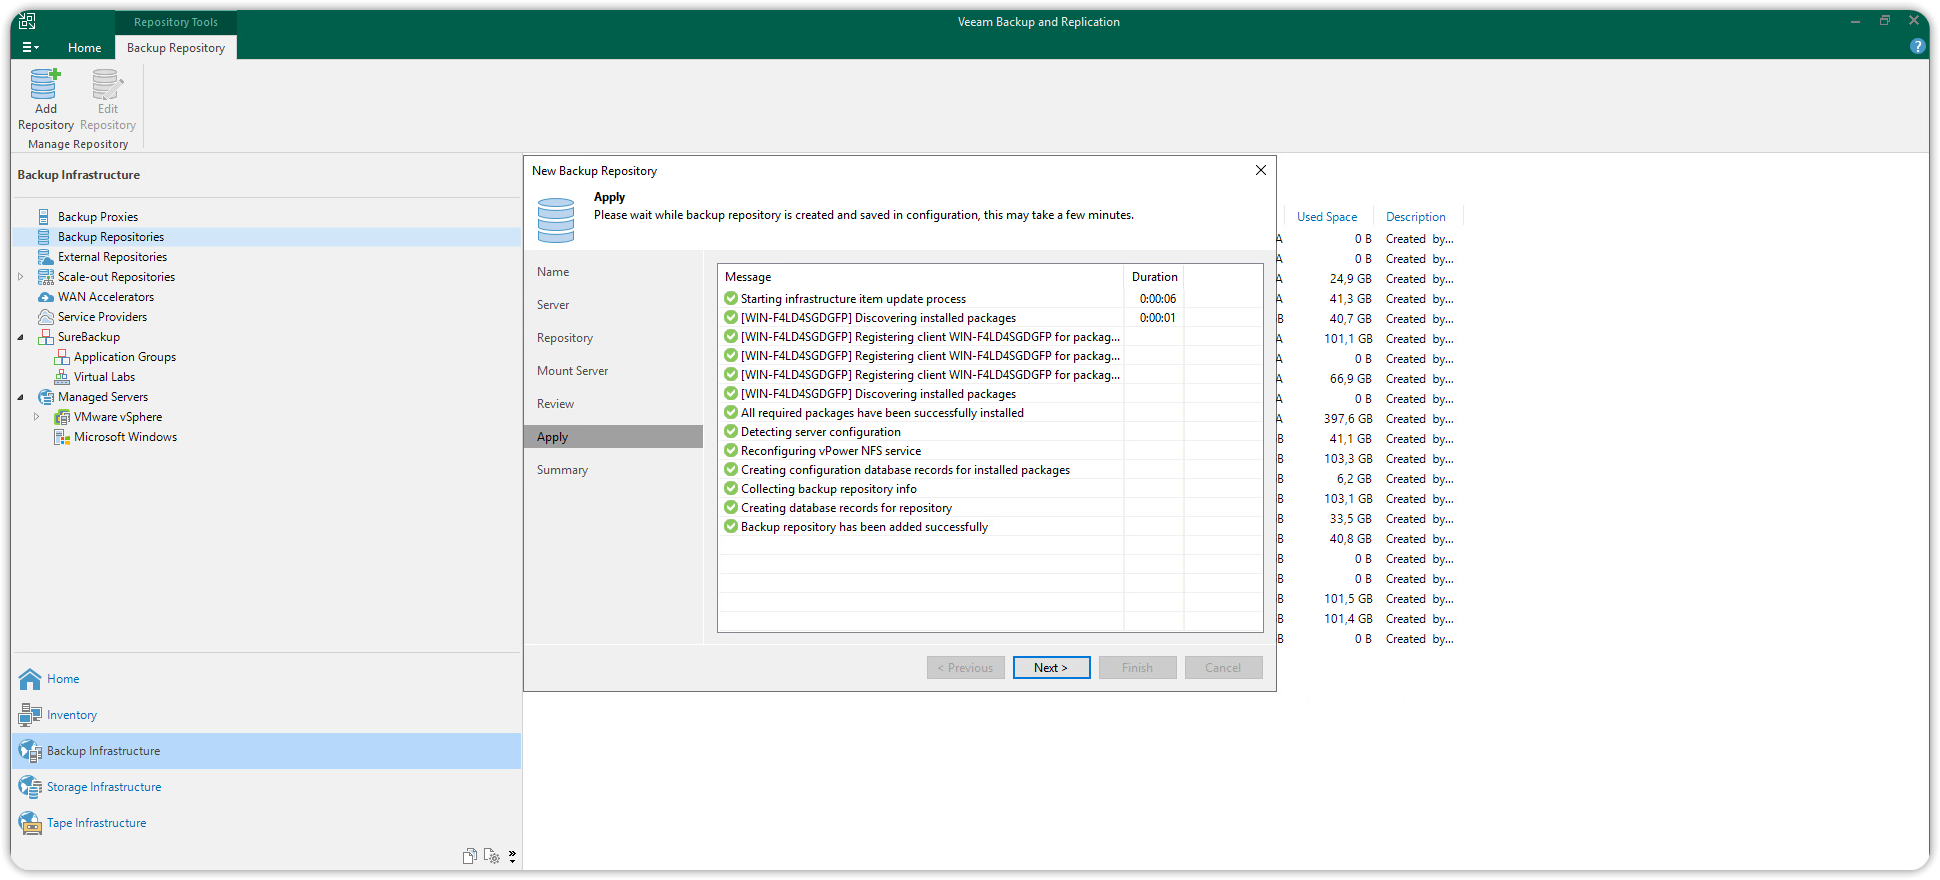
Then click Next until the wizard is closed.
Scale-out Repository
We now have both the Performance Tier and the Capacity Tier (Cubbit S3 Object Storage) needed to define the Scale-out.
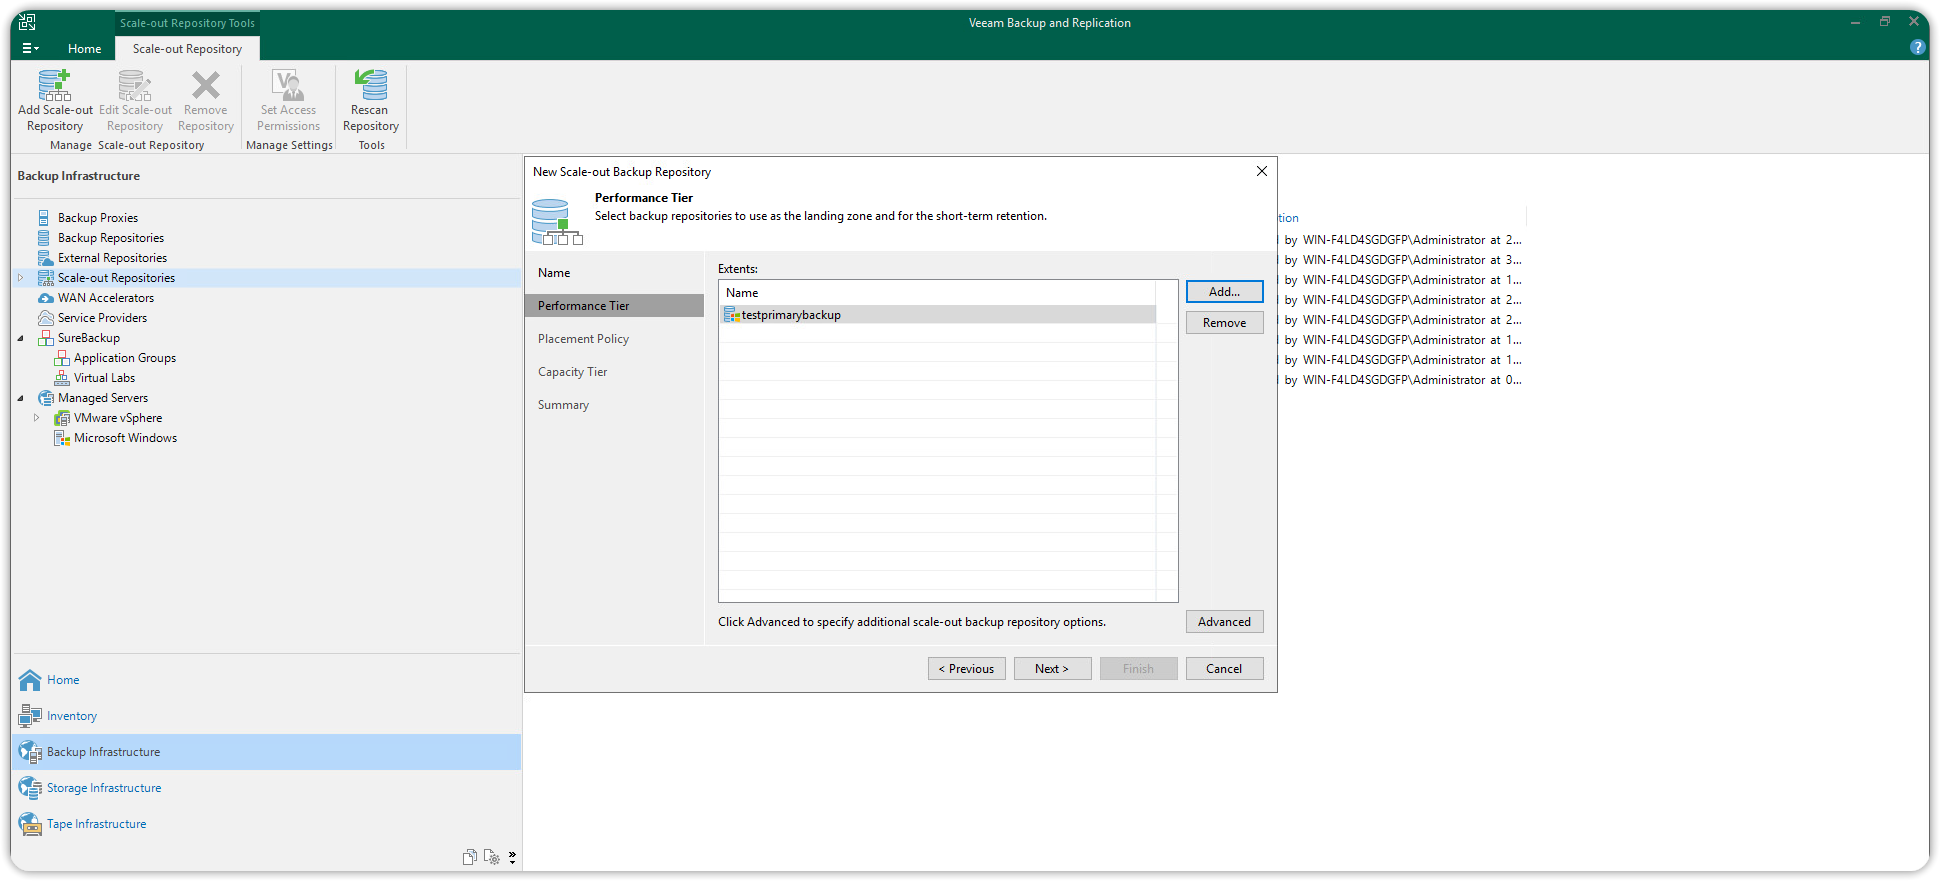
Select Backup Infrastructure again, click on Scale-out Repositories, and click on Add Scale-out Repository.
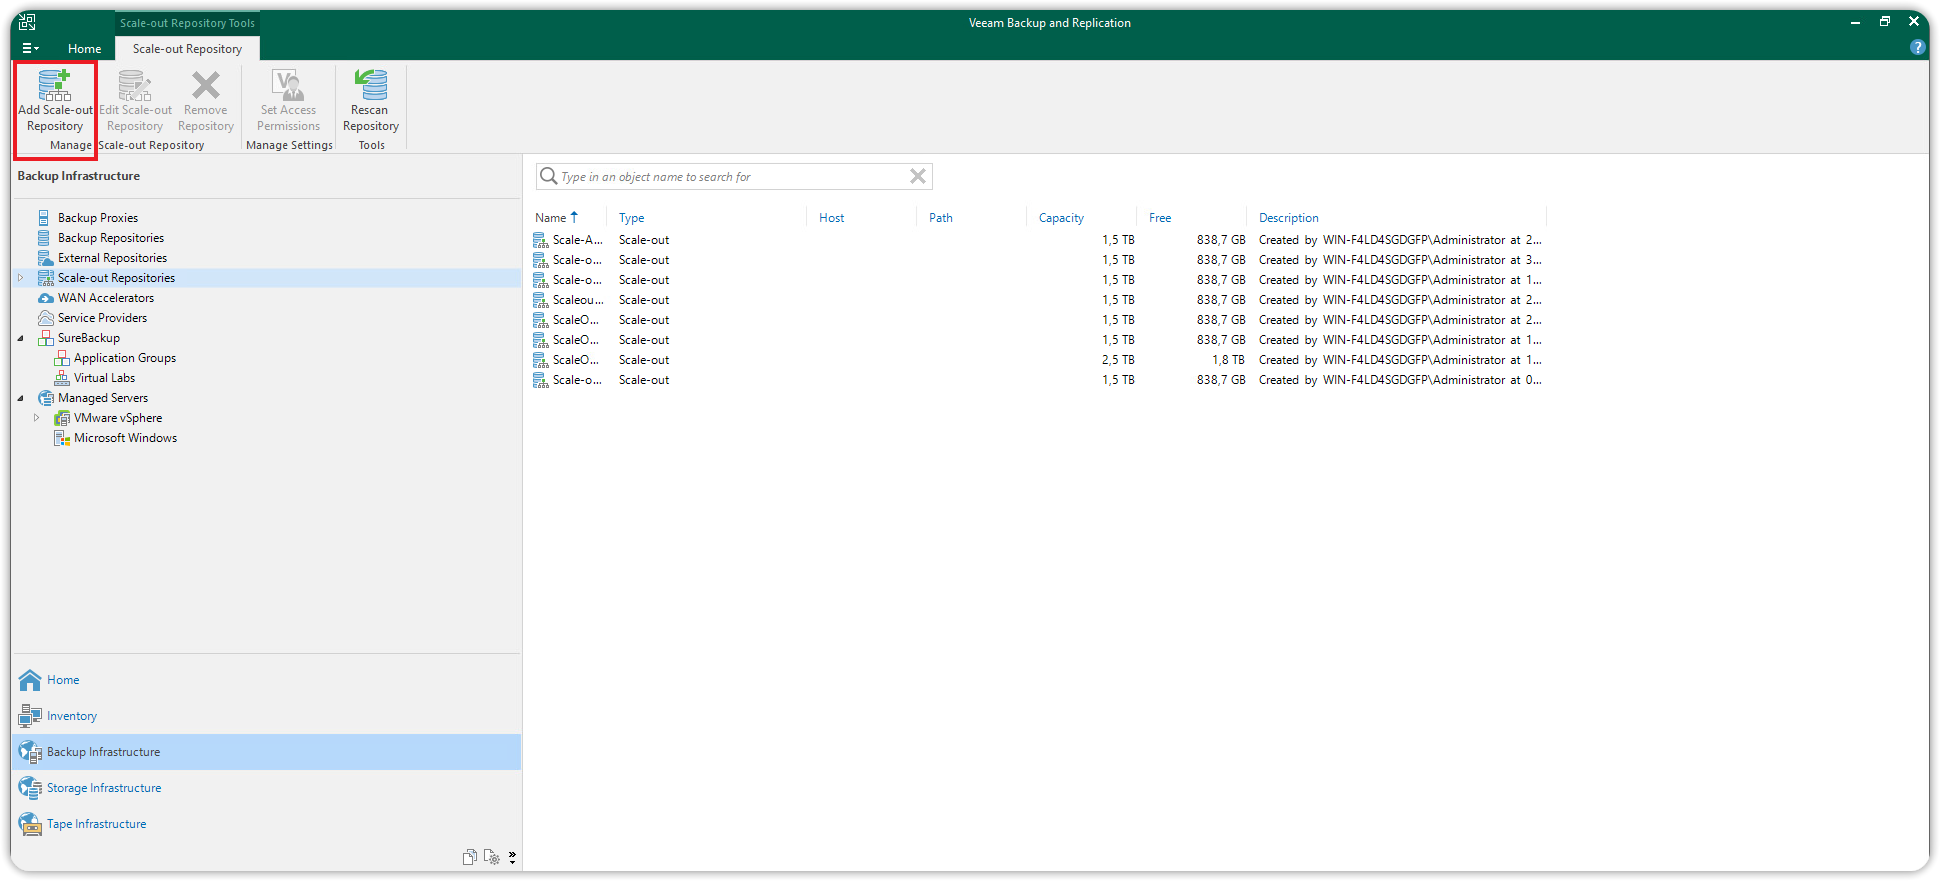
Enter the name and description for this new Scale-out Repository. Click Next to continue. In the Performance Tier section that will open, click Add... and select the primary repository (Performance Tier created in the previous paragraph.
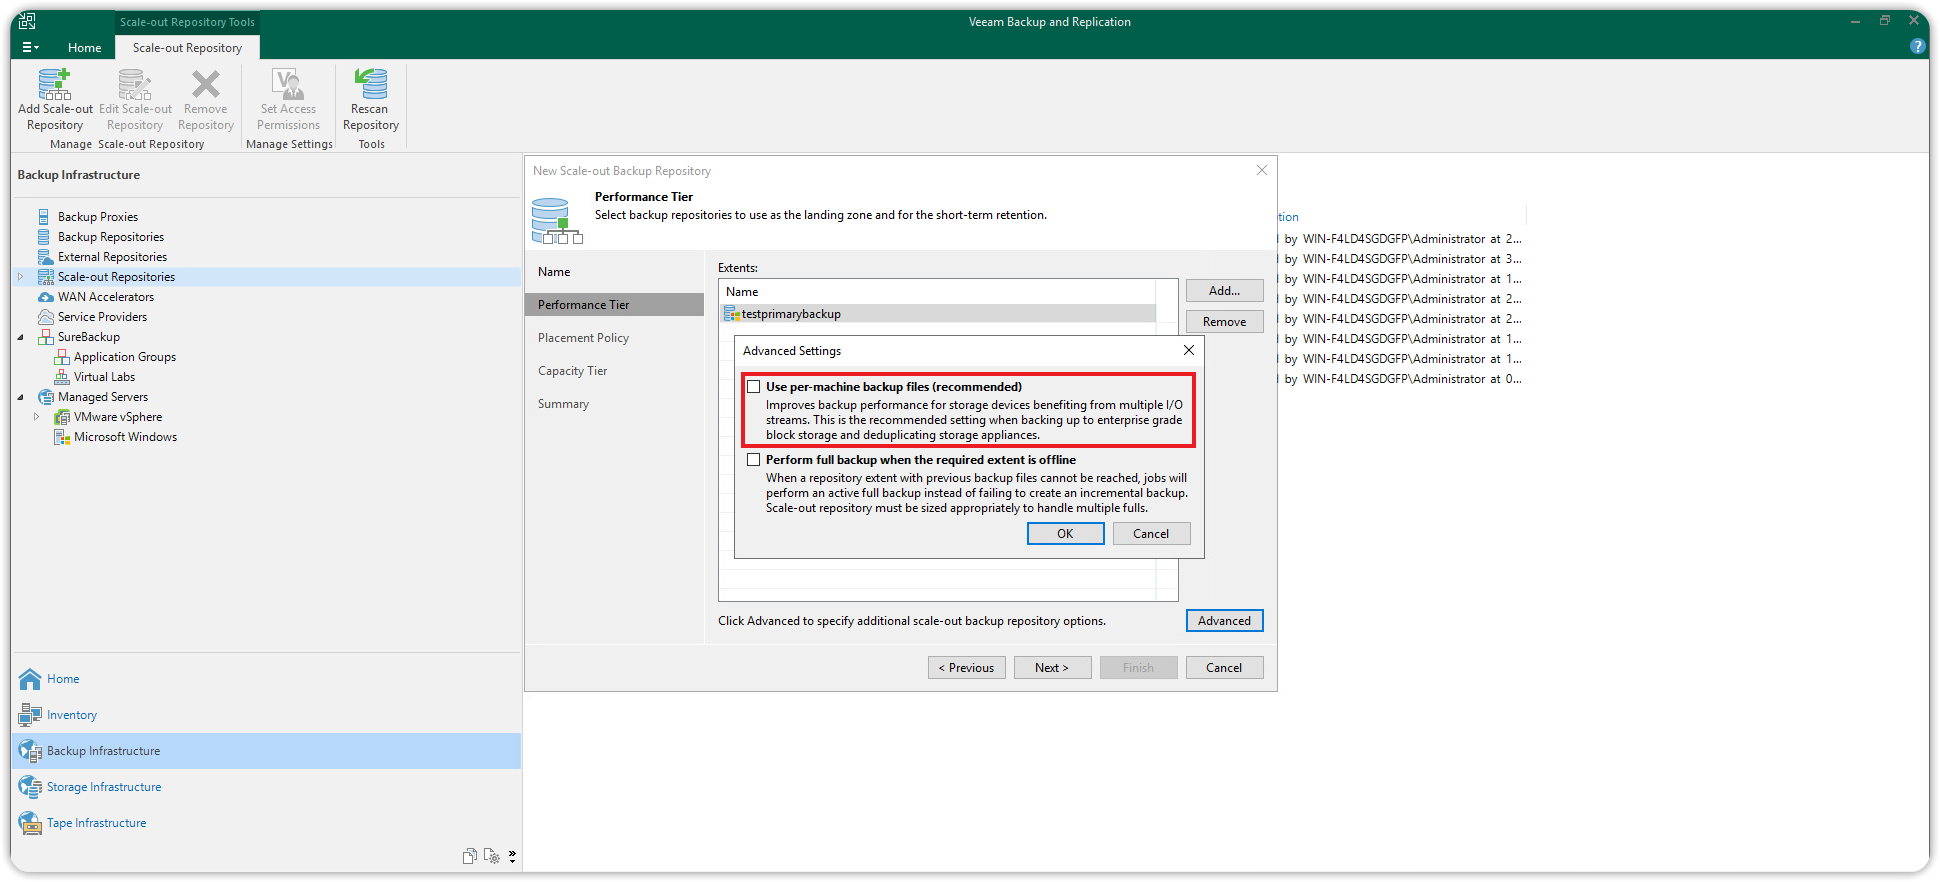
In the same Performance Tier dialog box, click on Advanced to display the advanced options of the Performance tier. Uncheck Use per-machine backup files and press OK. Then click Next to continue.
In the Placement Policy section, keep the default Data Locality policy. This policy allows all files (full and incremental) to be allocated in the same extension. Then click Next to proceed.
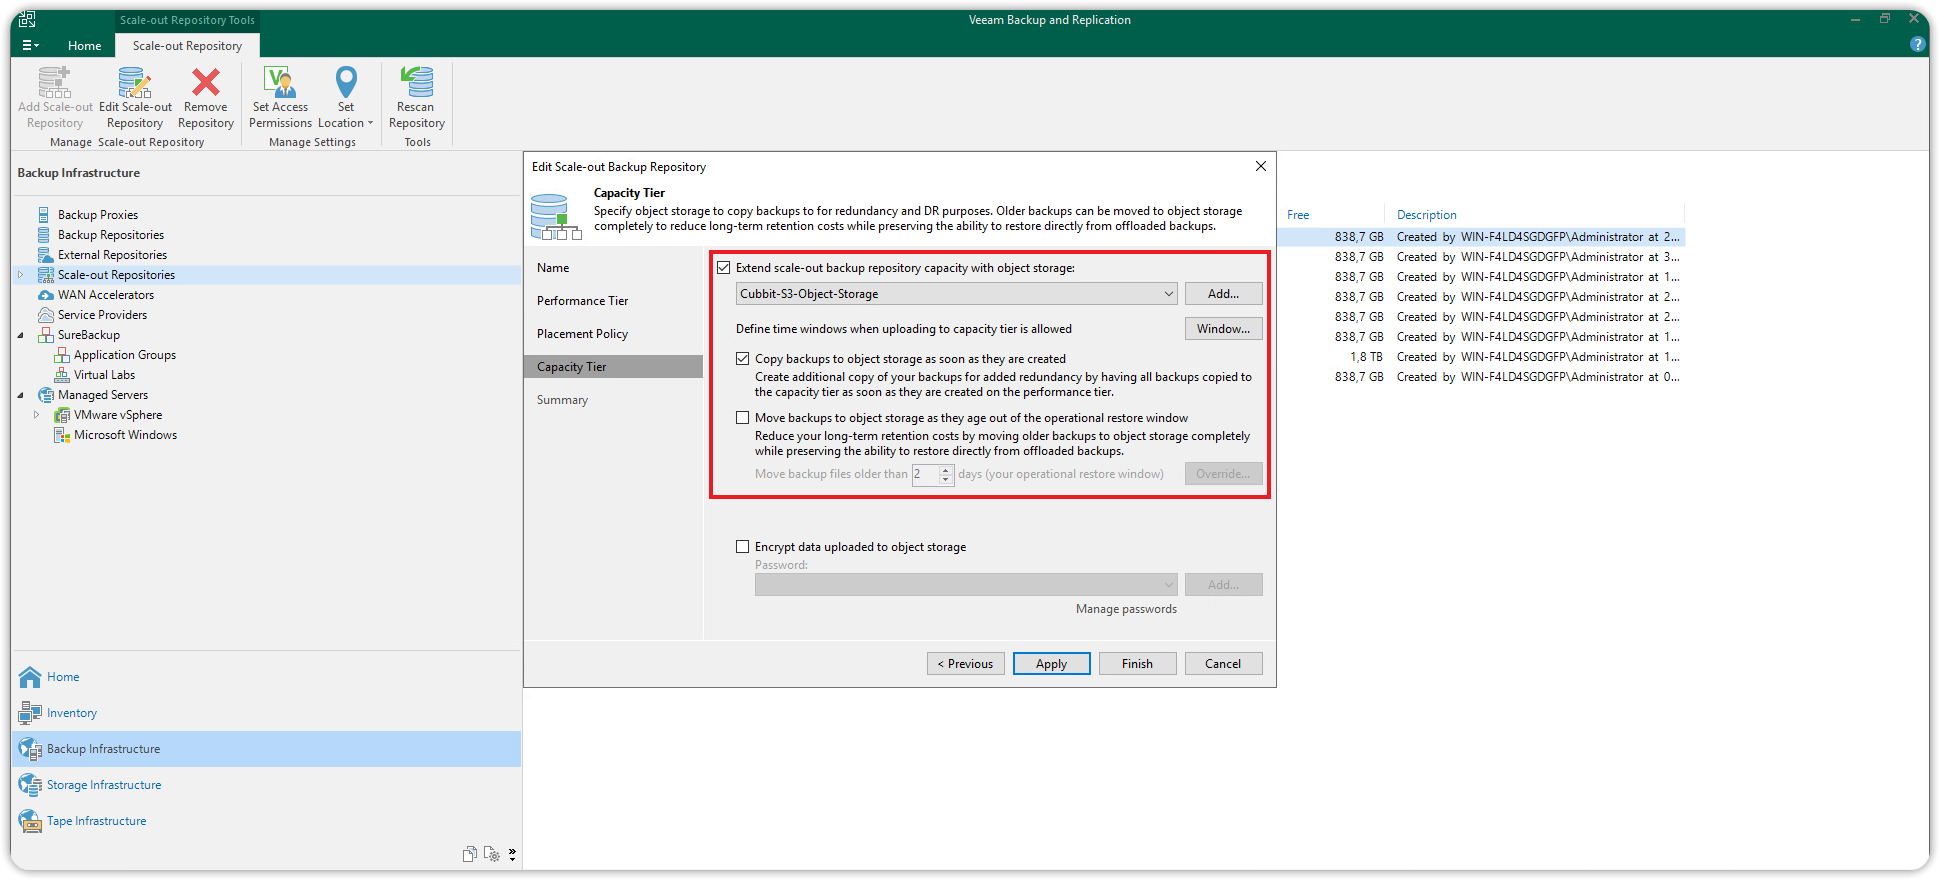
In the Capacity Tier section, check the box Extend scale-out backup repository capacity with object storage, and from the drop-down menu select the Cubbit S3 object storage repository (Capacity Tier) previously created.
Check the box whose description starts with Copy backups to object storage as soon as..., to move the backups to the cloud immediately after they are created. Check or uncheck the box whose description starts with Move backups to object storage as they age out... based on the user's specific needs.
Finally, press Apply to save the changes.
In the Summary section, review the list of changes applied and press Finish to complete the Scale-out Repository creation wizard.
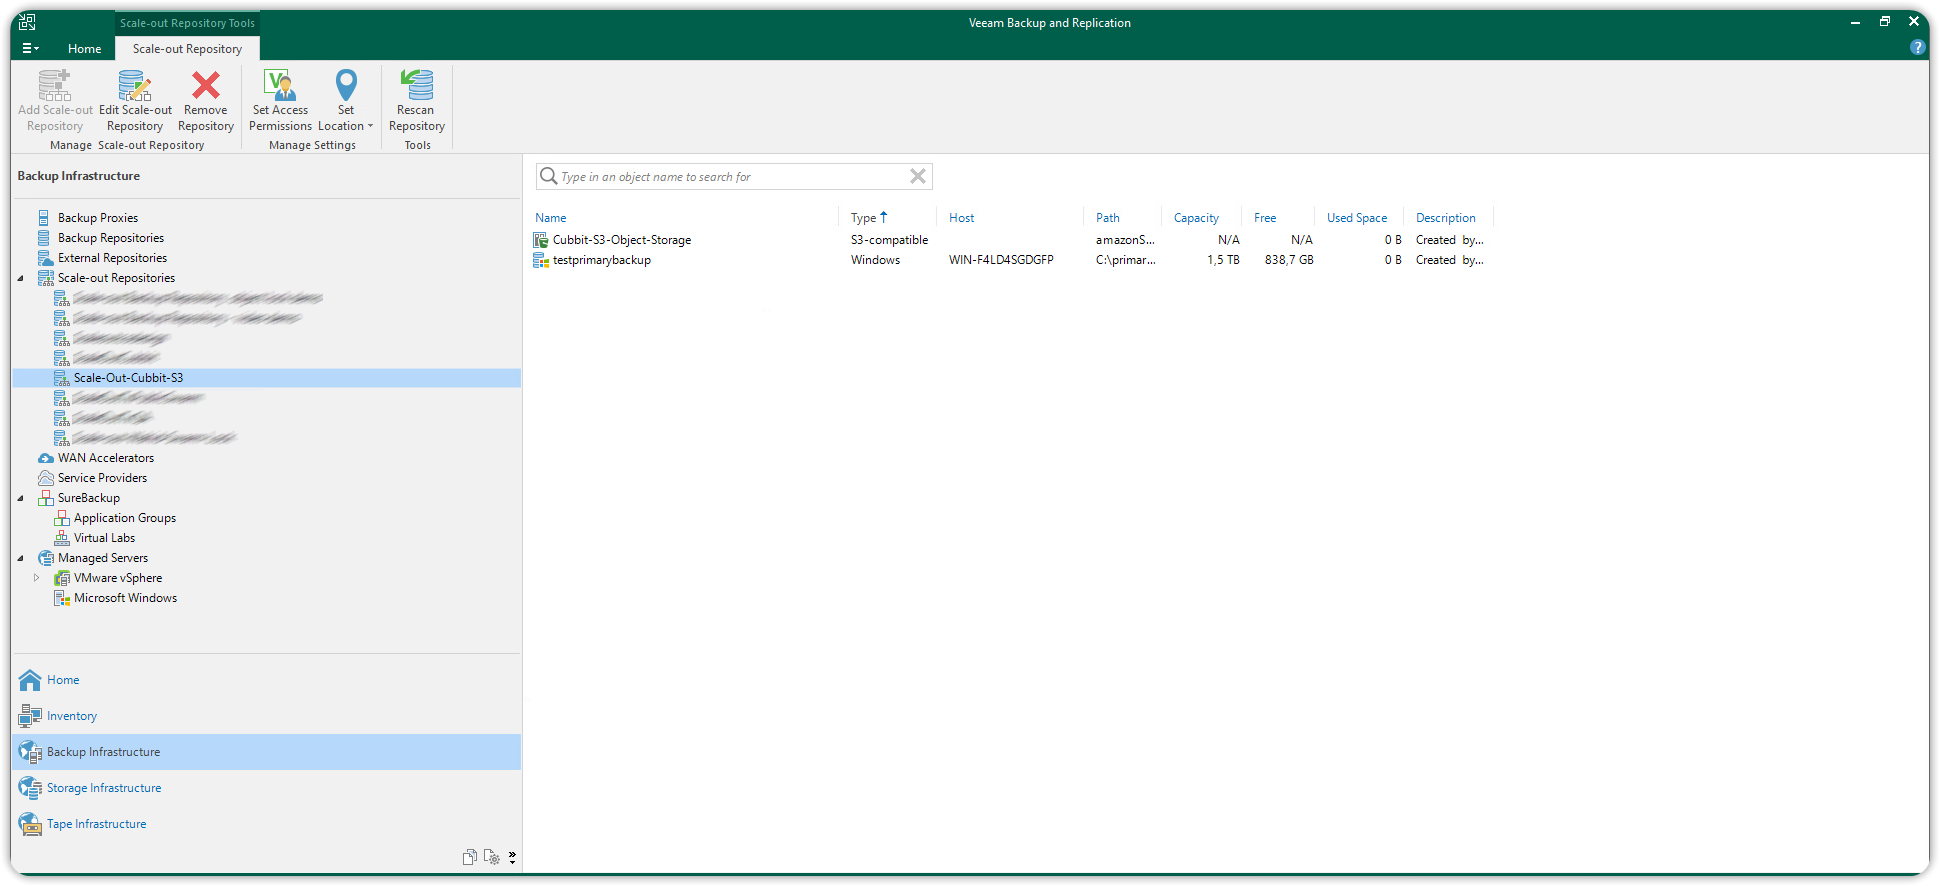
You will be able to view the newly created Scale-out Repository from the Backup Infrastructure section on Scale-out Repositories.
The newly created Scale-out Repository will be available as a target repository in any Backup Job that is created from now on.
For additional information about Veeam Backup & Replication usage please visit the official documentation page.
Cubbit Virtual NAS Gateway
This guide describes the configuration of an environment that allows a Veeam direct backup to the Cubbit cloud by using a pre-configured virtual machine image.
Cubbit will provide - as an OVA file - the image of a pre-configured virtual machine, which requires the following resources:
- 2x vCPUs
- 4GB RAM
- 100 GB HDD - the best performance is achieved when the VM's hard disk can accommodate a full backup.
Below is the architectural diagram of the proposed solution:
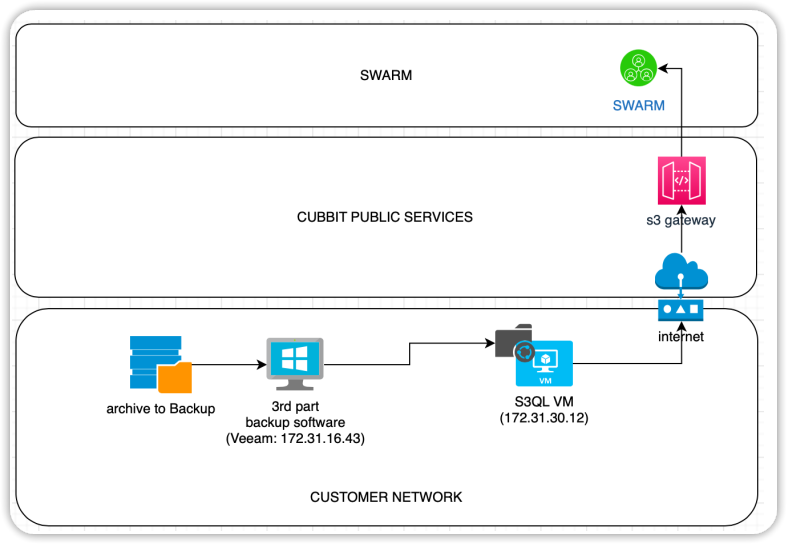
The NGC-s3gw VM is within the corporate LAN and is therefore able to receive backups at a very high speed. The upload bandwidth to the Internet may not be as efficient, in which case the VM needs to be able to temporarily store data until the Internet data queue clears. The VM is equipped with a disk cache for this purpose. We suggest configuring the VM's disk with a capacity at least equal to the combined size of the full backups that can be loaded onto it simultaneously.
Please, before continuing with this procedure, install and configure Cubbit Virtual NAS.
Connect Cubbit Virtual NAS to Veeam
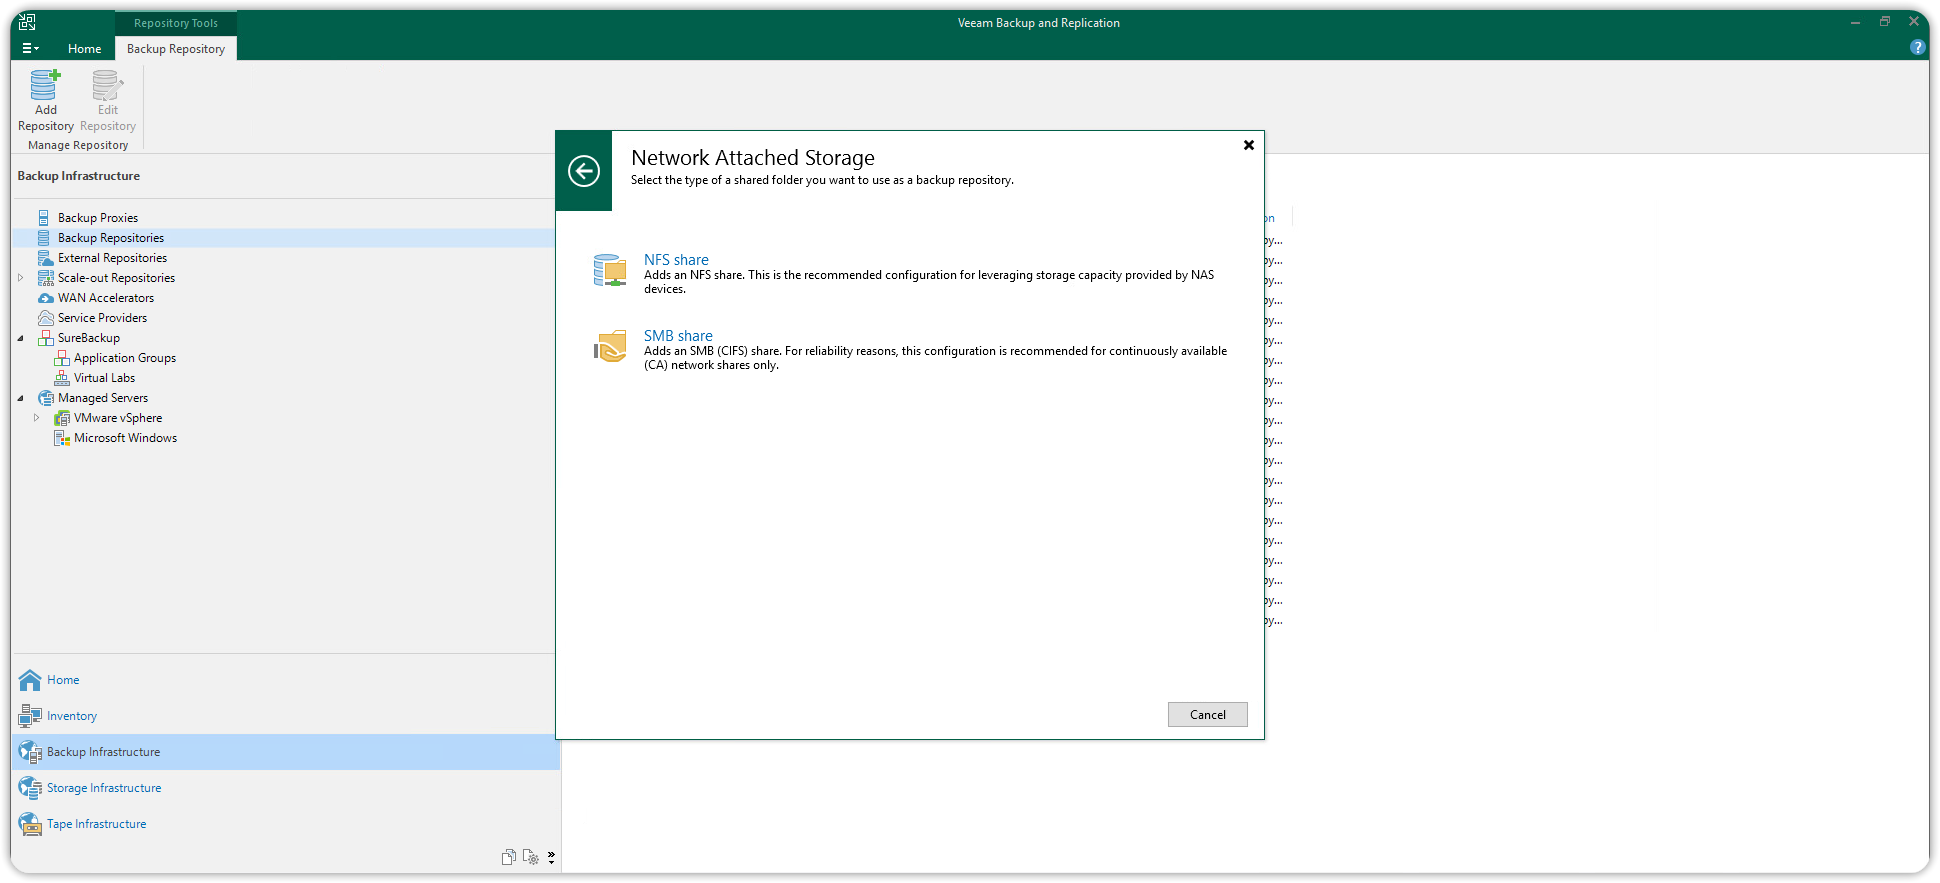
The shared folder /mnt/cubbit should now be available as a Veeam Linux backup repository. Choose Add Backup Repository and select the option Network attached storage.
Select NFS Share.
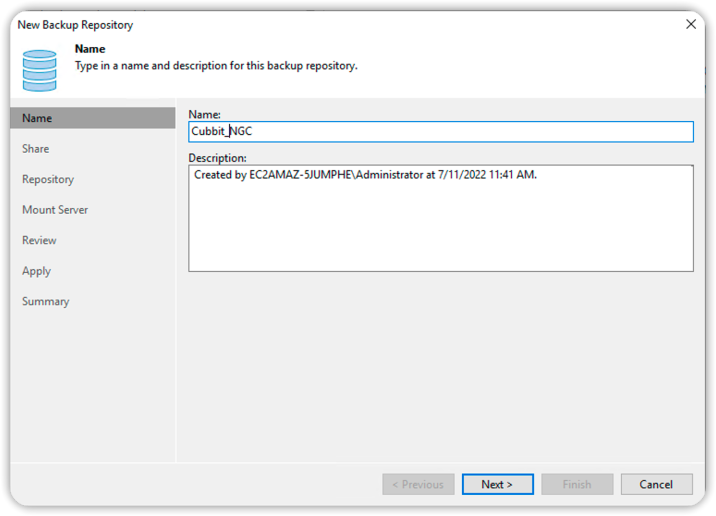
Choose a Name for the new repository, then press Next.
Enter the IP and path of the previously created NFS Share, then press Next.
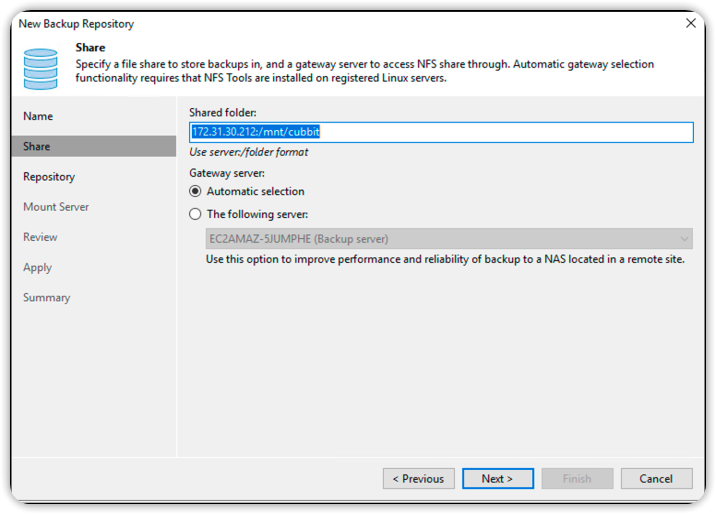
In the Repository section, configure as shown in the image below and press Next.
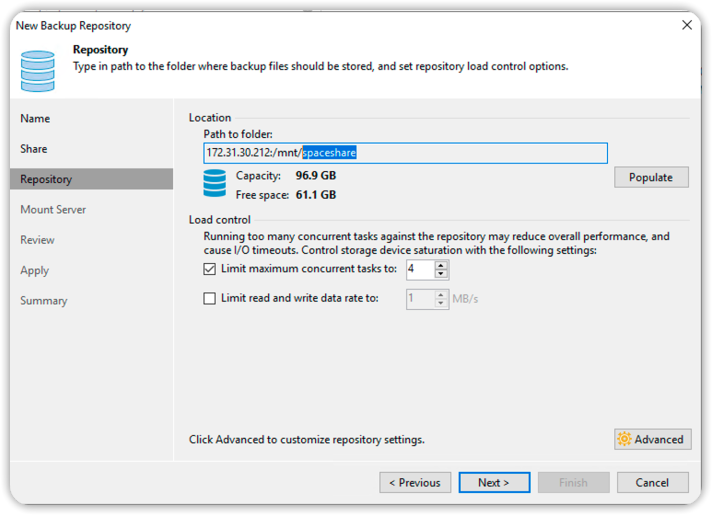
Continue by confirming the default settings until the end of the wizard, then click Finish.
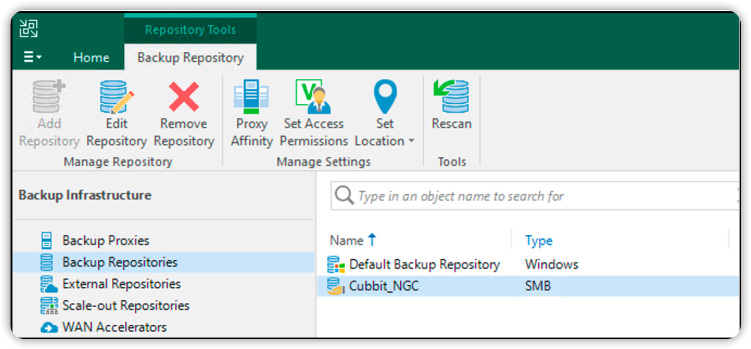
The repository will appear among those selectable for any type of backup.
To use it, choose the Cubbit repository as the Backup repository of any Backup job in the Storage section.
For additional information about Veeam Backup & Replication usage please visit the official documentation page.
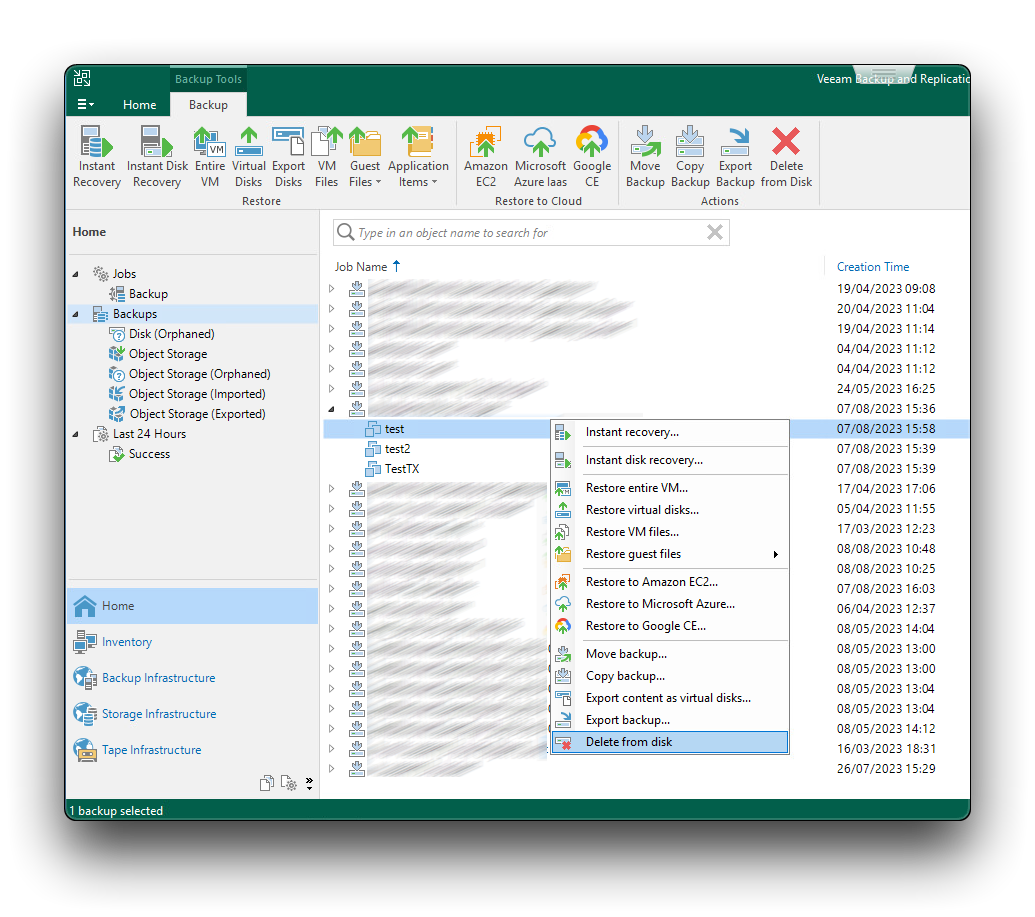
Remove a Veeam backup to delete a bucket
To remove a bucket containing Veeam backups, the first step is to completely empty the bucket. This can be achieved using the Veeam "Delete from Disk" feature.
The effectiveness of the "Delete from Disk" function comes into play when S3 Versioning is deactivated or when the Backup Repository has been configured with Immutability enabled since its initial setup.
When S3 Versioning is suspended or enabled, and the repository lacks immutability, employing the Delete from Disk function will merely introduce Delete Markers, leaving the bucket uncleared. In such instances, we advise consulting our Help Center article on bucket deletion for alternative solutions.
Before proceeding, if the Backup Repository is immutable, we suggest editing the repository properties to set the immutability of Veeam to one single day. Do not disable the Immutability.
To remove a backup from Cubbit repository using Veeam, navigate to the "Home" tab, select "Backups" and expand the dropdown menu to display all virtual machines within the backup job. Next, right-click on an individual VM and opt for the "Delete from Disk" choice, as illustrated in the image provided below.
Once the procedure is finalized for all virtual machines within the bucket, proceed to eliminate each repository in Veeam that is linked to the identical location.
Ultimately, you can utilize the Cubbit Web Console or https://console.[your-tenant].cubbit.eu or any other S3-compatible client to thoroughly clean the bucket of any remaining objects and proceed with its complete removal.
Following the deletion job, if the Backup Repository had immutability enabled, an additional waiting period of 10 days will be necessary before proceeding to empty and eliminate the bucket. This can be accomplished using the Cubbit Web Console or https://console.[your-tenant].cubbit.eu or any other S3-compatible client.