Tenant configuration
This settings area includes all configurations the operator can apply at the Tenant level. Typically, they affect all new Users and Projects within the Tenant.
General configuration
Sign in with
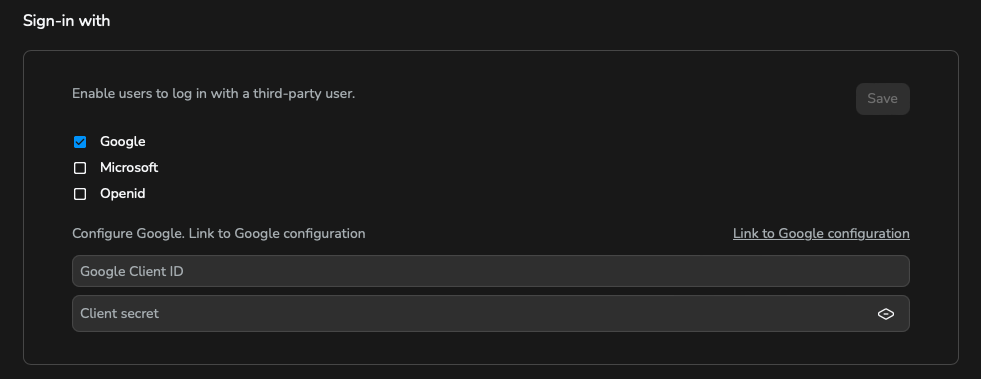
Configure a fast sign-up lane using a third-party account provider. We currently support the following:
- Microsoft
- OpenID Provider (OP) or Identity Provider (IDP)
Sign in with Google
Follow the instructions provided by Google at the following link. It will redirect you to the Google APIs console and guide you in creating a dedicated project. Once you have a valid OAuth client ID, configure the console gateway URL in the Authorised JavaScript origins. For any issue about the Project creation, contact Google account support.
The redirect URI must be https://console.<tenant-name>.cubbit.eu/oauth/redirect or in case of a custom domain https://<custom-domain>/oauth/redirect.
It's very important to add it to the "Authorised redirect URIs".
Sign in with Microsoft
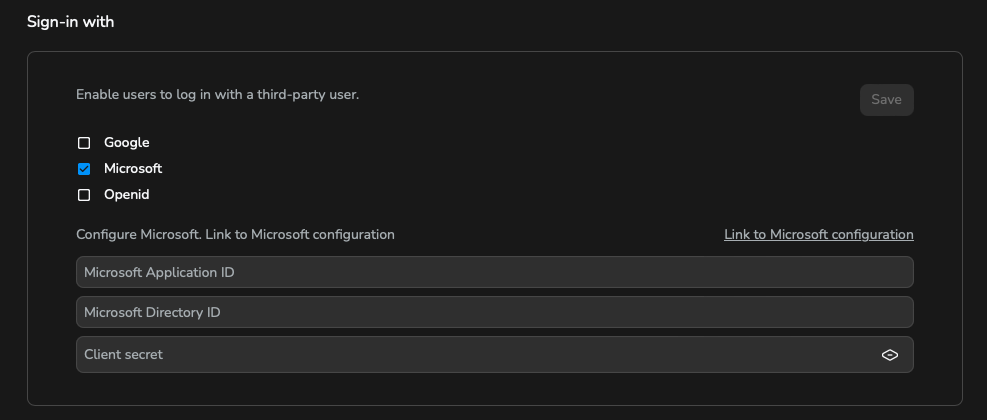
Enabling the sign-in with Microsoft requires specifying two IDs, creating a secret and configuring custom parameters. Create your application following the Microsoft documentation. If you already have a Microsoft application, you can see it in the Microsoft Entra admin centre.
These IDs will be displayed in the app overview:
Application (client) IDDirectory (tenant) ID
These IDs will enable only users of this particular Microsoft tenant. If you want to enable all users with a Microsoft account:
Directory (tenant) ID must be 9188040d-6c67-4c5b-b112-36a304b66dad.
For more information please check here
Copy and paste the Application ID into the Composer interface.
Learn how to support multiple directories in the same application here
To create the client secret, go to the Certificates & secrets section and click on New client secret. Insert a description, select the expiration date, and save it. Copy the secret value and paste it into the Composer interface.
The DS3 console associated with the Tenant is now connected to the Microsoft application we have created. To complete the configuration to work with Cubbit, we must first configure the authentication, the token, and the API permissions.
Authentication
Under Platform Configuration, you are asked to configure the DS3 Console. To do this, add a new platform of type "Web application > Web"
In the form that appears, paste the following DS3 Console address https://console.<tenant-name>.cubbit.eu and https://console.<tenant-name>.cubbit.eu/oauth/redirect under the redirect uris section and select ID tokens (used for implicit and hybrid flows).
In case of a custom domain add https://<custom-domain> and https://<custom-domain>/oauth/redirect.
Token configuration
On the application sidebar, select Token configuration and add the following optional claim:
- Family_name
- Given_name
If the menu item is not present, you have to manually configure the token in the Manifest menu. Insert the following item in the root of the JSON
  "optionalClaims": {
		"idToken": [
			{
				"name": "email",
				"source": null,
				"essential": false,
				"additionalProperties": []
			},
			{
				"name": "family_name",
				"source": null,
				"essential": false,
				"additionalProperties": []
			},
			{
				"name": "given_name",
				"source": null,
				"essential": false,
				"additionalProperties": []
			}
		],
		"accessToken": [],
		"saml2Token": []
	},
API permission
The information included in the token requires authorisation, which can be done through the API permission section. Here, the following permissions (all from the Microsoft Graph group) must be added:
- Profile
- User.Read
Sign in with OpenID Provider (OP) or Identity Provider (IDP)
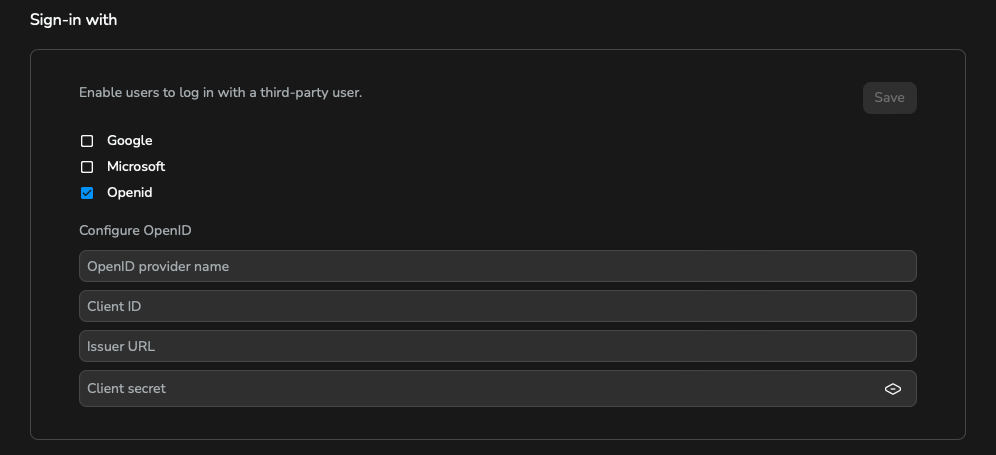
OpenID Connect is a simple identity layer on top of the OAuth 2.0 protocol. It allows clients to verify the identity of the end-user based on the authentication performed by an authorisation server, as well as to obtain basic profile information about the end-user in an interoperable and REST-like manner. The configuration strongly depends on the OpenID Provider (OP) or Identity Provider (IDP) you are using. The following fields are mandatory:
Name: the name of the OP or IDPClient ID: the client ID provided by the OP or IDPIssuer: the URL of the OP or IDPClient Secret: the client secret provided by the OP or IDP
Once you have filled in the mandatory fields, you have to configure the following on the OP or IDP side:
Redirect URI: the URI where the OP or IDP will redirect the user after the authentication processScope: the scope of the access request
The following scopes are mandatory:
- openid
- profile - should contain given_name and family_name
The redirect URI must be https://console.<tenant-name>.cubbit.eu/oauth/redirect or in case of a custom domain https://<custom-domain>/oauth/redirect.
It's very important to add it to the allowed origins in the OP or IDP configuration.
Default number of Projects per user
Every User can create multiple Projects and be invited to collaborate with others. The number of Projects a User may create can be limited, as defined by the Tenant configuration.
Changing this value affects only newly created Users. The change must be done from the Users section on the specific resource to modify the value for existing Users.
Disable console sign-up
Console sign-up, and more broadly, User sign-up, can be restricted for the current Tenant. This limitation can be implemented at different levels:
- Turning off sign-up for all users.
- Allowing sign-up only for specific domains.
The first option blocks all sign-ups from both the console and API user-side but still permits the creation of new Users from the DS3 Composer. Check how to invite a new User in Manage Projects and Users.
The second option lets you specify a list of valid domains the Tenant will accept. They will be validated during the sign-up operation. All emails that do not match the requirements will be rejected. Type an allowed domain into the input field and press enter to specify it. Invalid domains will prompt an error notification, while accepted domains will be added below automatically.
Free tier
Every Project can have a reserved capacity included in its plan, which exempts it from billing. This reserved capacity value can be specified for any resource tracked in the usage report. If no resources need to be reserved for the Project, simply disable the free-tier configuration. The unit of measurement remains fixed for all resources.
Setting 0 is equivalent to letting the Project pay for everything it uses.
Changing this value affects only newly created Users. The change must be done from the Projects section on the specific resource to modify the value for existing users.
Notifications
Enabling the free tier and configuring at least one resource with a positive value will make the section visible. Within this section, there are tabs for each resource. Only the tab corresponding to the enabled resource will be active. Here, you can set up alert notifications to be sent to specified email addresses and, if selected, to the Project owner.
The email frequency is specified for each level. To view this information, simply hover over the adjacent info icon.
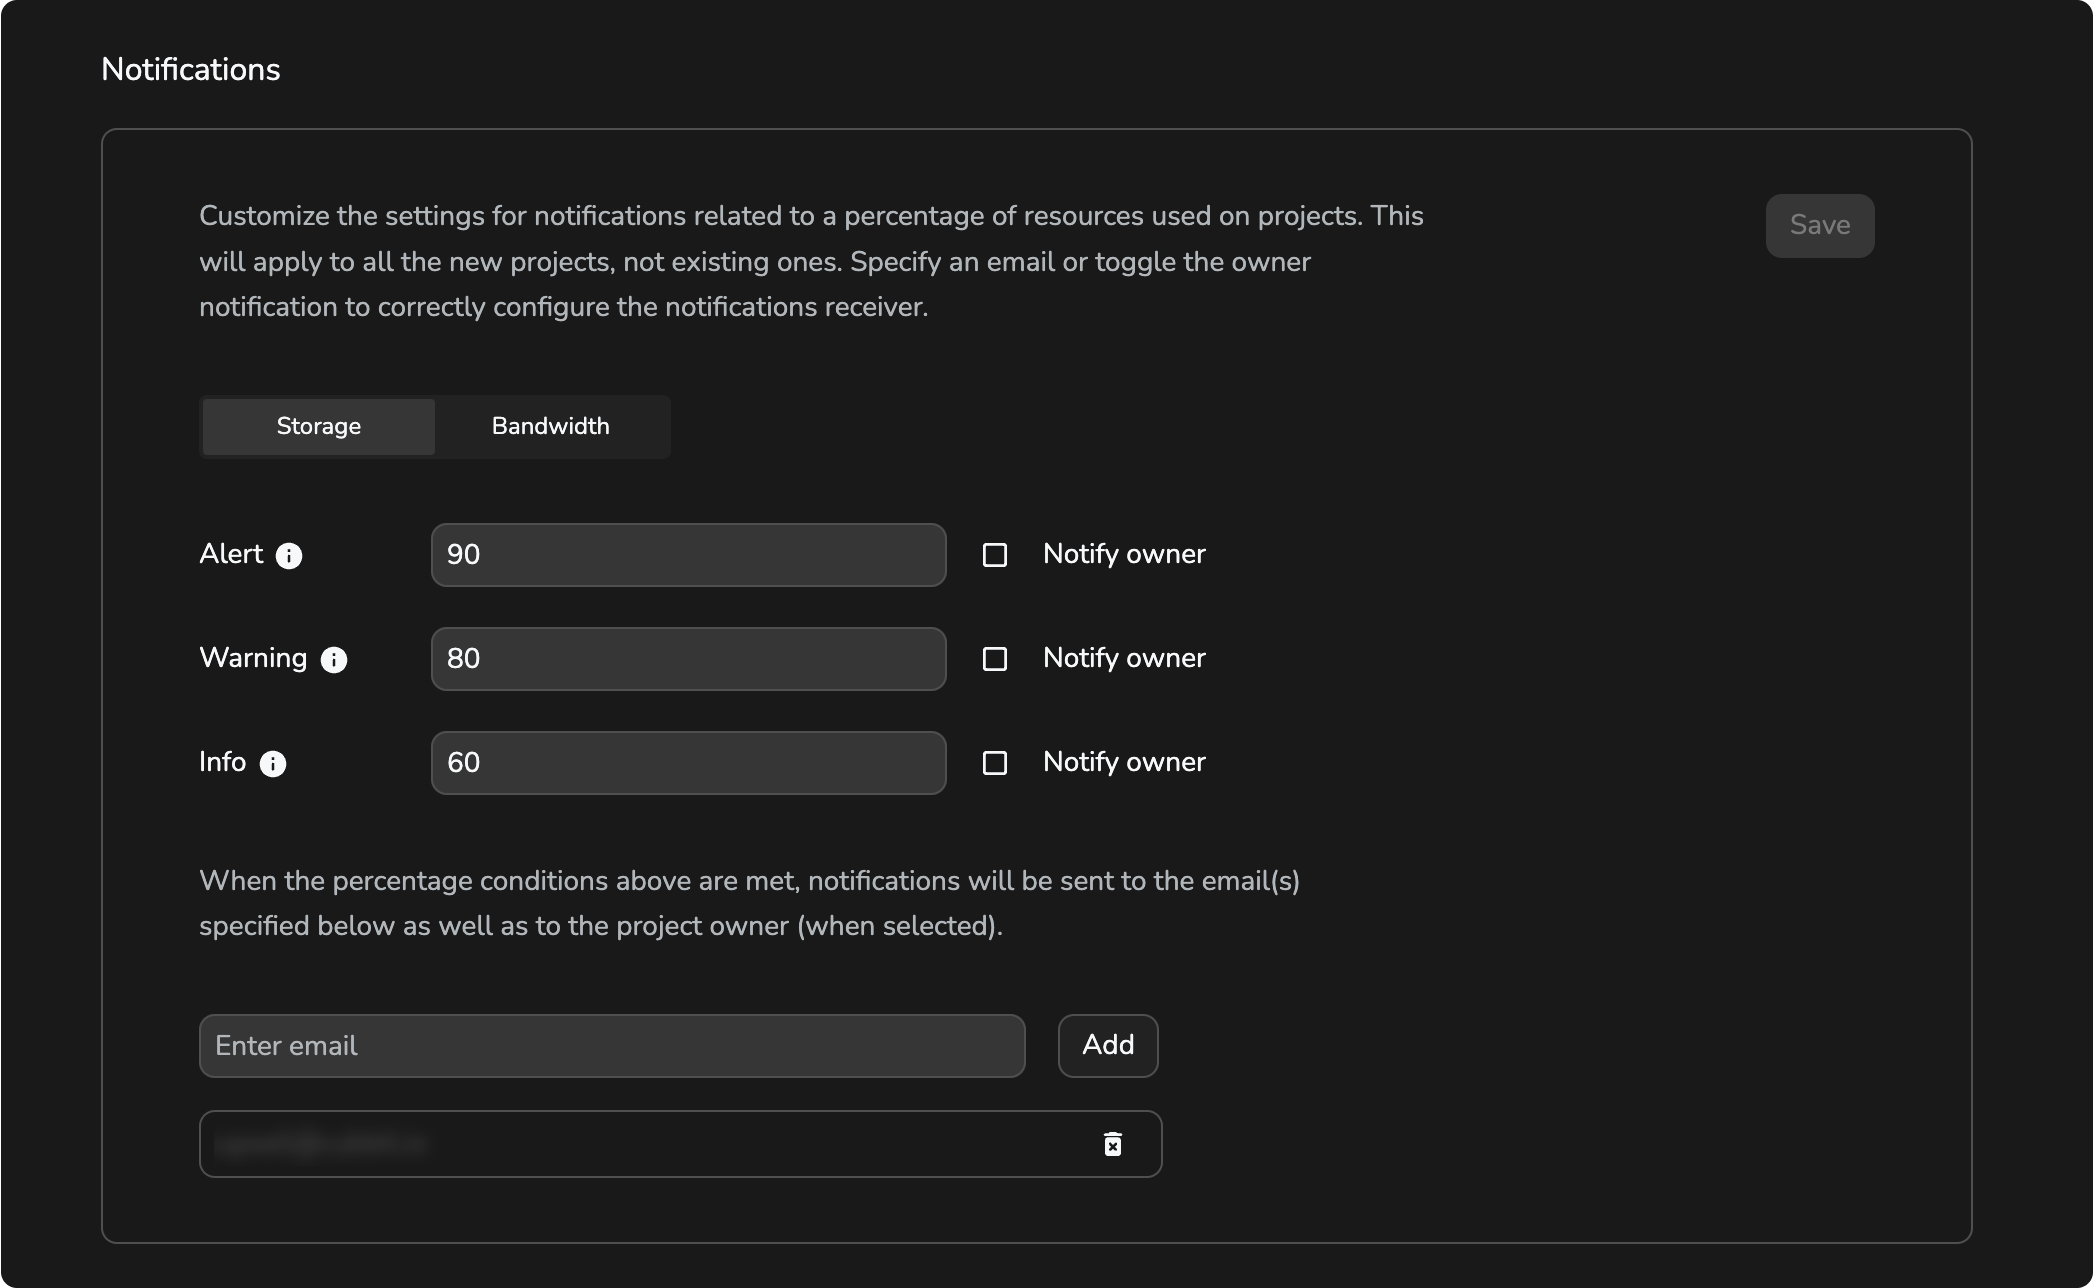
The threshold for each resource is customisable and optional. You can leave any threshold blank if you're not interested in receiving notifications for that particular resource. Remember that the threshold should always respect the Alert > Warning > Info order.
The email received by the Project owner differs from other emails. The Project owner's email will contain a link to the DS3 Console, while other emails will include a link to the DS3 Composer, as they are expected to be related to Tenant operators.
Changing this value affects only newly created Projects. The change must be done from the Projects section on the specific resource to modify the value for existing Projects.
Whitelabel
The white-label feature allows the Tenant to tailor the DS3 console’s visual aesthetics and the email sent to the end-users. Use it to customise the product with your company logos and communications.
Custom content
A master switch protects white-label custom contents. This ensures you can configure the icons and content and enable them only once they are set up properly.
Contents are grouped into three areas:
- Icons
- Sign-up text
- Sign-in text
Icons
Three different icon formats are required, ensuring they are not duplicates of previously configured icons. The favicon is designated as the tab icon. The remaining two logos are intended for use within console UI and emails, with the selection of either version dependent on the space available.
Sign-up/Sign-in text
The text on the sign-in (console.<tenant-name>.cubbit.eu/signin) and sign-up (console.<tenant-name>.cubbit.eu/signup) screens will be updated to the standard text used by the application.
Style your text with basic HTML tags:
- Insert a line break with
<br/>. - For bold text, use
<strong>or<b>. - For italic text, use
<i>. - Wrap paragraphs in
<p>tags.
Even if the console supports multiple languages, the text will always be displayed in a single language. This means all users will see the text you enter in the same language.
Connect storage
The storage section is where you manage the space allocated to the Tenant. To ensure operational functionality for users, a Tenant must always maintain a connection to a storage system. For more storage information, check What is a Swarm?
Before starting, ensure your operator is active and you have correctly created a Tenant.
From the Tenant Overview, open Settings and select the storage tab.
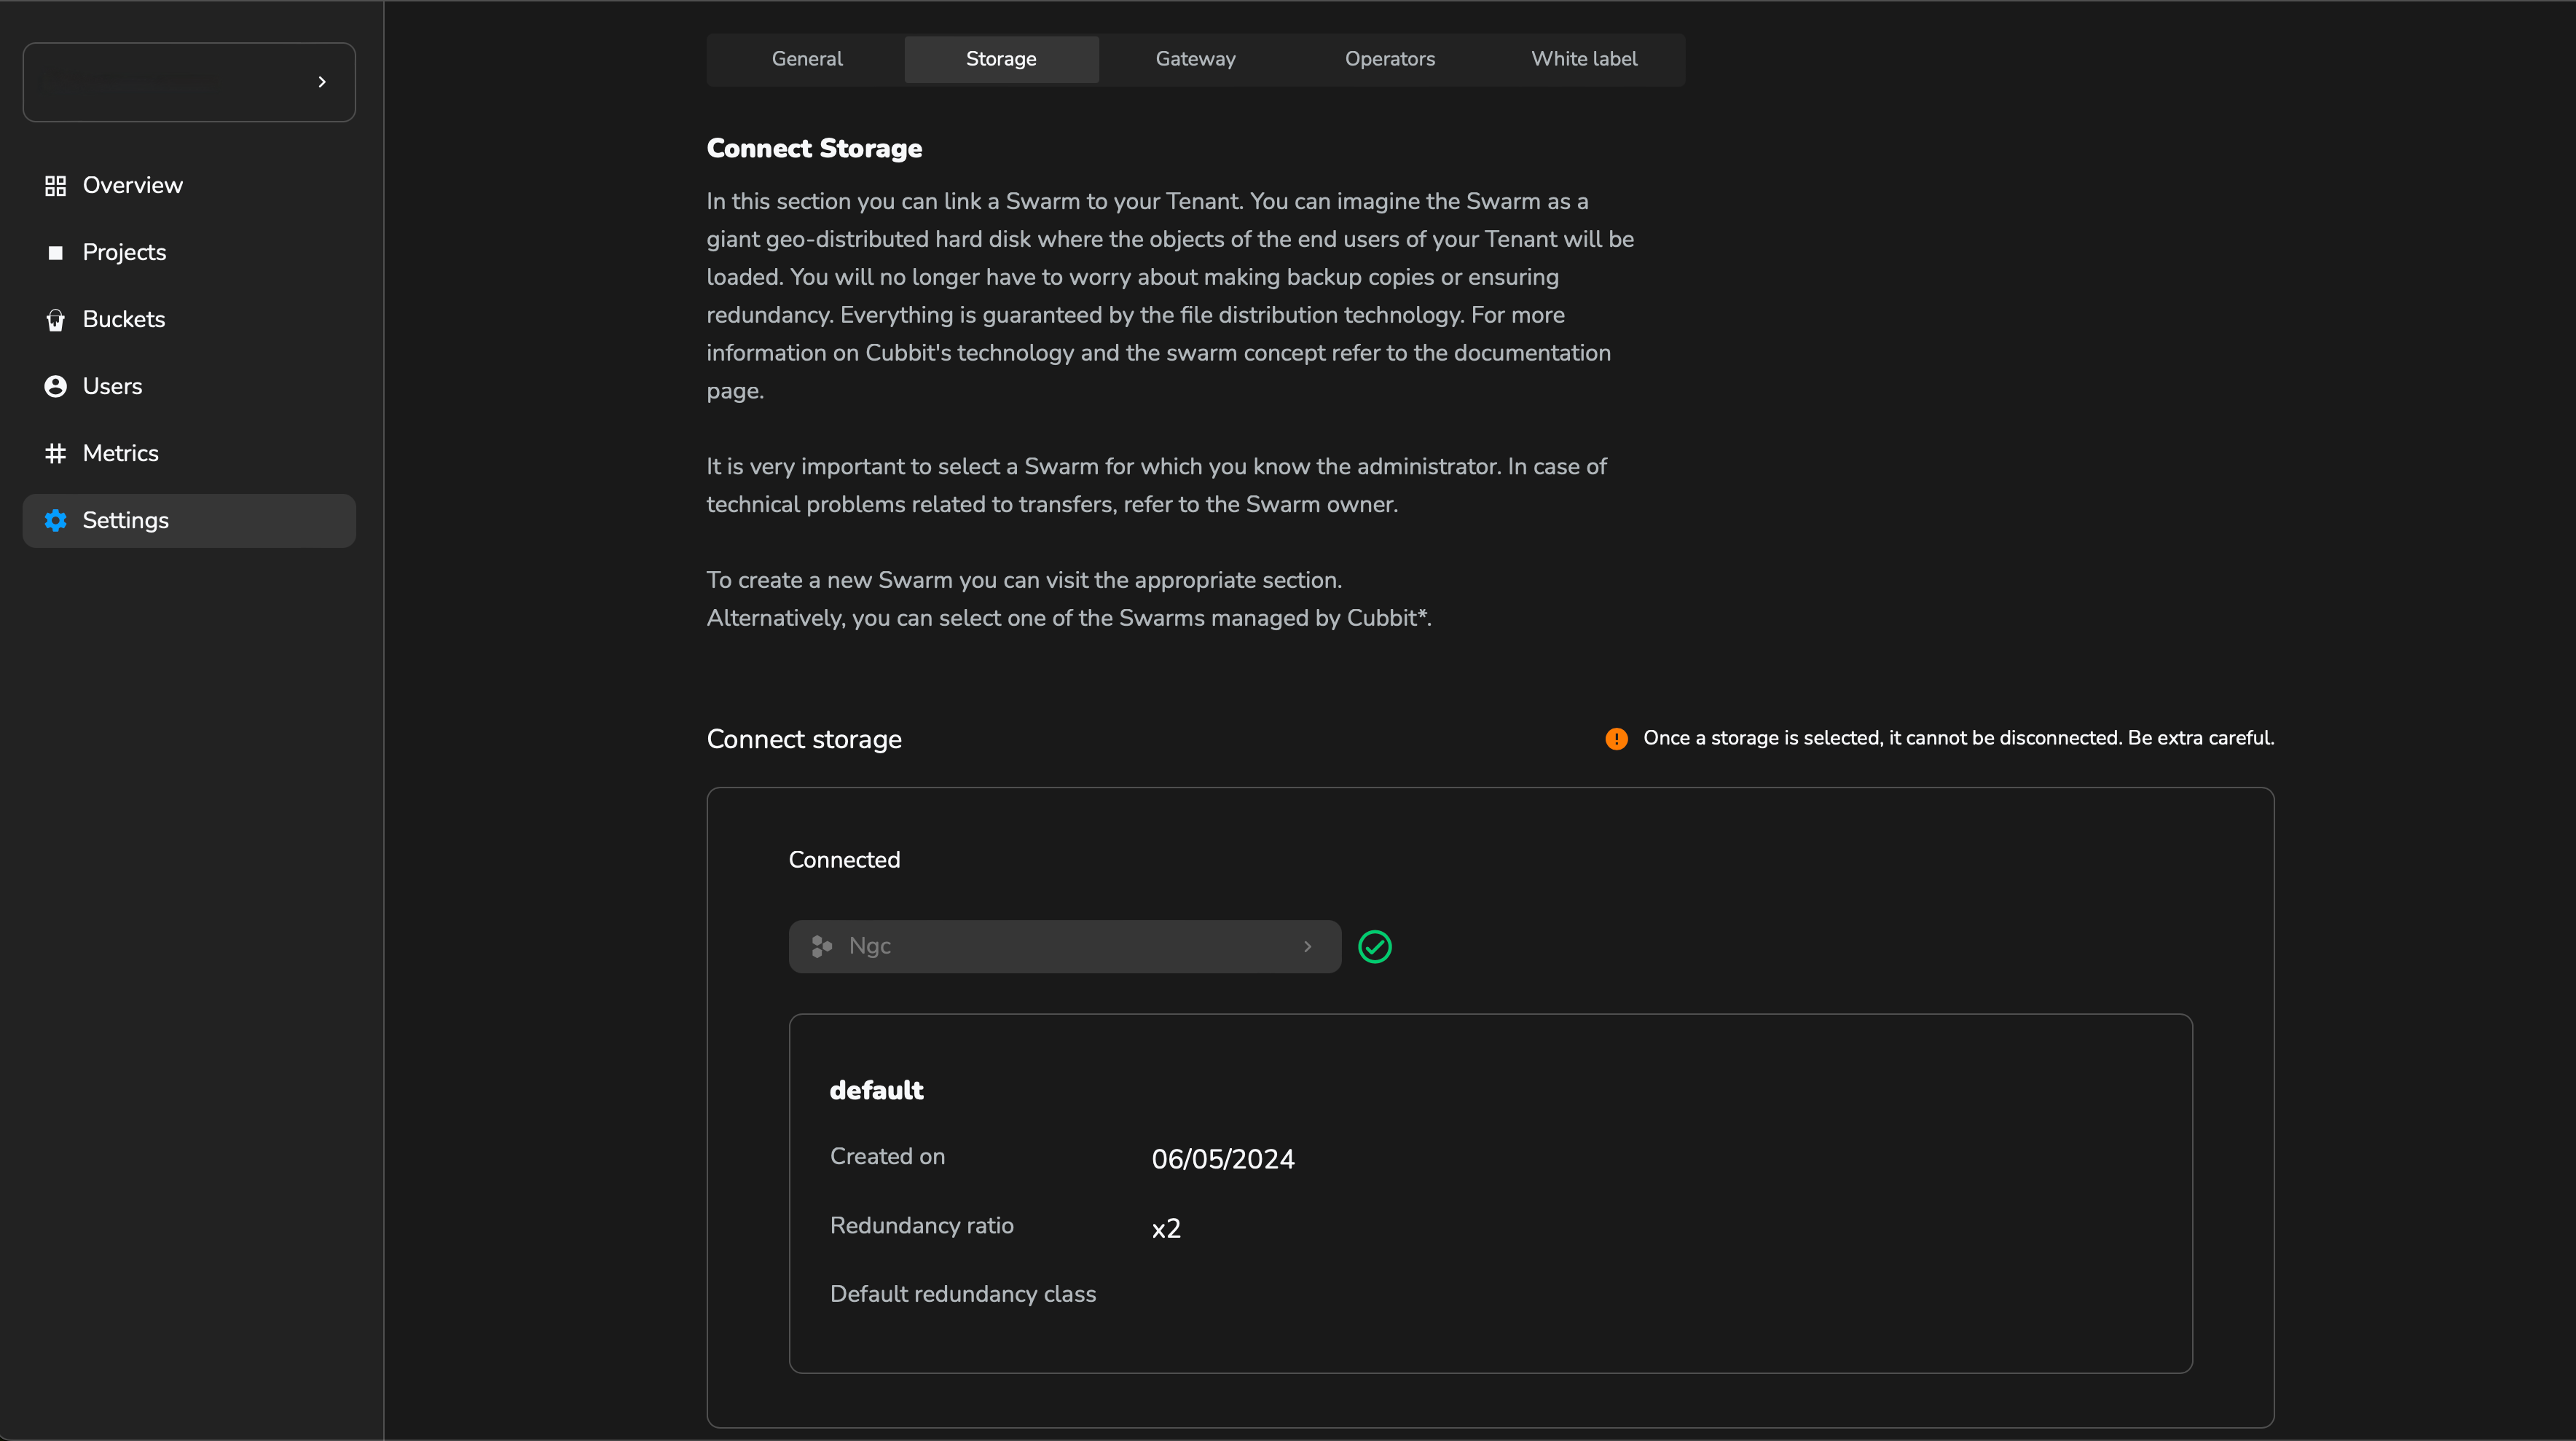
Under the introduction, a dropdown menu lets you choose between your vendor's storage options or private Swarms's. For any inquiry, please contact your vendor.
Once storage is connected, it cannot be changed.
After connecting storage, the notification bar in the Tenant Overview will no longer be visible.
Gateways
Gateways are access points to the Swarms connected to your Tenant. In Cubbit, it is possible to have multiple gateways connected in remote locations. The section allows you to create, configure, and manage your gateways. For more information, check What is a DS3 Gateway?
Custom DNS
Configuring a custom domain allows you to link your own domain (e.g. www.yourdomain.com) to the service, enhancing brand recognition and user trust. That is also a required step since request coming from console hosted on custom gateway that are not registered will be blocked by browser due to CORS policy.
To set up a custom domain for your gateway, follow these steps:
- Open the Tenant settings and navigate to the Gateways section
- Insert your custom domain in the provided field
- A challenge record will be generated. This record is necessary to verify your ownership of the domain.
- Access your domain registrar's DNS management console and add the provided challenge record as a TXT record named
_cubbit-challenge - After adding the TXT record, return to the Cubbit Composer and click on the "Validate" button to complete the verification process
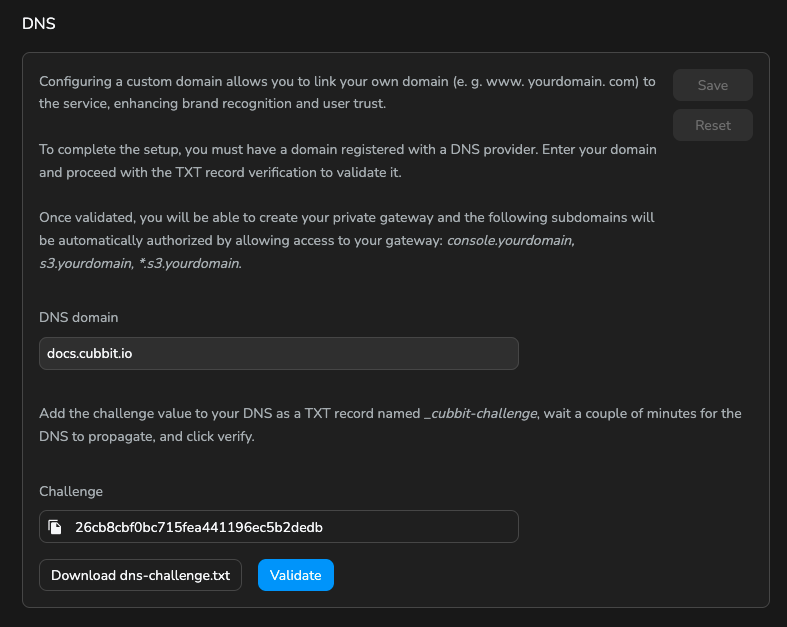
The DNS propagation may take some time depending on your DNS provider. If the validation fails, please wait a few minutes and try again. If the issue continue wait a day before contacting support.
Private gateway
A private gateway is a dedicated access point to your Tenant's Swarm, providing enhanced security and performance. It is typically used in enterprise environments where data privacy and control are paramount.
To set up a private gateway, remember you must configure a custom domain first. Use the UI to create the gateway, specifying the following parameters:
- Name: A unique identifier for the gateway within the Tenant.
- location: The geographical location where the gateway will be hosted. Choose a location close to your users to reduce latency.
After the resource is created, you will have to complete the installation by following the instructions provided in the gateway details page. For a complete guide on setting up a private gateway, refer to the Private Gateway Setup Guide.
Operators
Operators list all the collaborators of the Tenant. Here, you can see, manage, and invite your colleagues and get support in Tenant management. We currently have three different levels of privilege:
- Owner and Admin are allowed to perform every operation in the Tenant context
- Member can view and manage Tenant resources
- Read only can view Tenant resources
The main difference between Admin or Owner and Member is the management of the Tenant operators, which is limited to Admins and Owners.
For more information, check What is an operator?