Onboarding wizard
This guide gives a single-page overview of the onboarding wizard and its checklist of setup steps; each step links to its own detailed guide.
Guide Structure
- Prerequisites: Required conditions before starting the onboarding wizard
- Accessing the Onboarding Checklist: How to open the wizard and how leaving it works
- Checklist Overview: The checklist steps and when each becomes active and completed
- Step 1 - Connect your infrastructure: Connecting your Kubernetes clusters
- Step 2 - Configure your first Swarm: Creating your first Swarm
- Step 3 - Create your Gateway: Provisioning your first Gateway
- Step 4 - Create your first Domain: Registering and verifying a domain
- Step 5 - Configure your Tenant: Creating your first Tenant, including DNS and TLS
- Step 6 - Create your IAM Users: Inviting collaborators
After the checklist is complete, the guide includes a Troubleshooting reference section for common issues. It is not an onboarding step.
Prerequisites
Before starting the onboarding wizard, ensure you have:
- An active Cubbit organization with admin privileges
- A confirmed email address (the "Confirm your email" step must be done before you can sign in and reach the wizard)
- Access to the Composer dashboard
Everything else — infrastructure, swarms, gateways, domains, tenants, IAM users — is created step by step inside the wizard. Per-step prerequisites (tools, cluster requirements, DNS access) are noted in each walkthrough below and detailed in the linked guides.
Accessing the Onboarding Checklist
There are two ways to open the onboarding checklist:
- Navigate to
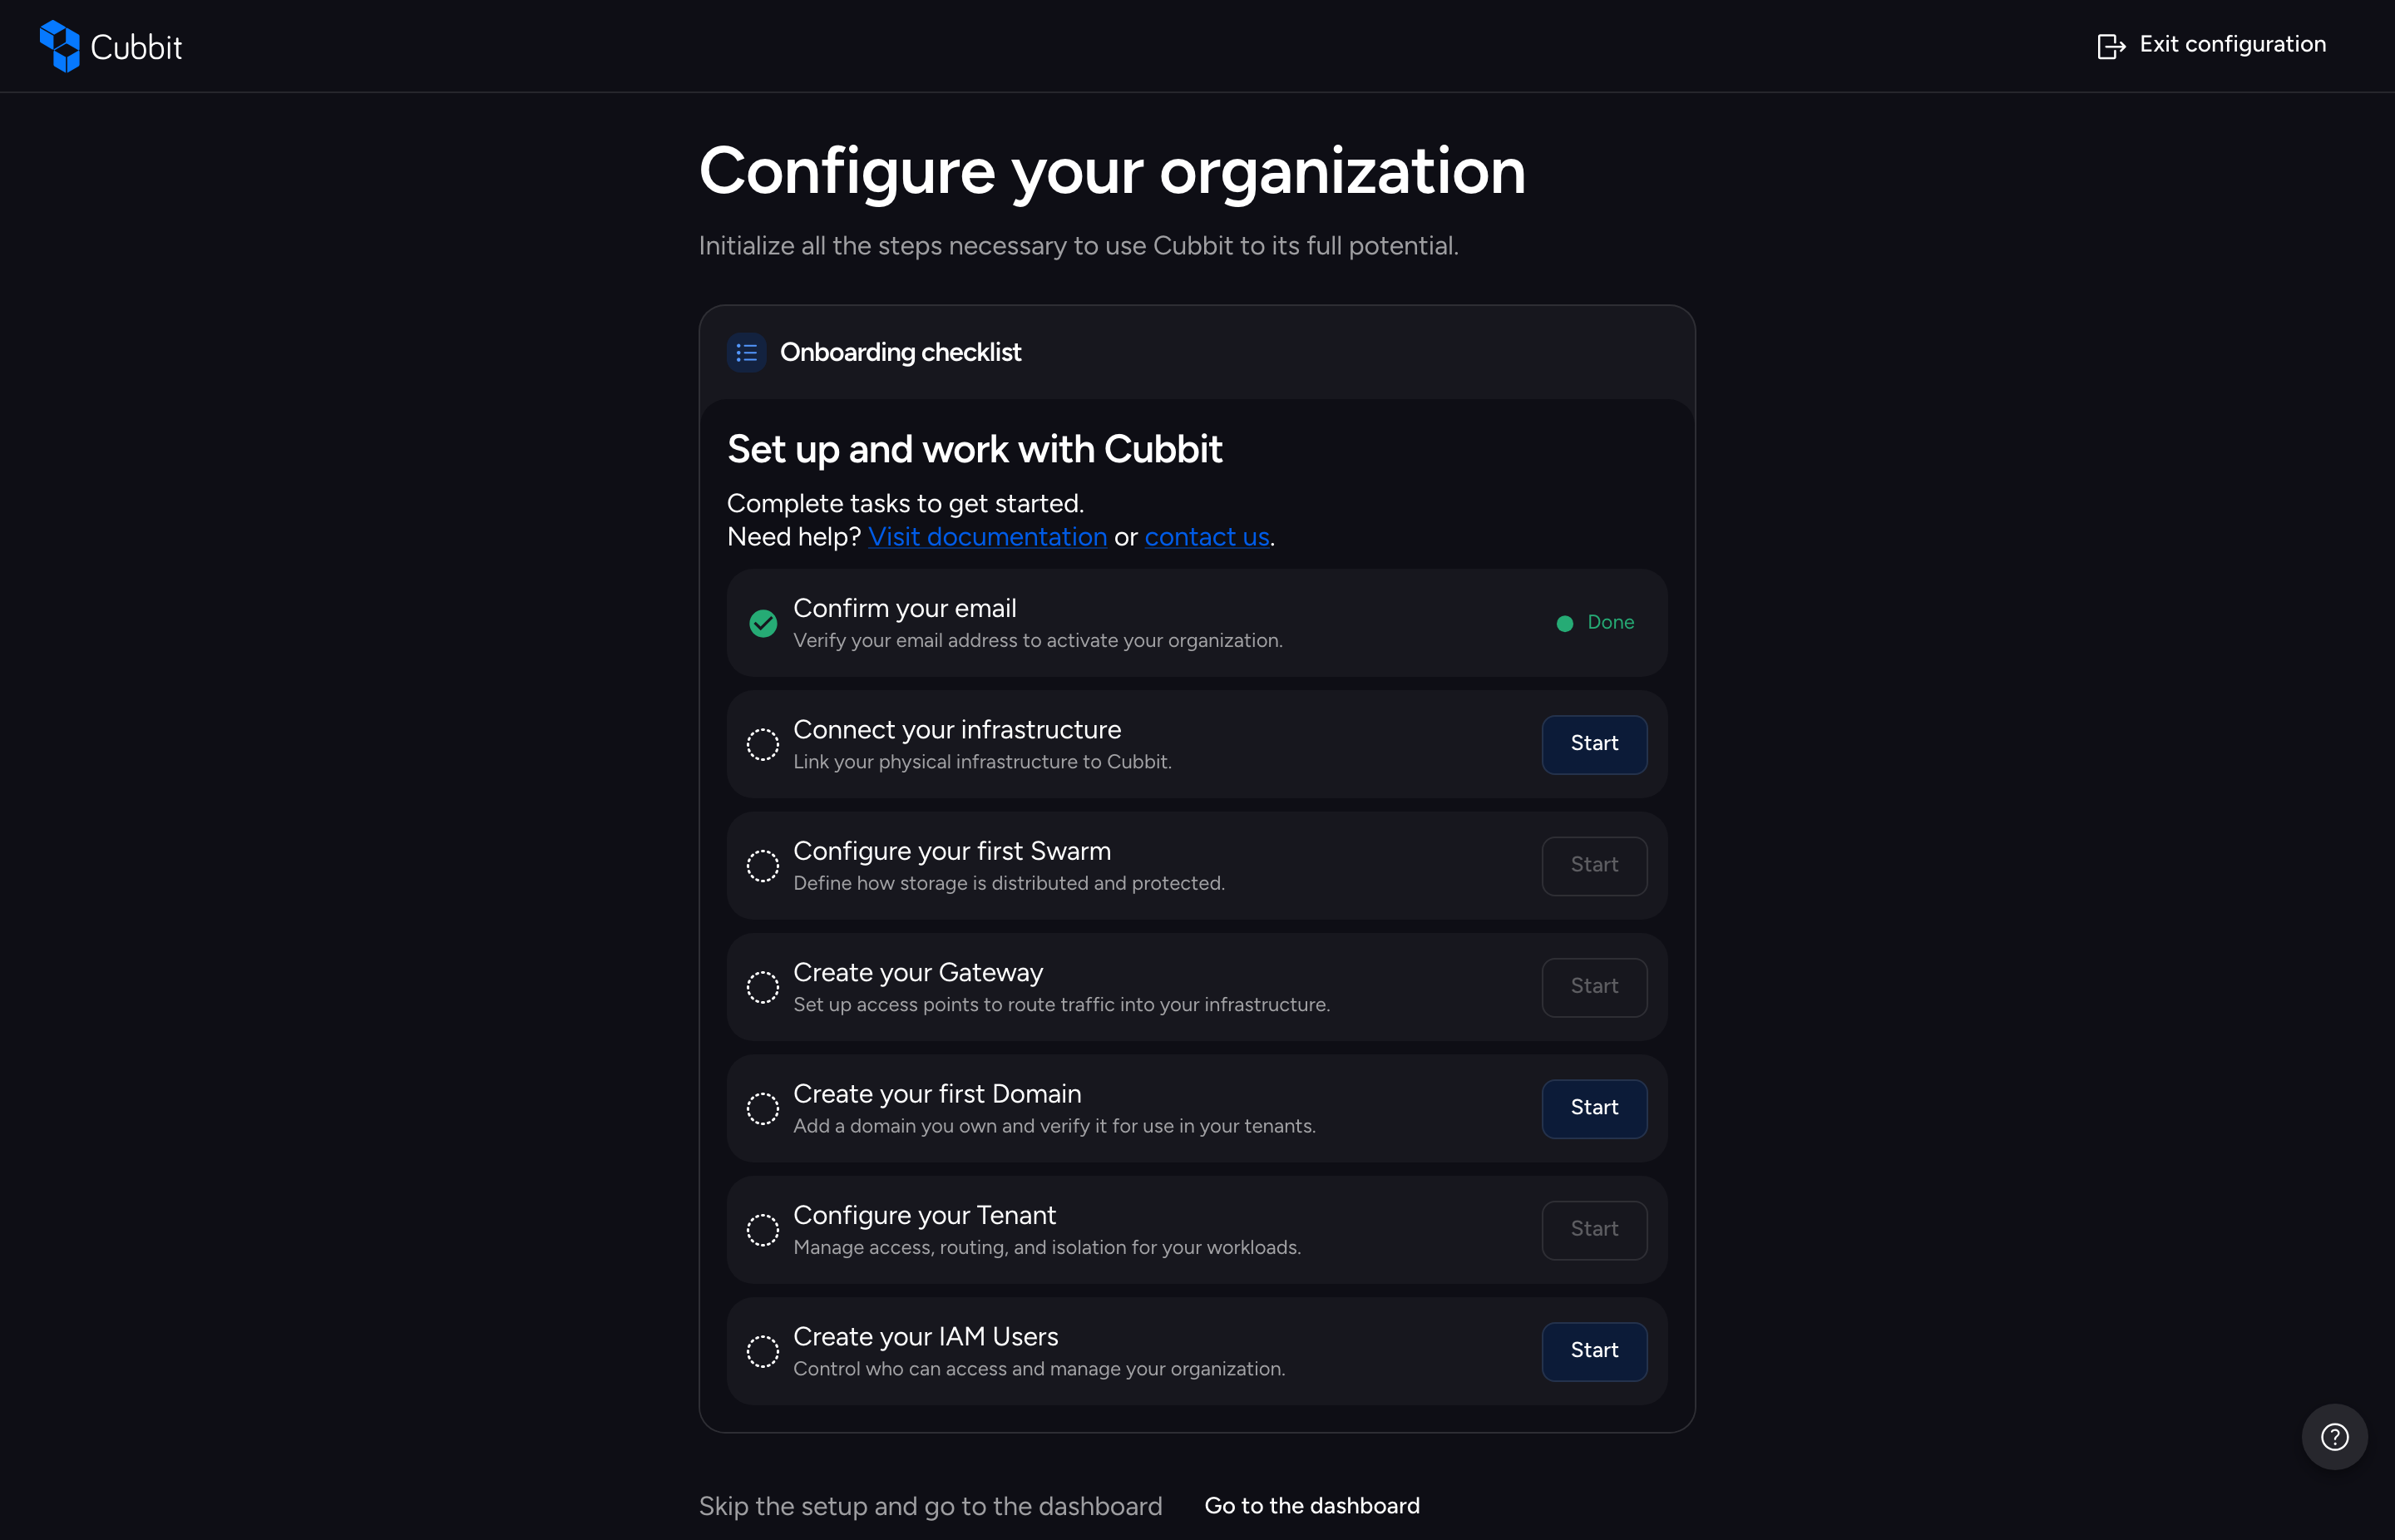
/wizard(the wizard intro page, titled "Configure your organization"), or use the "Onboarding checklist" card embedded in the dashboard home. - Follow the redirect applied after your first sign-in: when the wizard is not yet complete, first-login flows route you to
/wizard.
Leaving the Wizard
The progress-guarded exits — the Exit configuration button in the header and the Go to the dashboard skip button on the intro page — behave differently based on your progress:
- All steps complete: you go directly to the target (usually the dashboard) with no prompt.
- Any step incomplete: a blocking confirmation modal appears. You can cancel and stay in the wizard, Leave the wizard and go to the dashboard anyway, or jump straight to the last setup task with Create IAM users.
Other ways out are not guarded: the footer Back to main page button returns you to the checklist without a prompt. Closing or refreshing the browser tab while the wizard is incomplete triggers a native browser confirmation, so you don't lose your place by accident.
Checklist Overview
The onboarding checklist chains the six setup tasks that take a new organization from empty to a working Cubbit deployment. Each step's Start button opens the guided flow for that resource, and returning to the checklist shows the updated progress — completed steps are marked Done.
Every step has a required predecessor: a step is active once its prerequisites exist, disabled (its Start button is greyed out) before that, and completed once the resource it creates exists in your organization. Your progress is recomputed every time the checklist loads, so resources created outside the wizard (for example from the Infrastructure or Tenants pages) also mark steps as done.
| Step | Active when | Completed when |
|---|---|---|
| Confirm your email | Always | Always displayed as completed |
| Connect your infrastructure | Always active | A physical location has been connected |
| Configure your first Swarm | A physical location exists | A Swarm exists |
| Create your Gateway | A Swarm and a physical location exist | A Gateway exists |
| Create your first Domain | Always active | A Domain exists |
| Configure your Tenant | A Gateway and a Domain exist | A Tenant exists |
| Create your IAM Users | Always active | An IAM user exists besides the always-present Composer users |
The always-present Composer users are the Organization owner and, when you are not the Organization owner, your own user: "Create your IAM Users" completes as soon as the organization contains at least one invited IAM user.
Step 1 - Connect your infrastructure
This step links your Kubernetes clusters to Cubbit. The wizard shows a generated setup command to run on each cluster you want to connect; once a cluster reports in, a monitor screen shows the connection progress ("Waiting for cluster connection…") and updates by itself — no refresh needed. The step completes when the first physical location appears in your infrastructure.
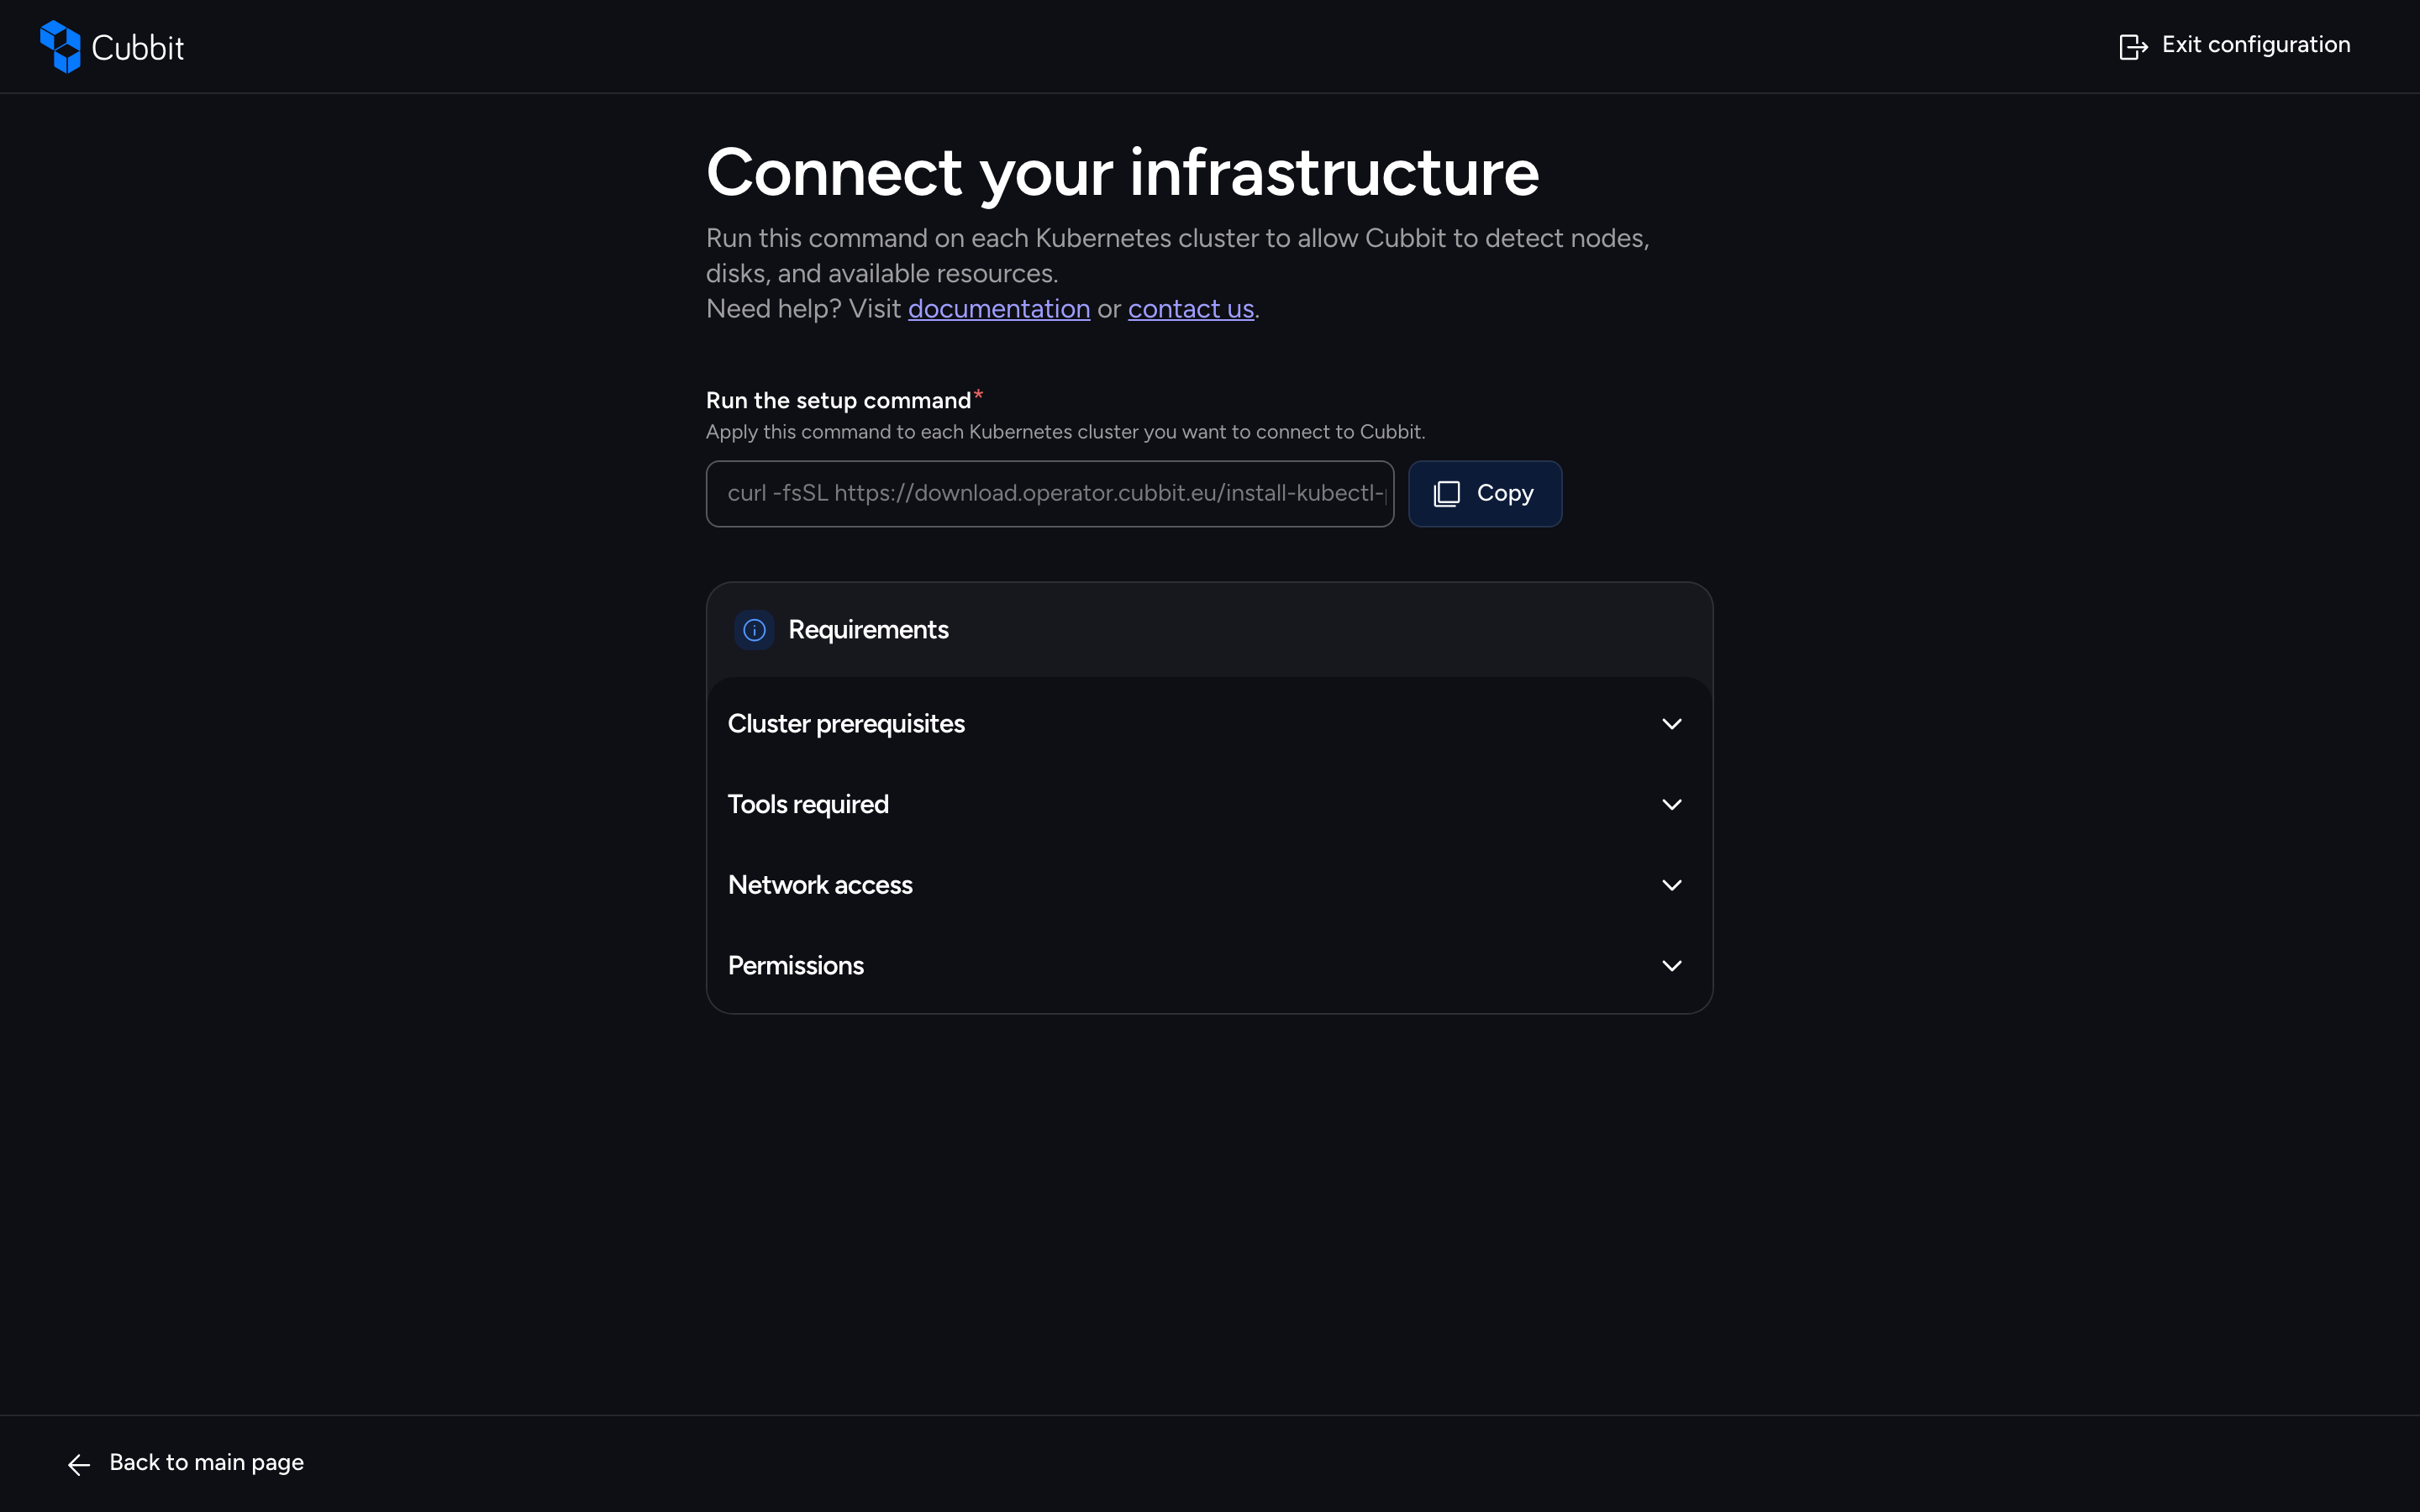
Machine and cluster prerequisites (bash, curl, kubectl, formatted disks, and the kubectl cubbit plugin) are listed in the Add Infrastructure guide, which covers the same setup command in detail.
Step 2 - Configure your first Swarm
This step defines how storage is distributed and protected. You create a Swarm by naming it, selecting locations, and picking nodes and disks; you then configure a redundancy class in two sub-steps — base settings (name, maximum disks per location per node) and failure tolerance (locations to lose, disks per location, disks to lose per location). Creation runs through a progress screen that creates the nexuses, deploys agents, and configures the redundancy classes.
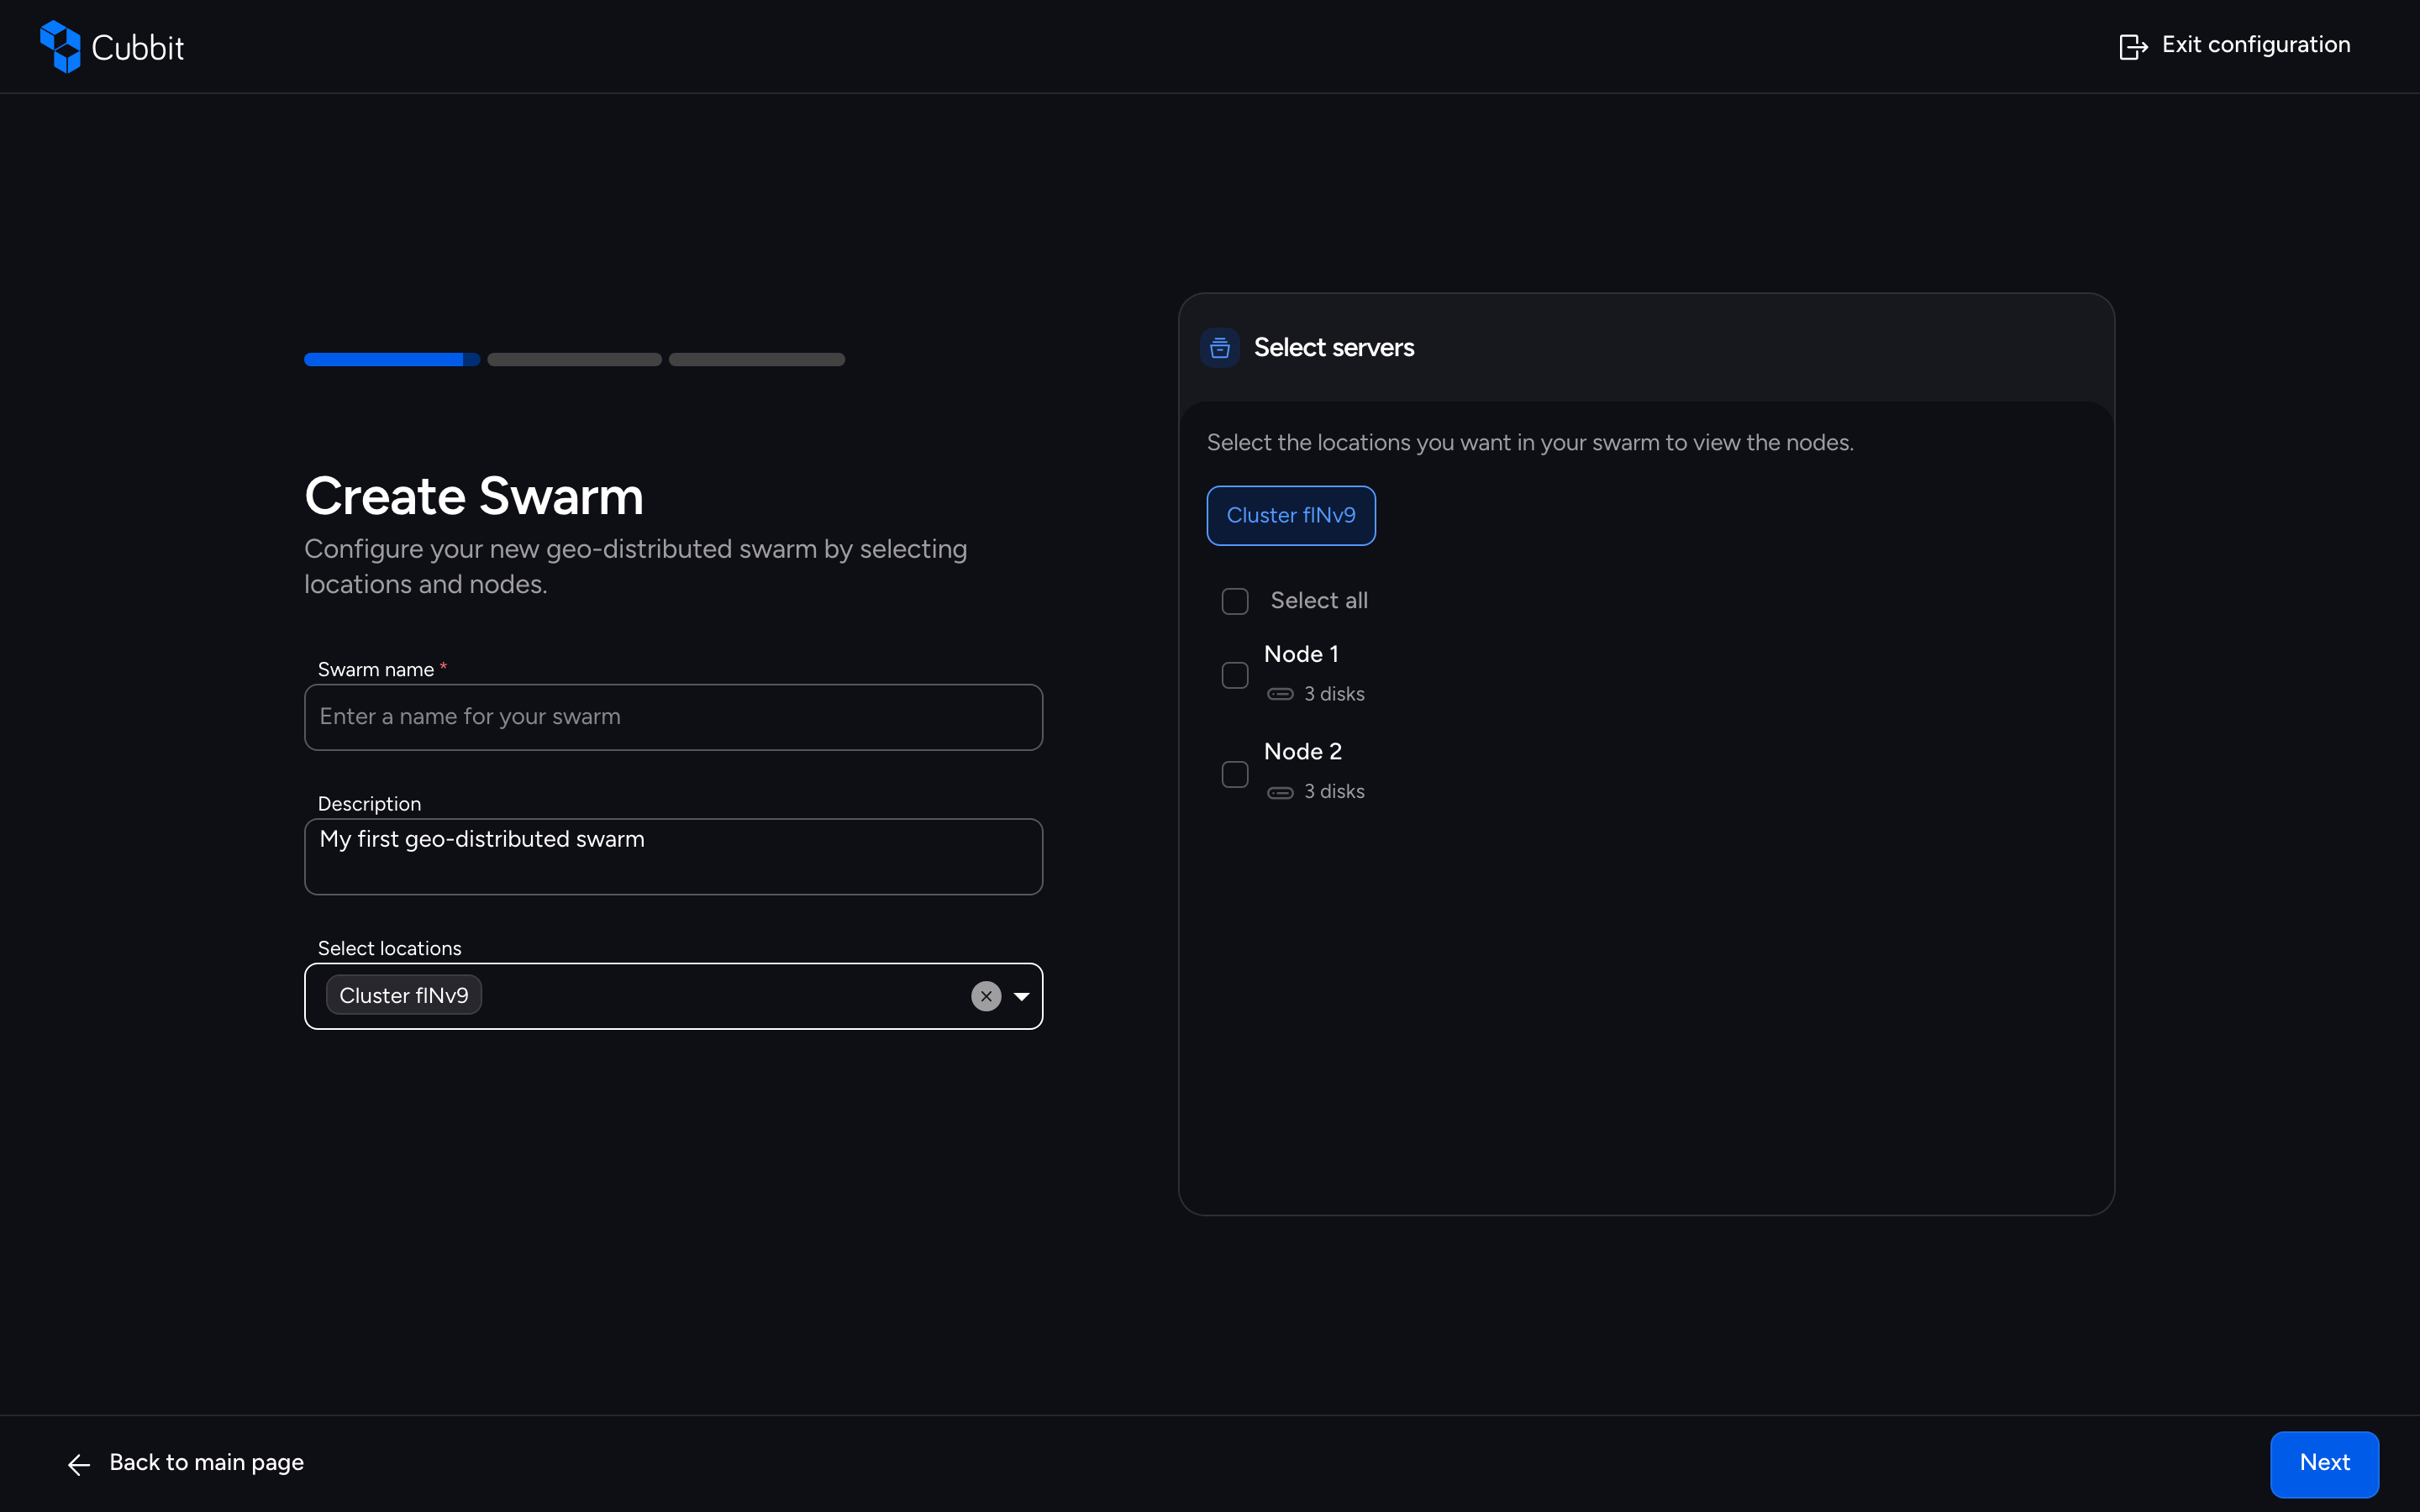
The step becomes available as soon as a physical location exists. For redundancy class rules and the full form walkthrough, see the Swarm Creation guide.
Step 3 - Create your Gateway
This step provisions the access point that routes traffic into your infrastructure. The wizard runs the same 3-stage flow as the Gateways page: Gateway setup (name, slug, description, physical location), Swarm & redundancy class (swarms to write to and the default fallback class), and Connection (Manual), followed by a provisioning progress screen with stages for the profile installation, gateway deployment, and connection verification.
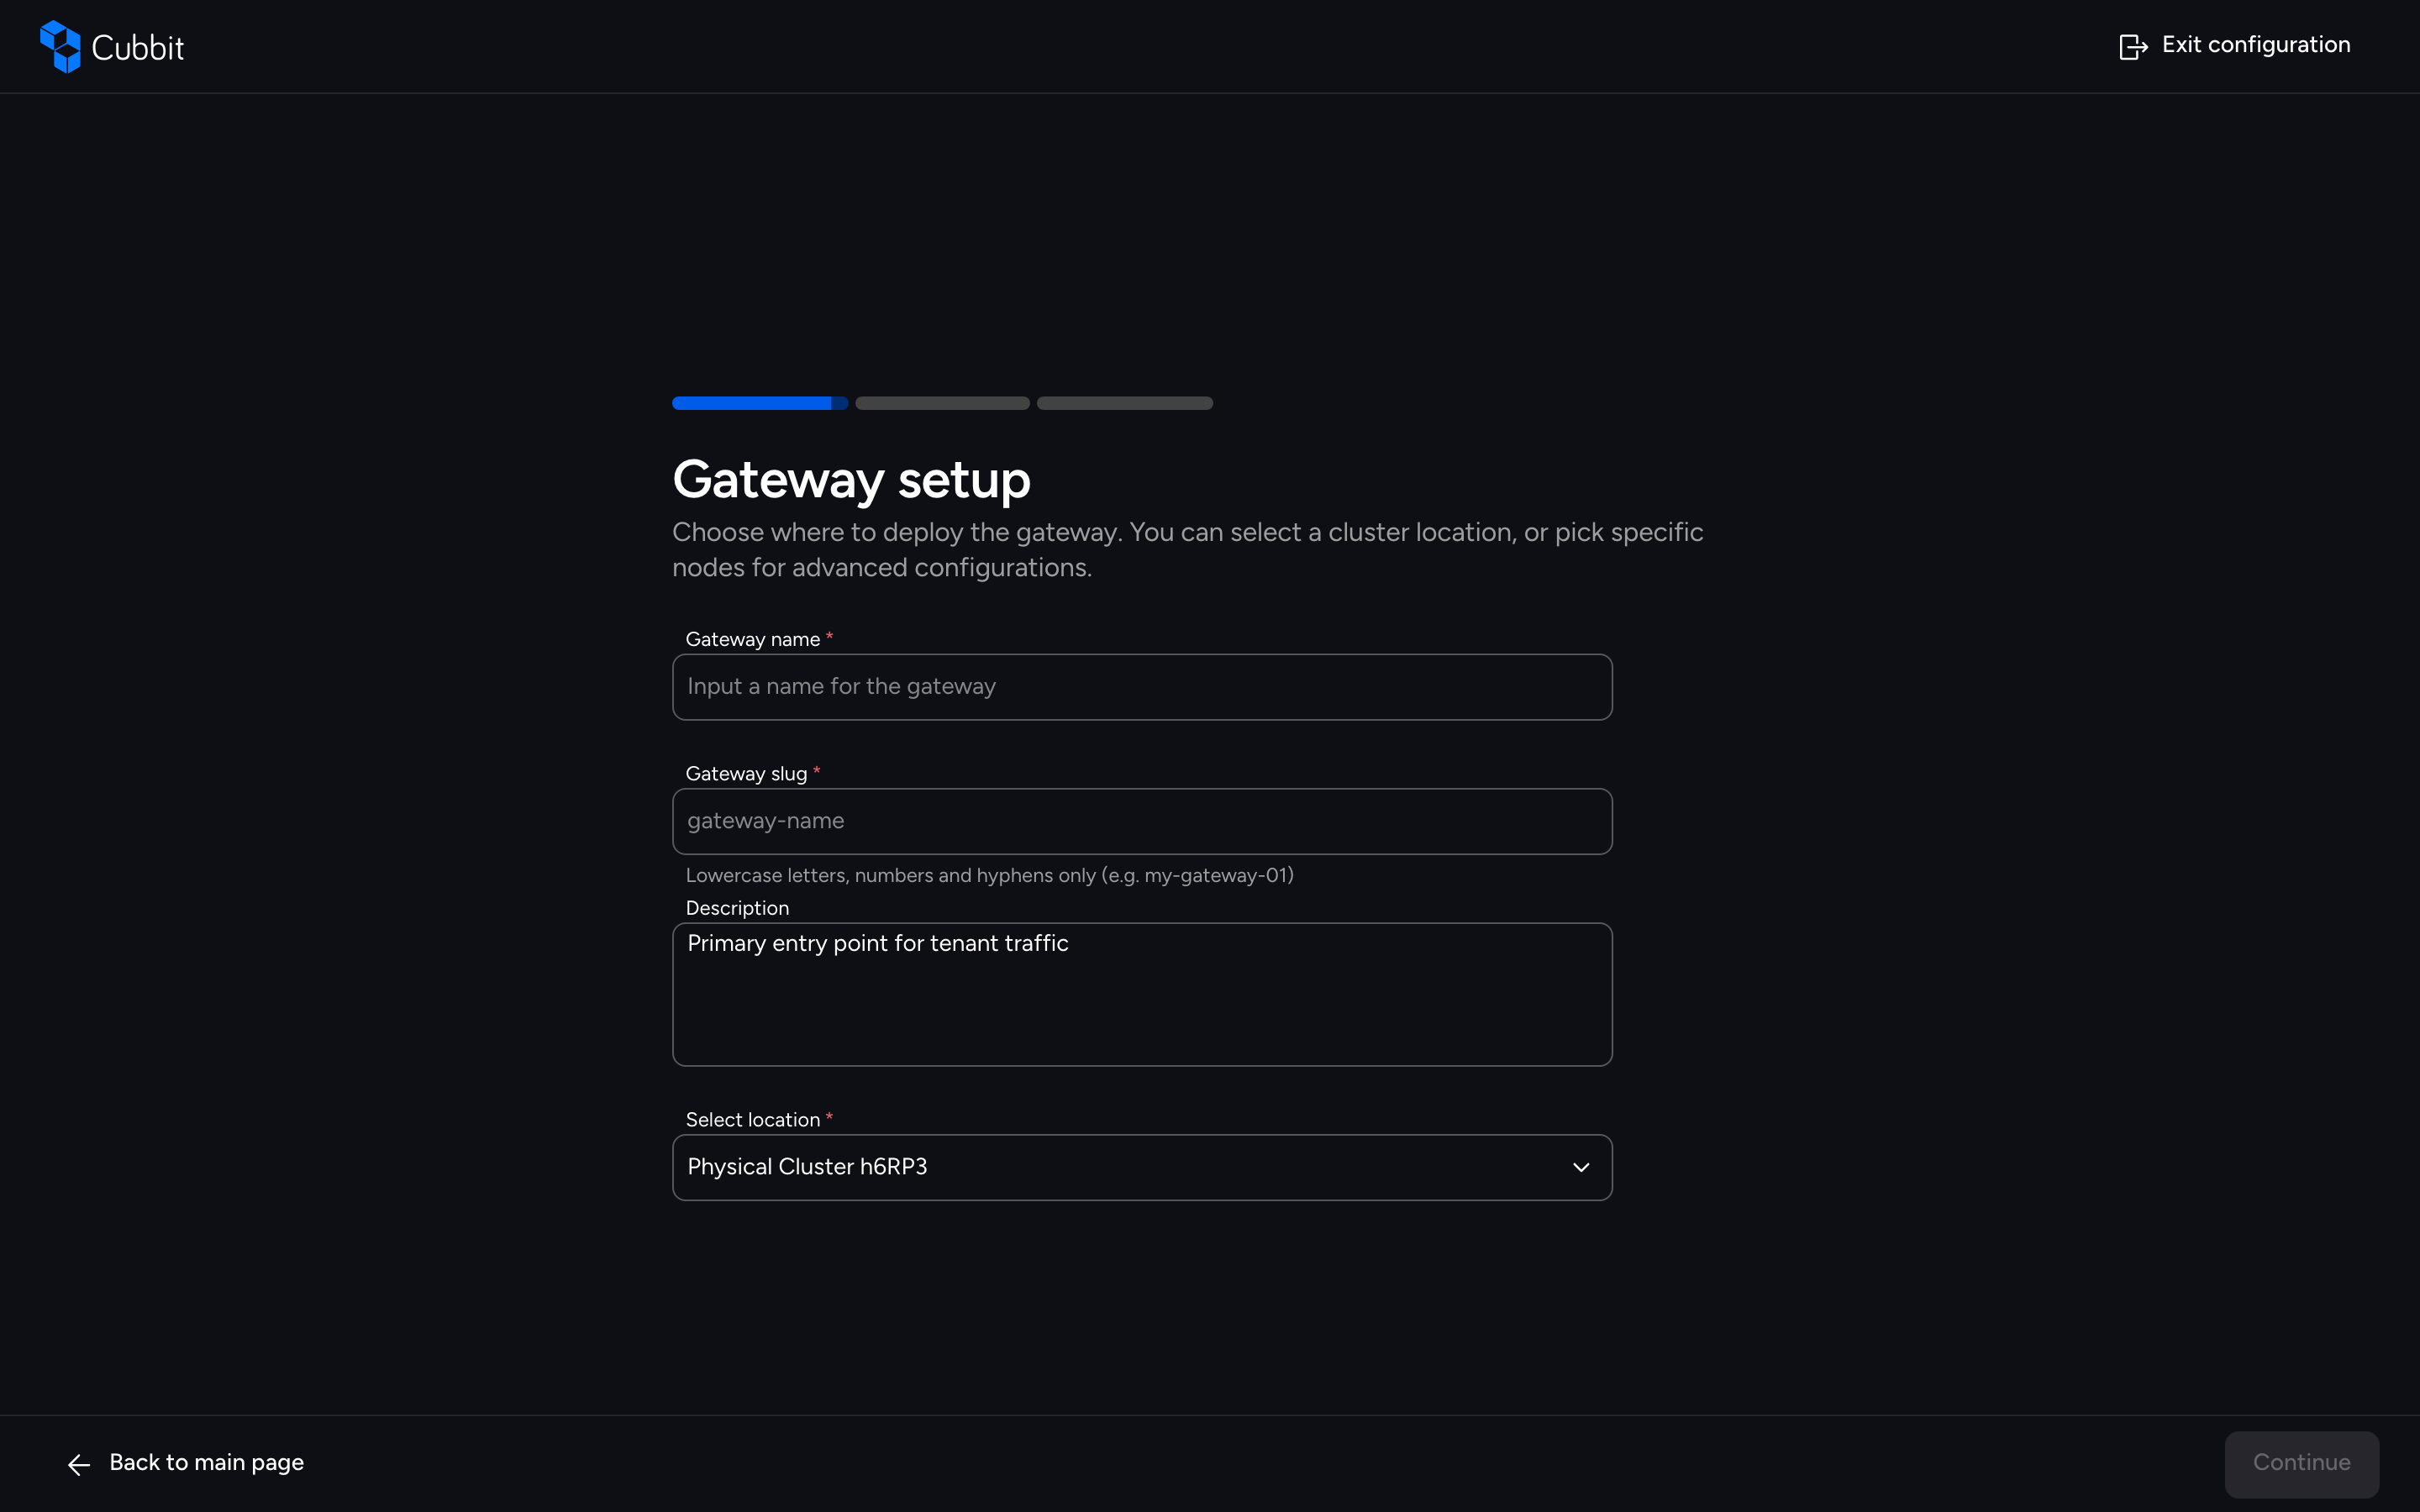
The step requires an existing Swarm and a physical location, since gateways are deployed to physical clusters. For the full walkthrough, see the Gateway Creation guide.
Step 4 - Create your first Domain
This step registers a domain you own so it can be used by your tenants. You enter the domain name and the wizard generates a DNS challenge: add the provided TXT record named _cubbit-challenge at your DNS provider, wait for propagation, and the wizard verifies domain ownership. Only verified domains can be selected later in the tenant step.
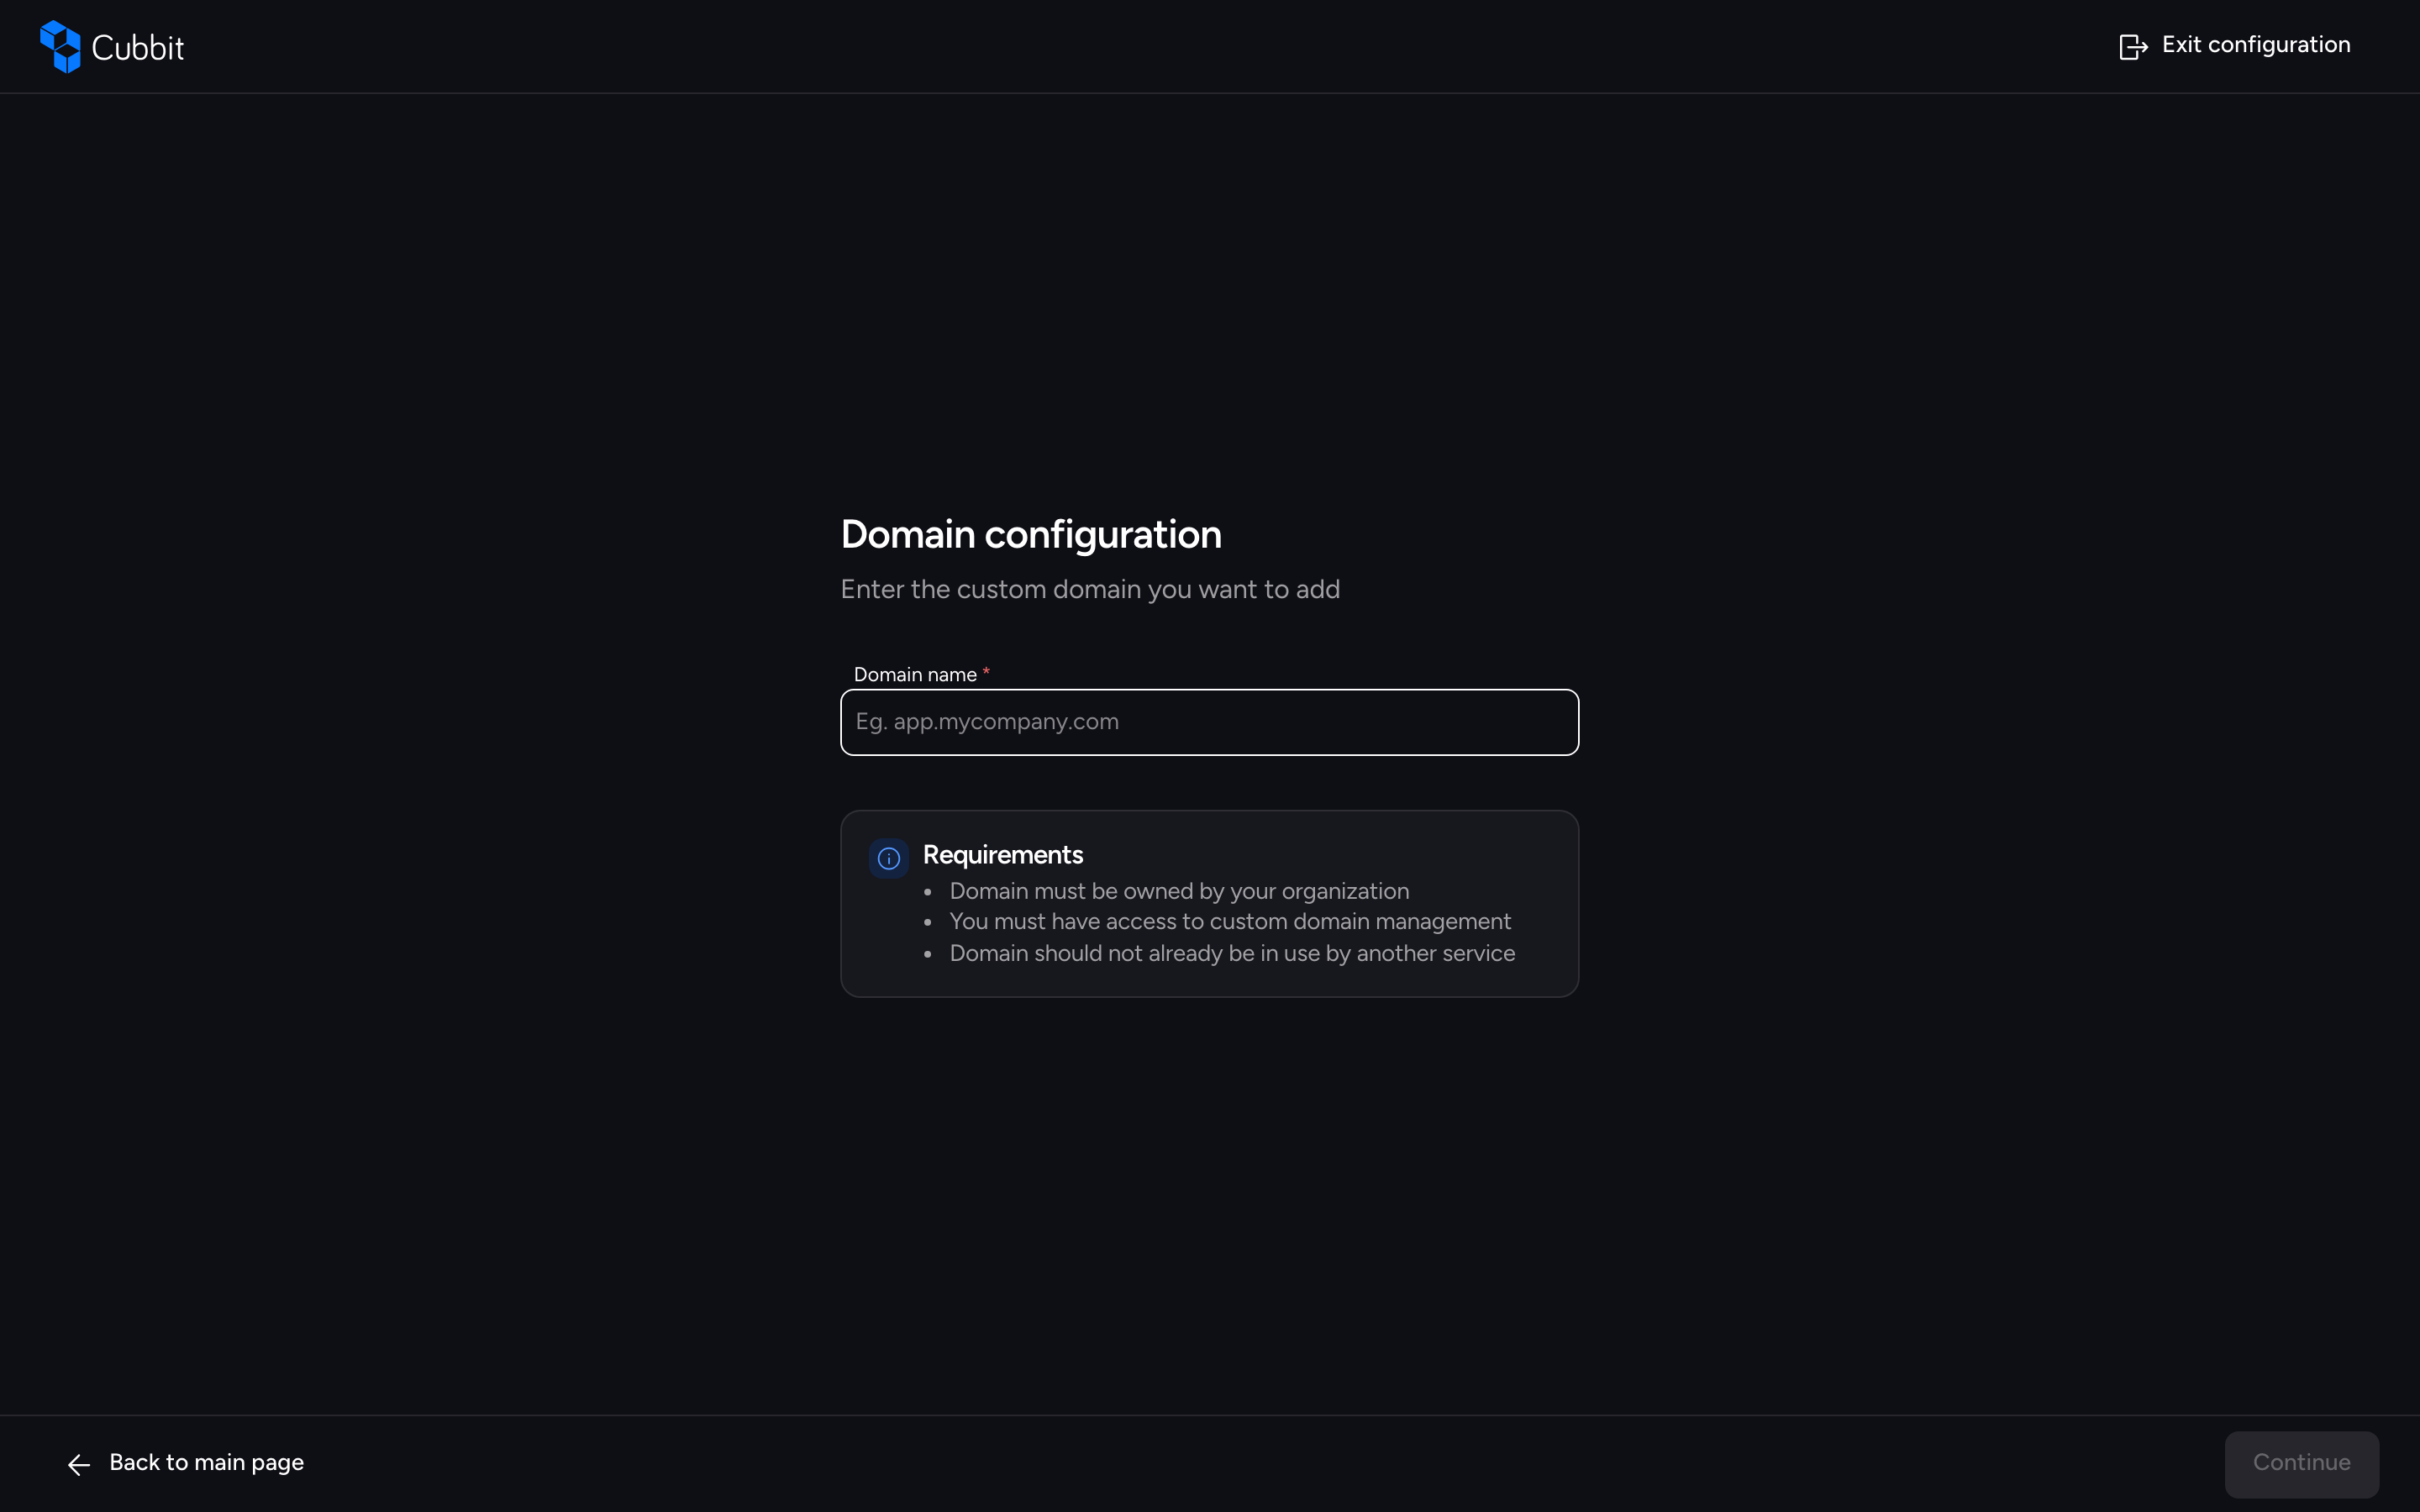
The challenge and verification flow, including shared Cubbit domains, is documented in the "Adding New Domains" section of the Tenant Creation guide. For DNS record details, see the Tenant Connections DNS and TLS guide.
Step 5 - Configure your Tenant
This step creates the tenant with its domains, gateways, and basic configuration. The wizard uses a 2-segment form and then walks you through the post-creation setup to make the tenant reachable, so it differs from the regular tenant flow (see How This Differs from the Regular Tenant Flow).
Tenant Information
The first segment collects the base information: Tenant name, Tenant slug (auto-generated from the name with a live availability check, editable), and an optional Description (maximum 120 characters). Click Continue to proceed.
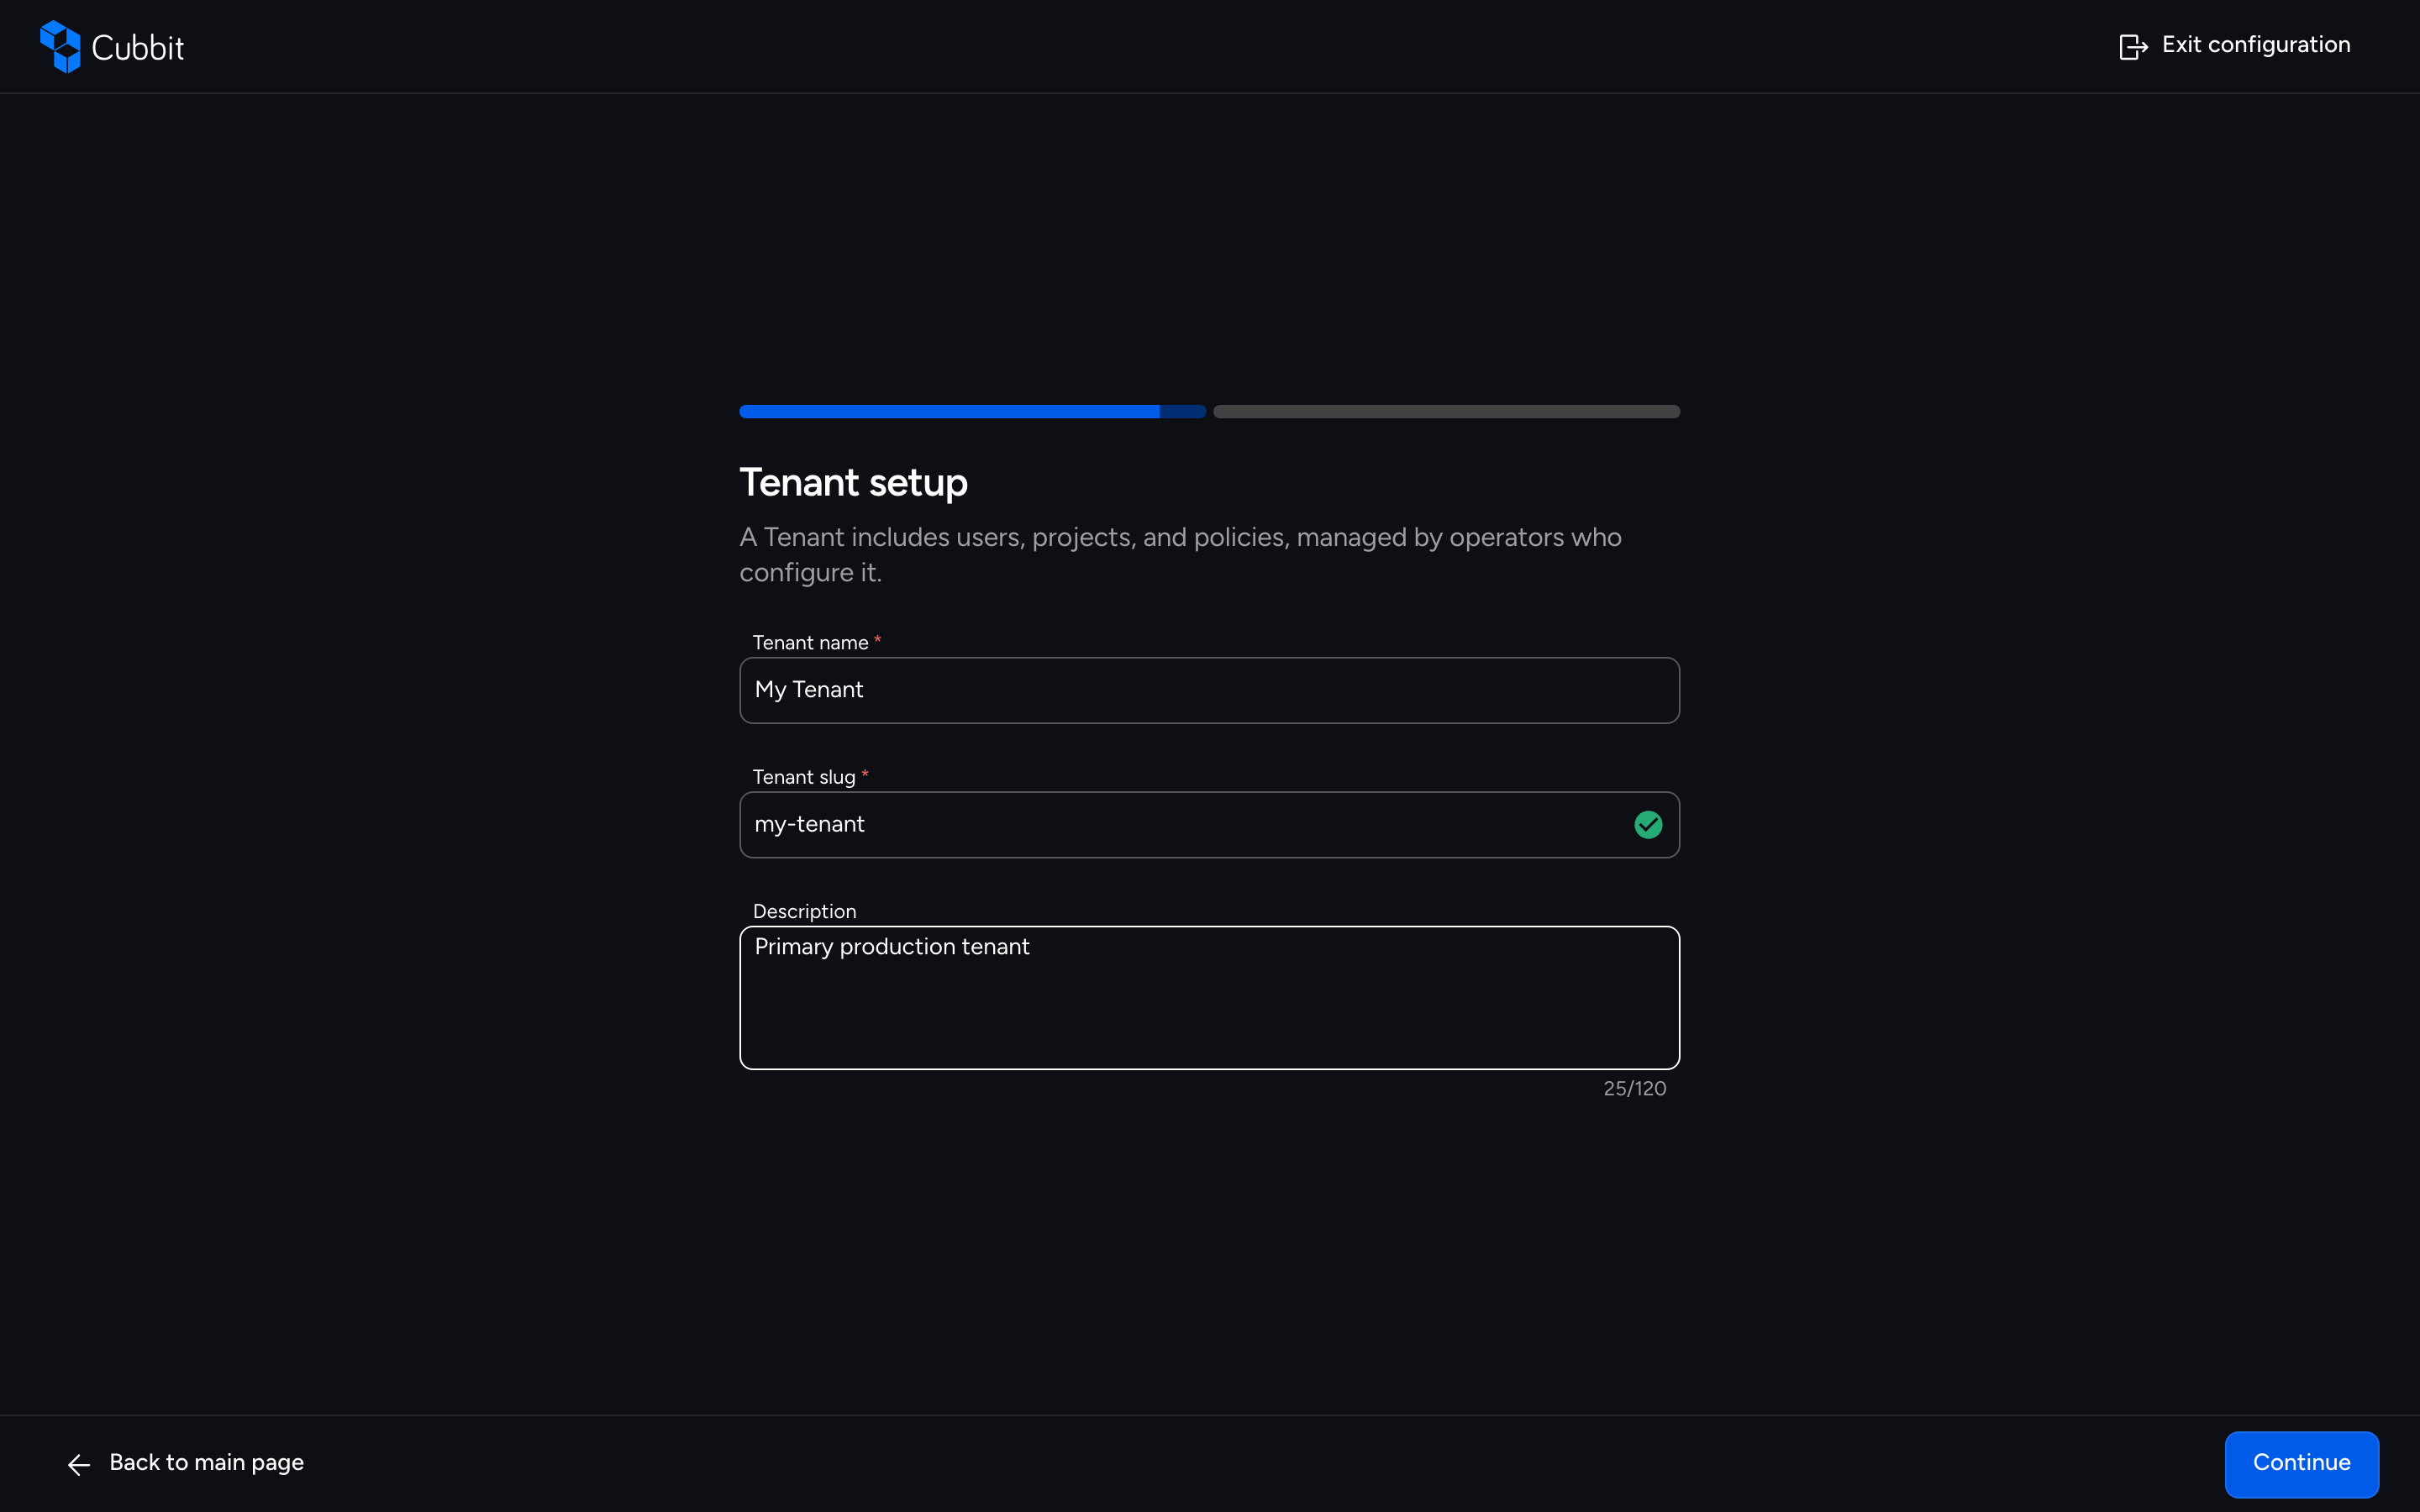
For the slug format rules, see the Tenant Creation guide.
Select Domains
The second segment is a merged form: a single Domain (verified domains only) with an optional Subdomain prefix, and a single Gateway. The "Your tenant will be reachable at" summary previews the resulting hostnames for the console, the S3 endpoint, and buckets — these become the three shared DNS records created later in the setup.
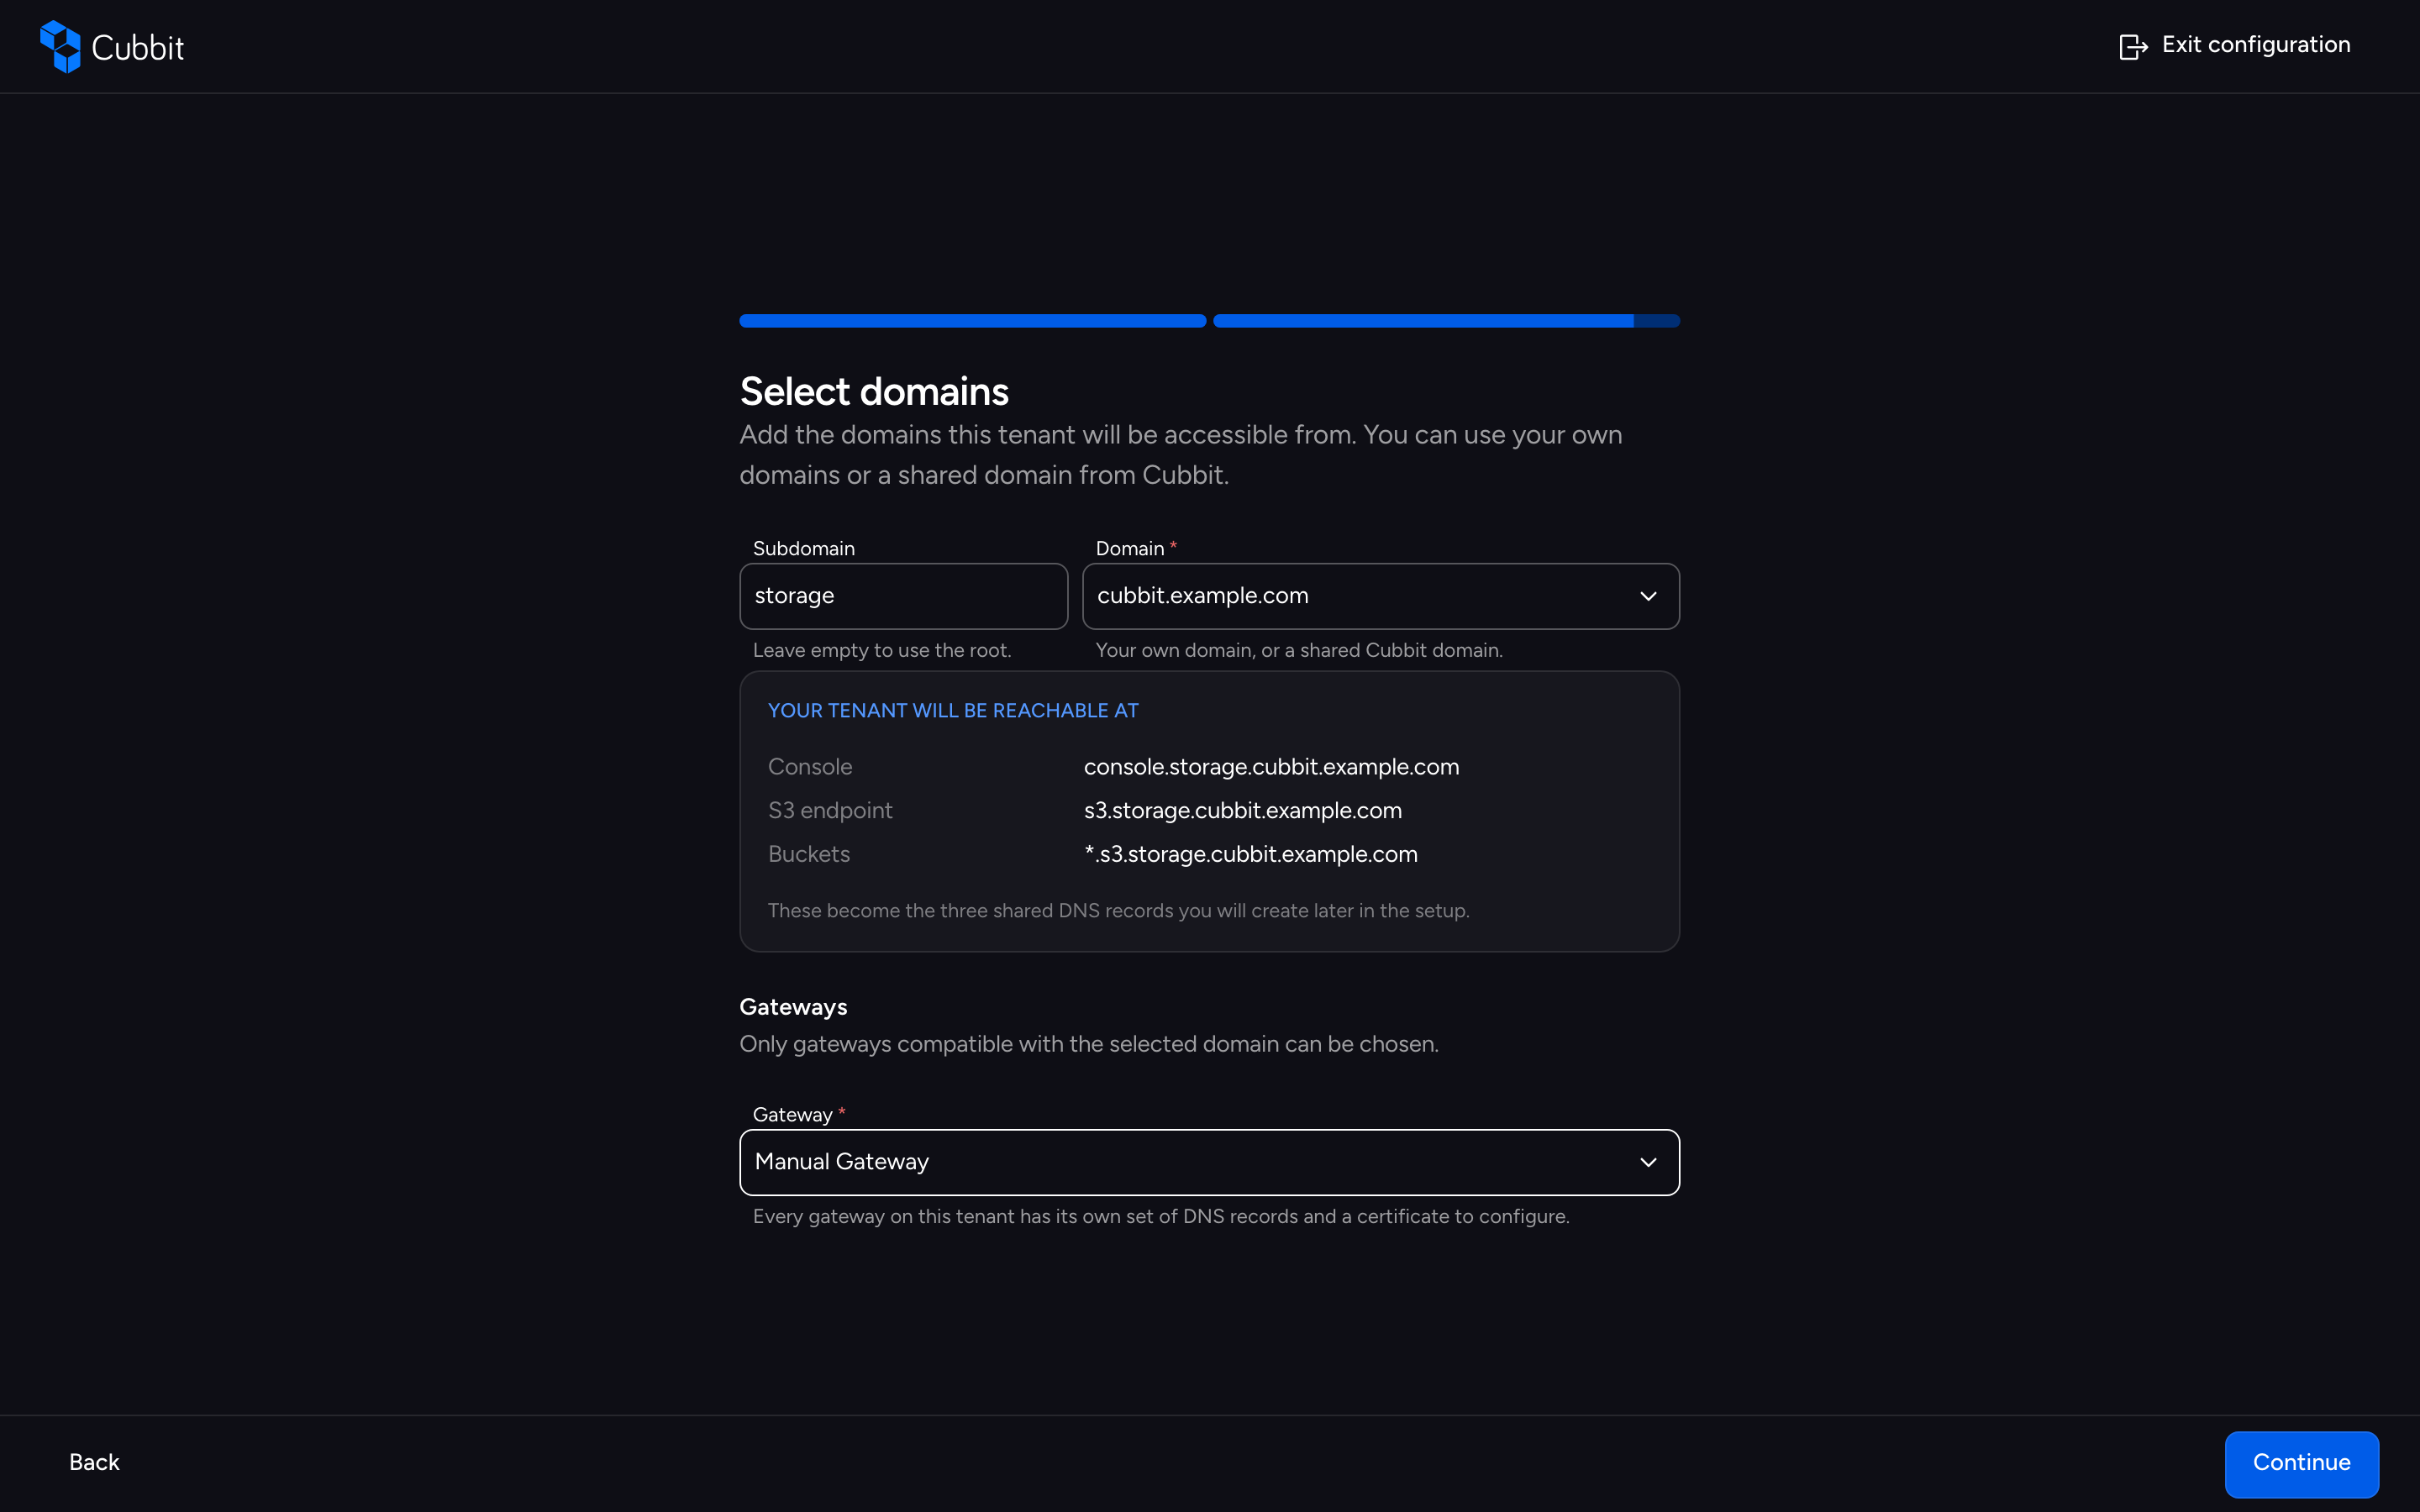
Click Continue to create the tenant: in the wizard this button is the create action for the whole flow.
Creation Progress
After the form is submitted, creation runs asynchronously through two stages — Creating tenant and Configuring gateways — while the status is polled. If creation fails, an error screen offers Retry or Exit and continue later; the wizard keeps your place.
Once the process completes, the flow that follows depends on the gateway connection type.
Manual Gateway Configuration
With a Manual gateway, the tenant exists but needs DNS and TLS configured before it is operational. The wizard walks you through the remaining stages.
Intermediate Success
The creation success screen reports that the tenant was created and connected to the selected gateway. Click Continue configuration to start the DNS and TLS setup.
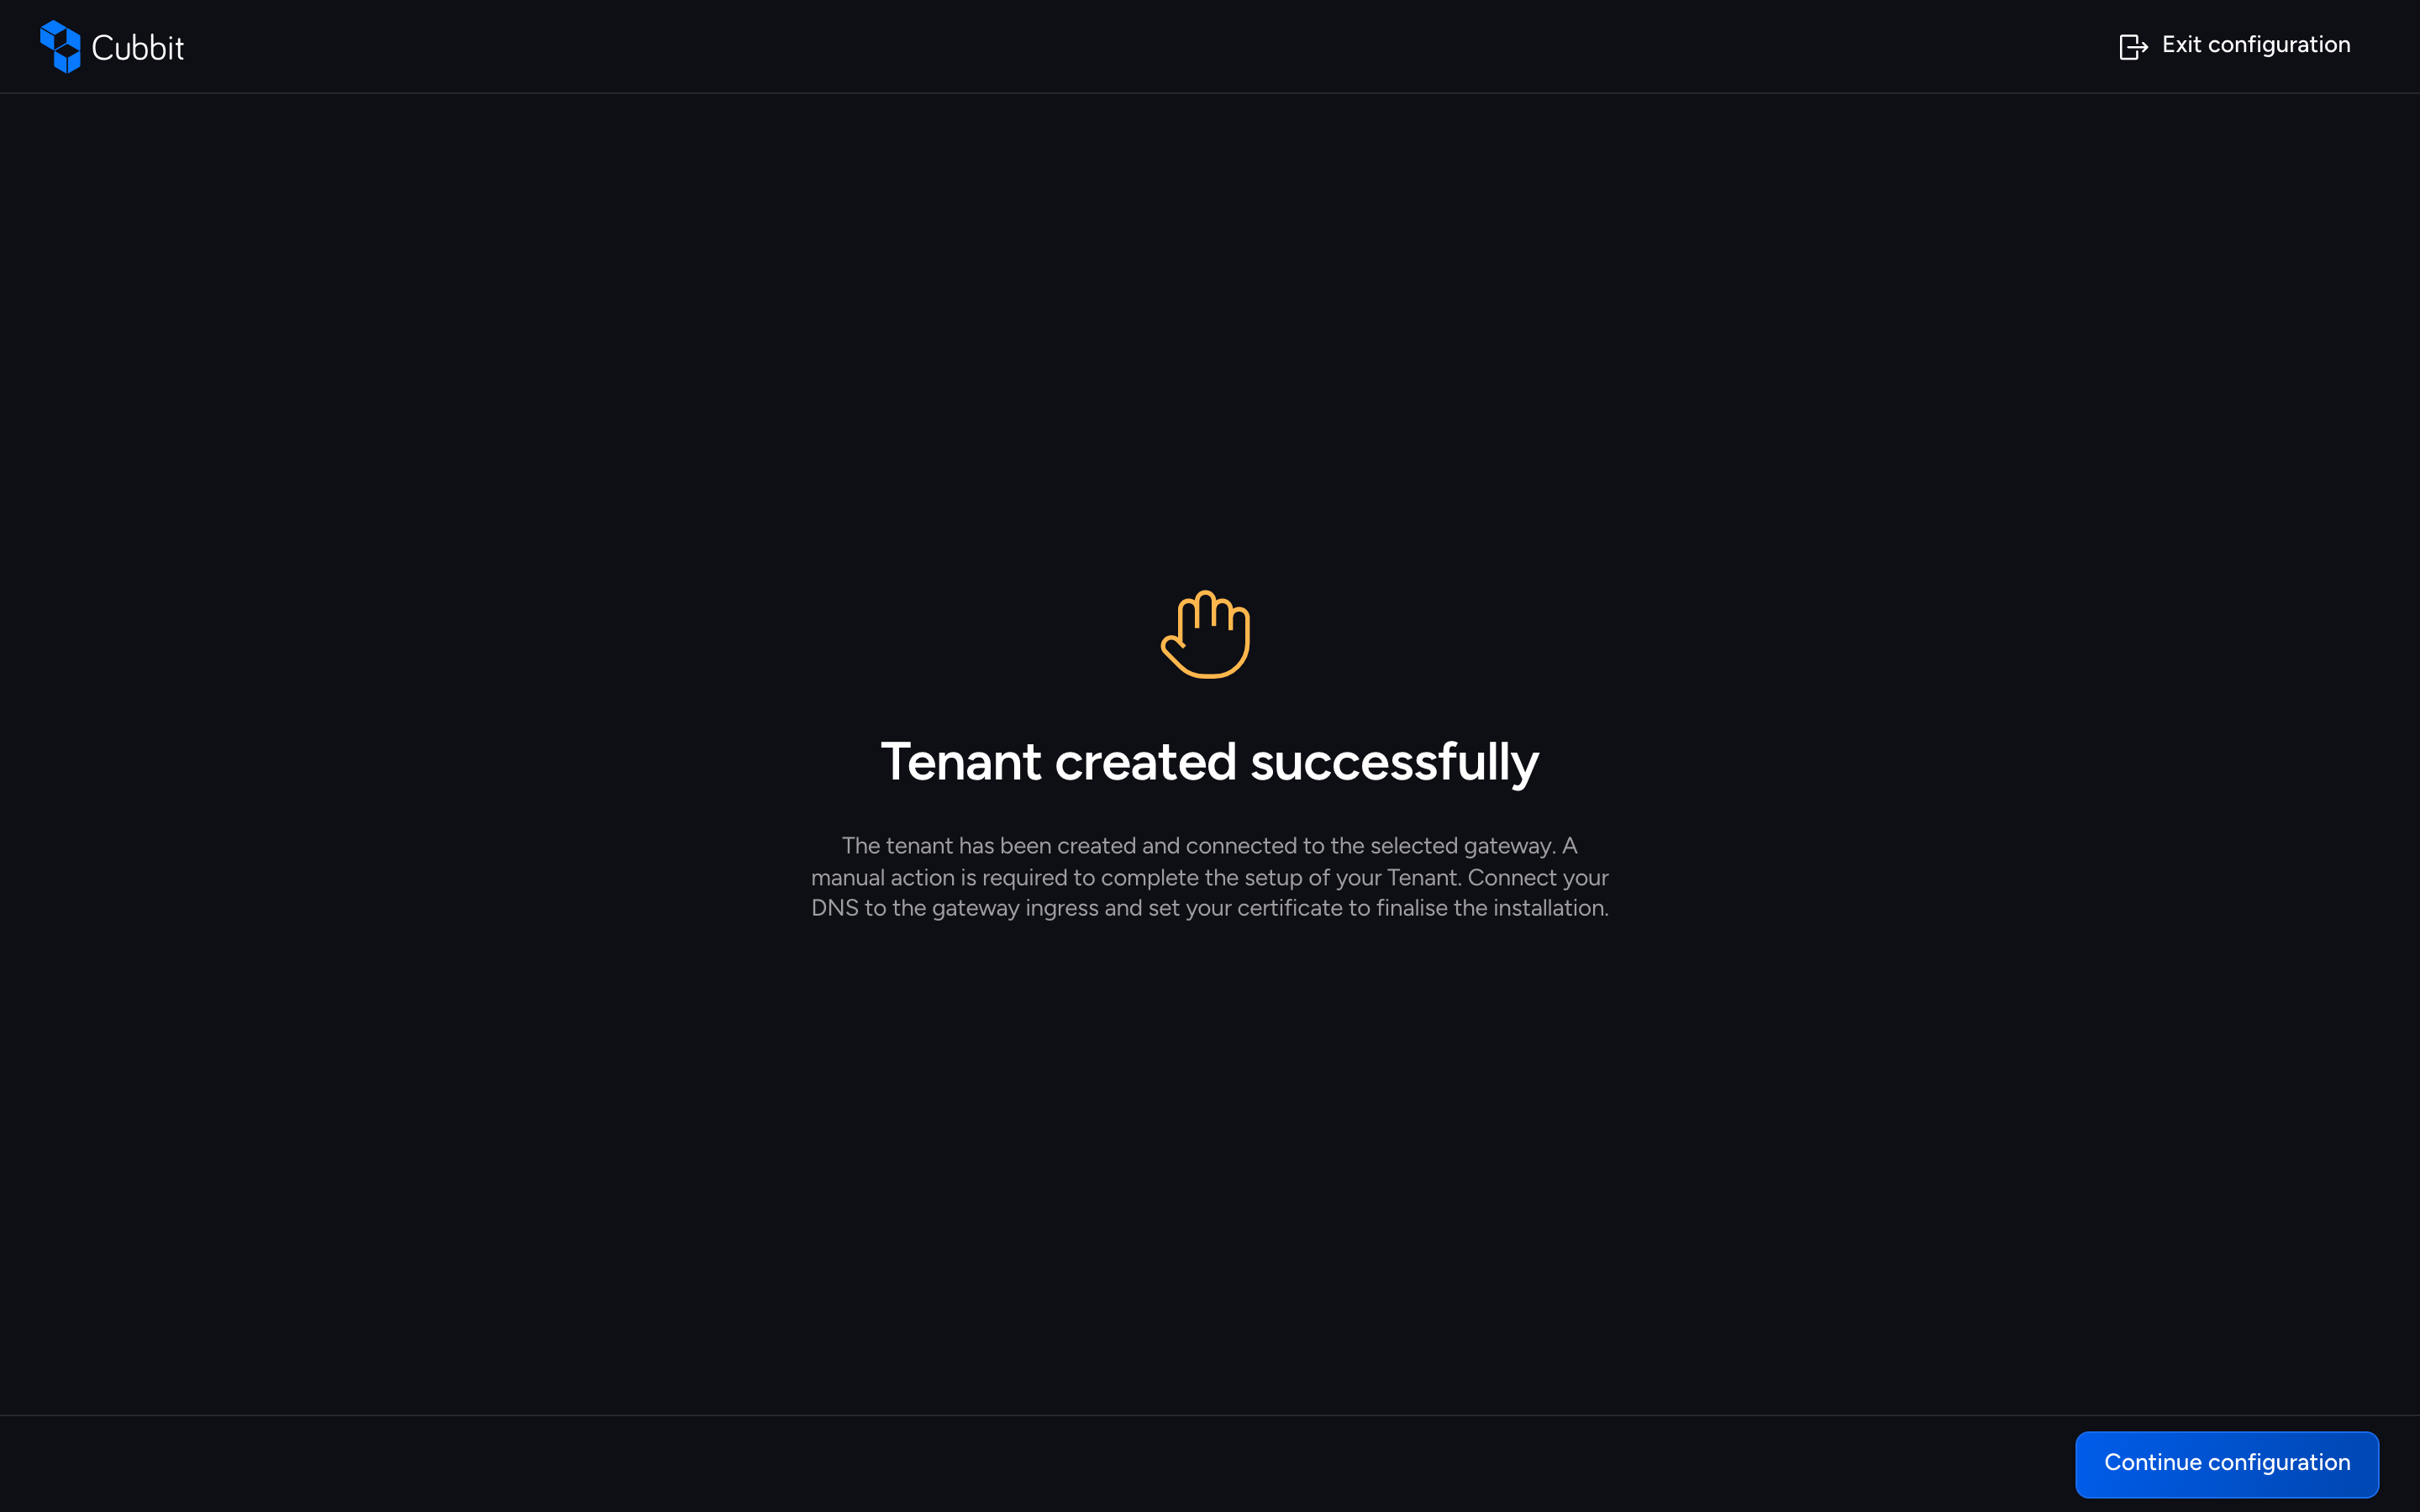
Domain DNS Step
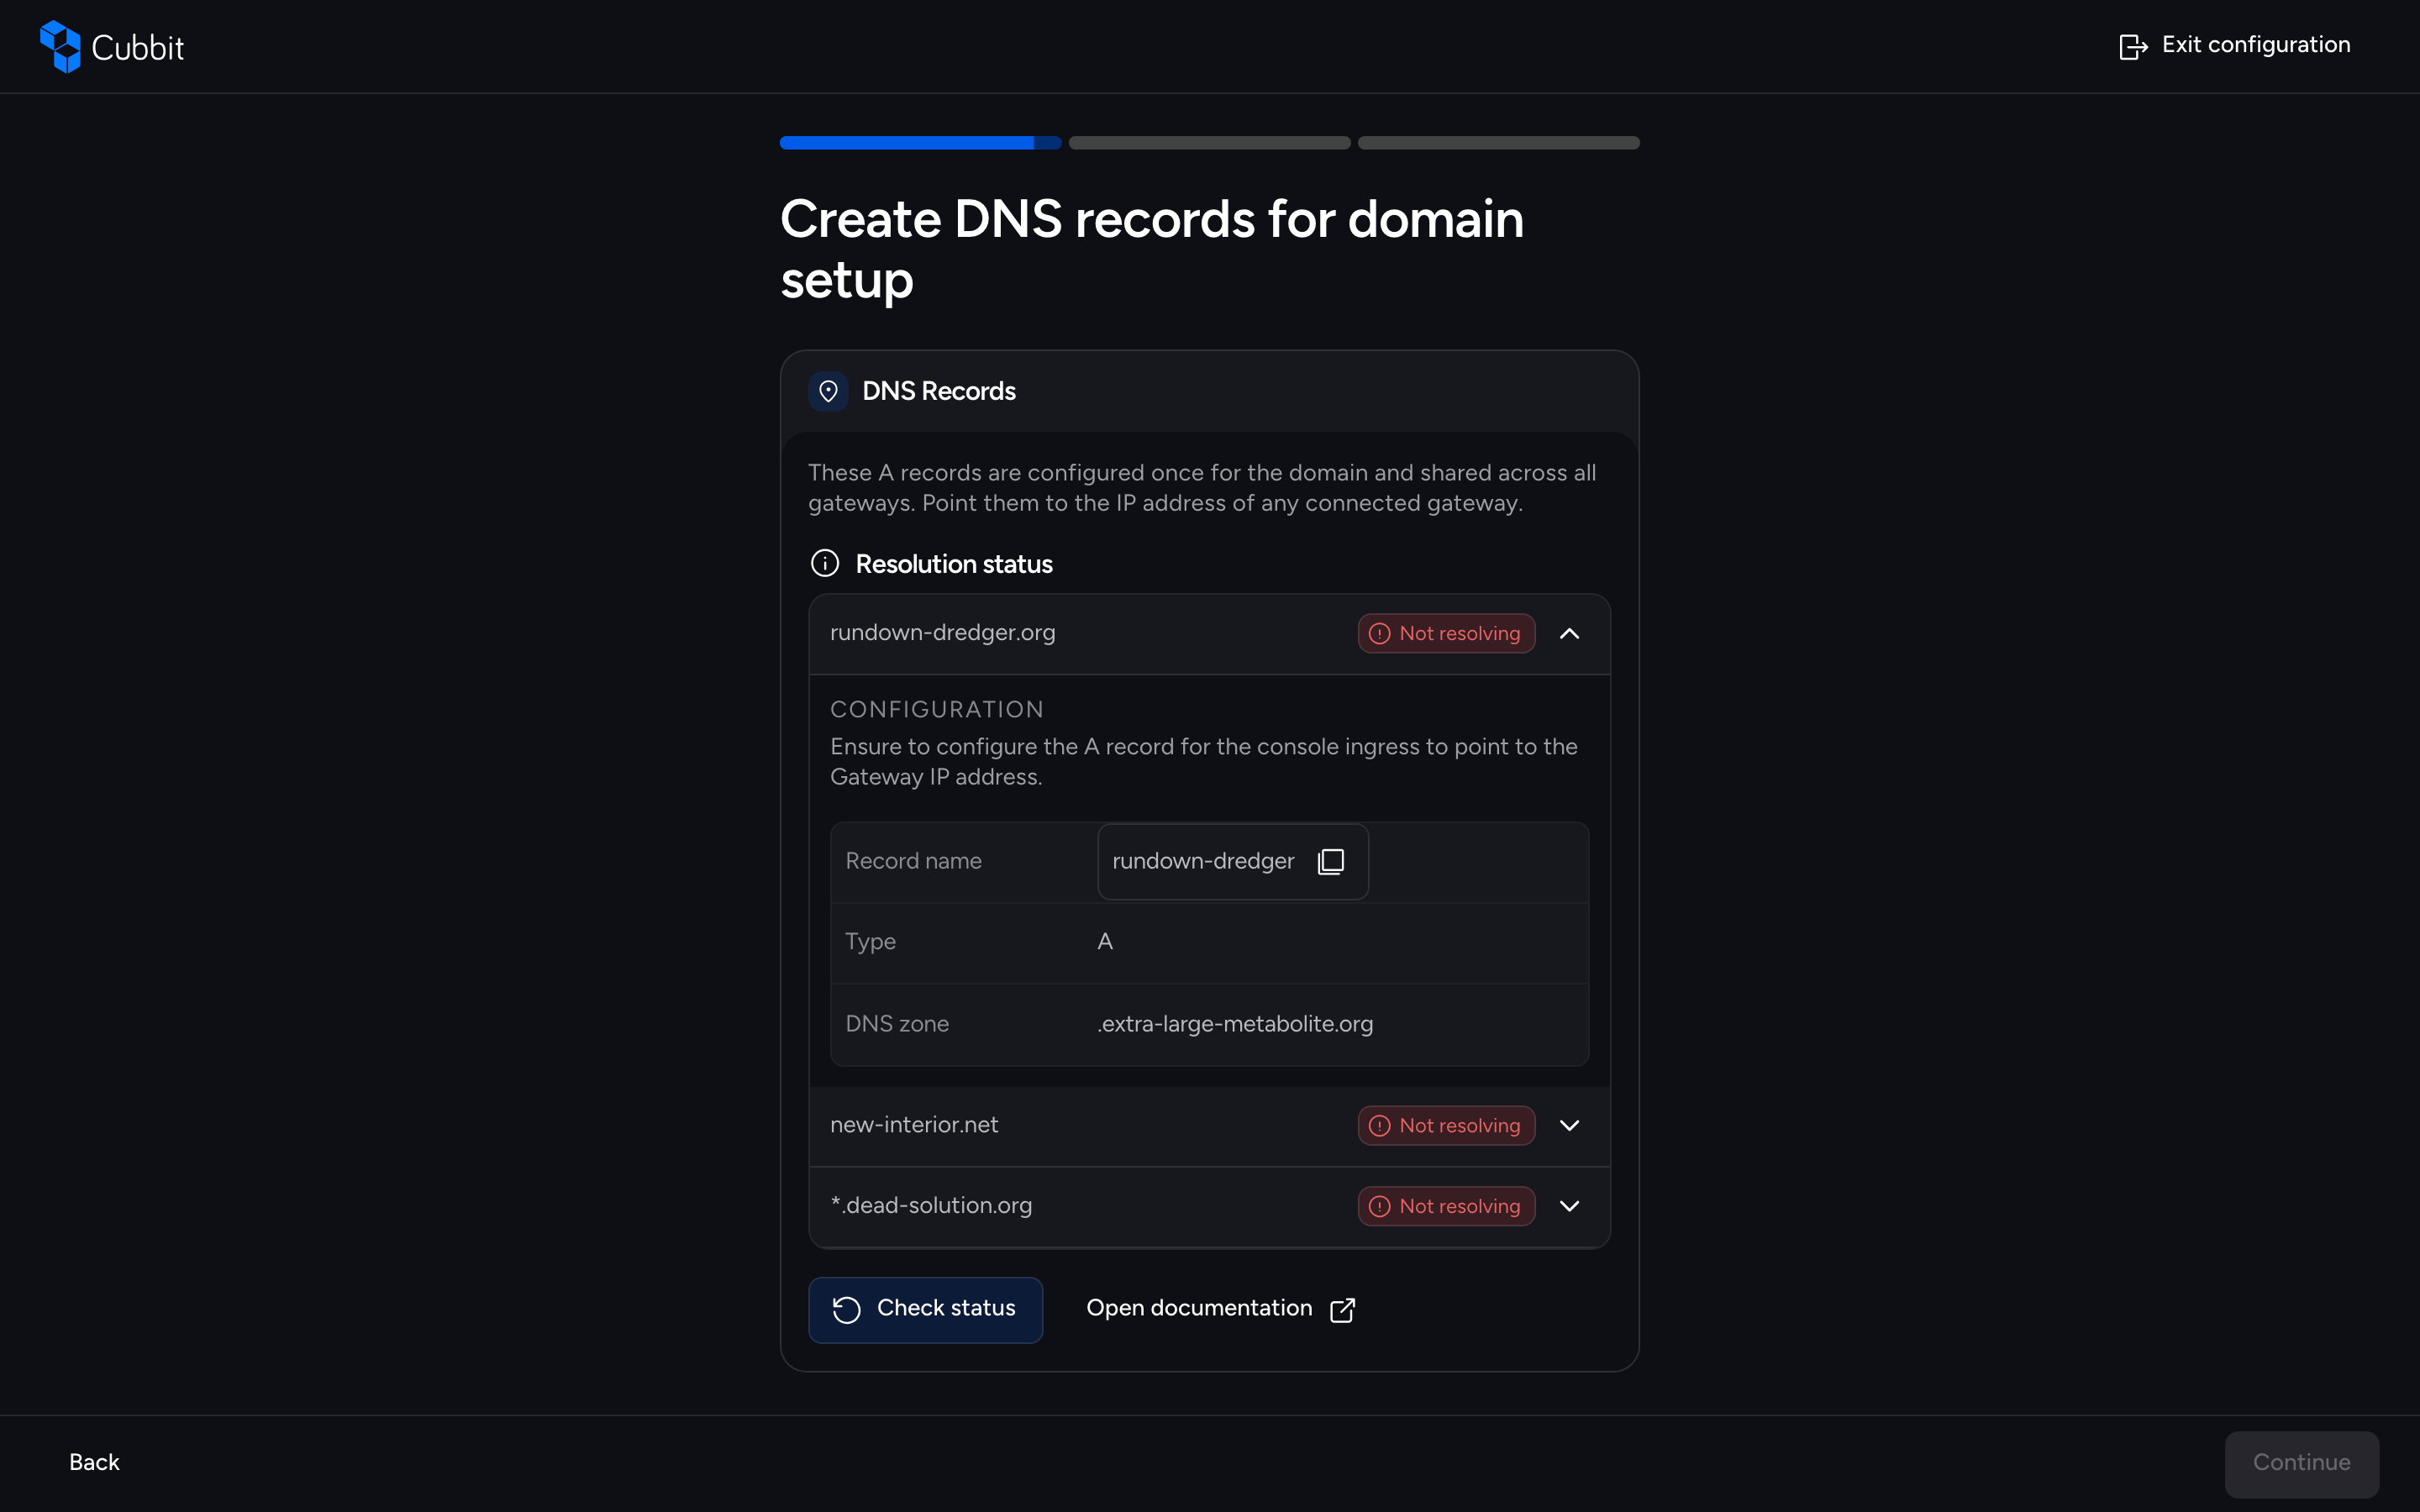
This step shows the three shared A records for the domain (console, path-style S3, and bucket-style S3 hostnames), configured once for the domain and shared across all gateways. Each record displays its own status with the exact name and value to create at your DNS provider. Click Check status to re-verify the records live: Continue unlocks only when every record resolves.
Gateway DNS Step
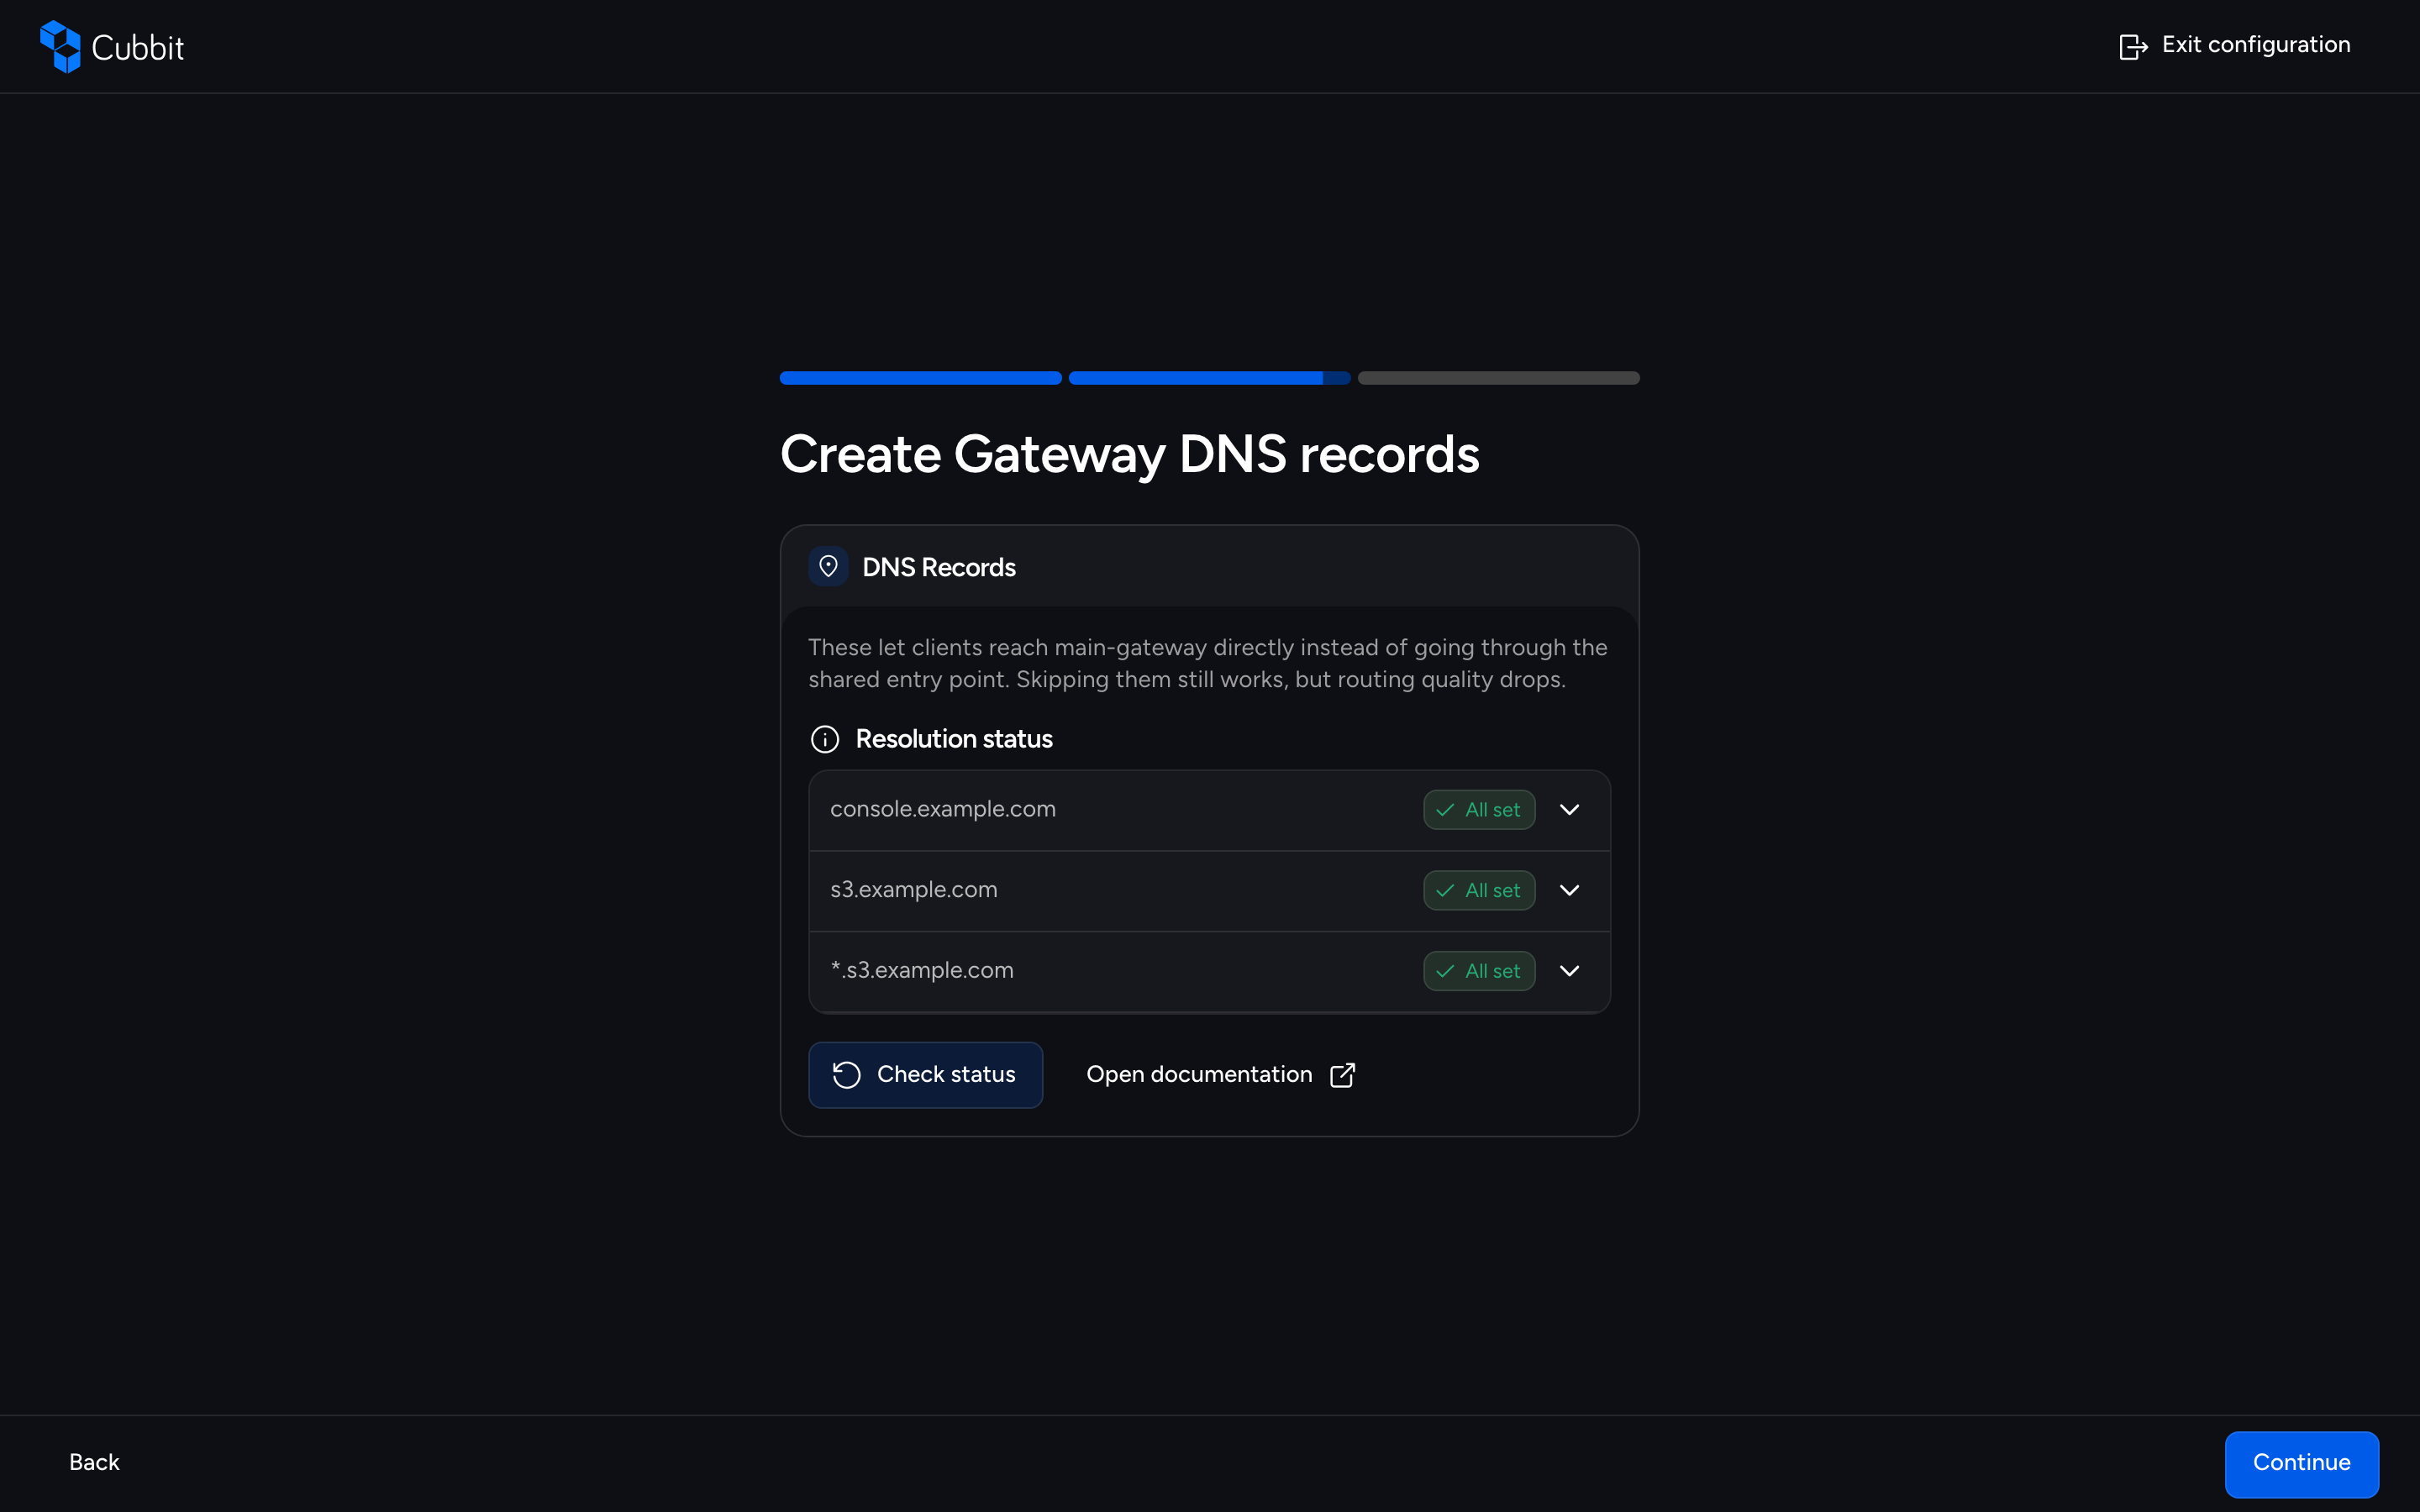
This step shows the gateway-scoped A records — hostnames that include the gateway slug so clients can reach the gateway directly instead of going through the shared entry point. They follow the same pattern: per-record statuses and Check status, and Continue unlocks only when every record resolves.
TLS Certificates Step
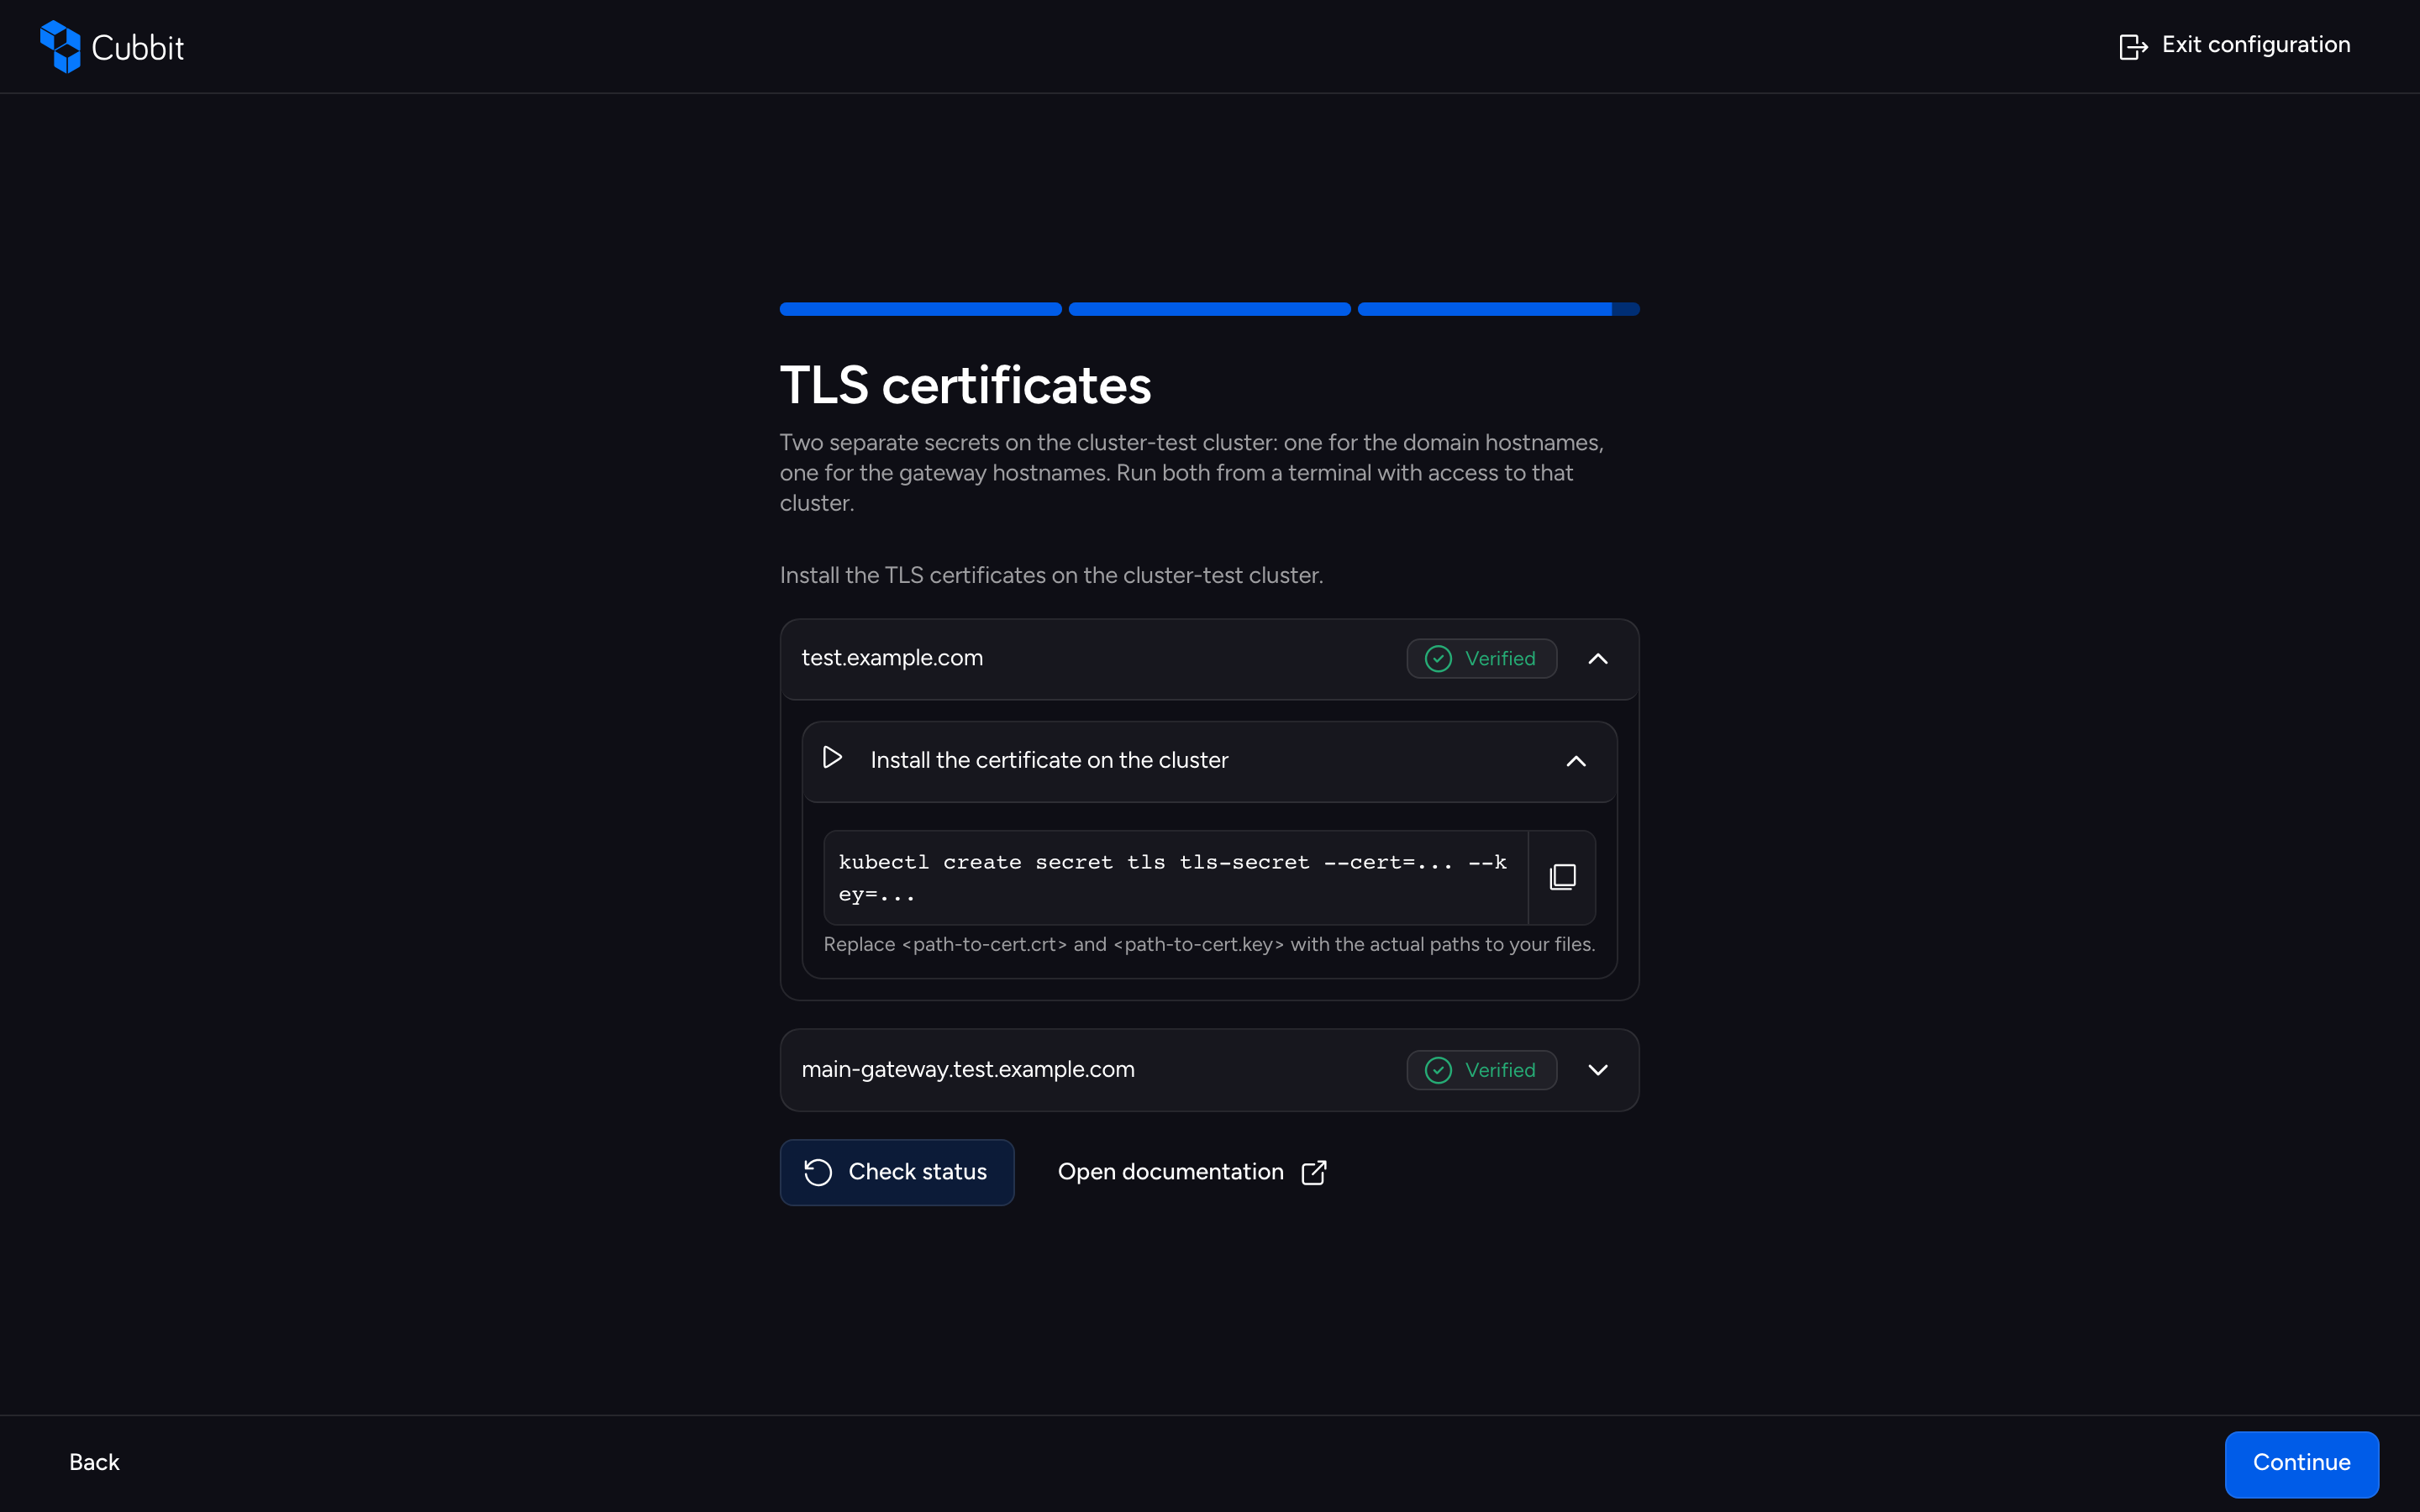
This step shows two certificate cards — one for the domain hostnames and one for the gateway hostnames — each with its verification status and a copyable kubectl install command to run from a terminal with access to the cluster. Each card reports the hostname, the certificate status (verified live through Check status), and the install command; the two secrets must both be installed on the cluster before Continue unlocks.
Completion
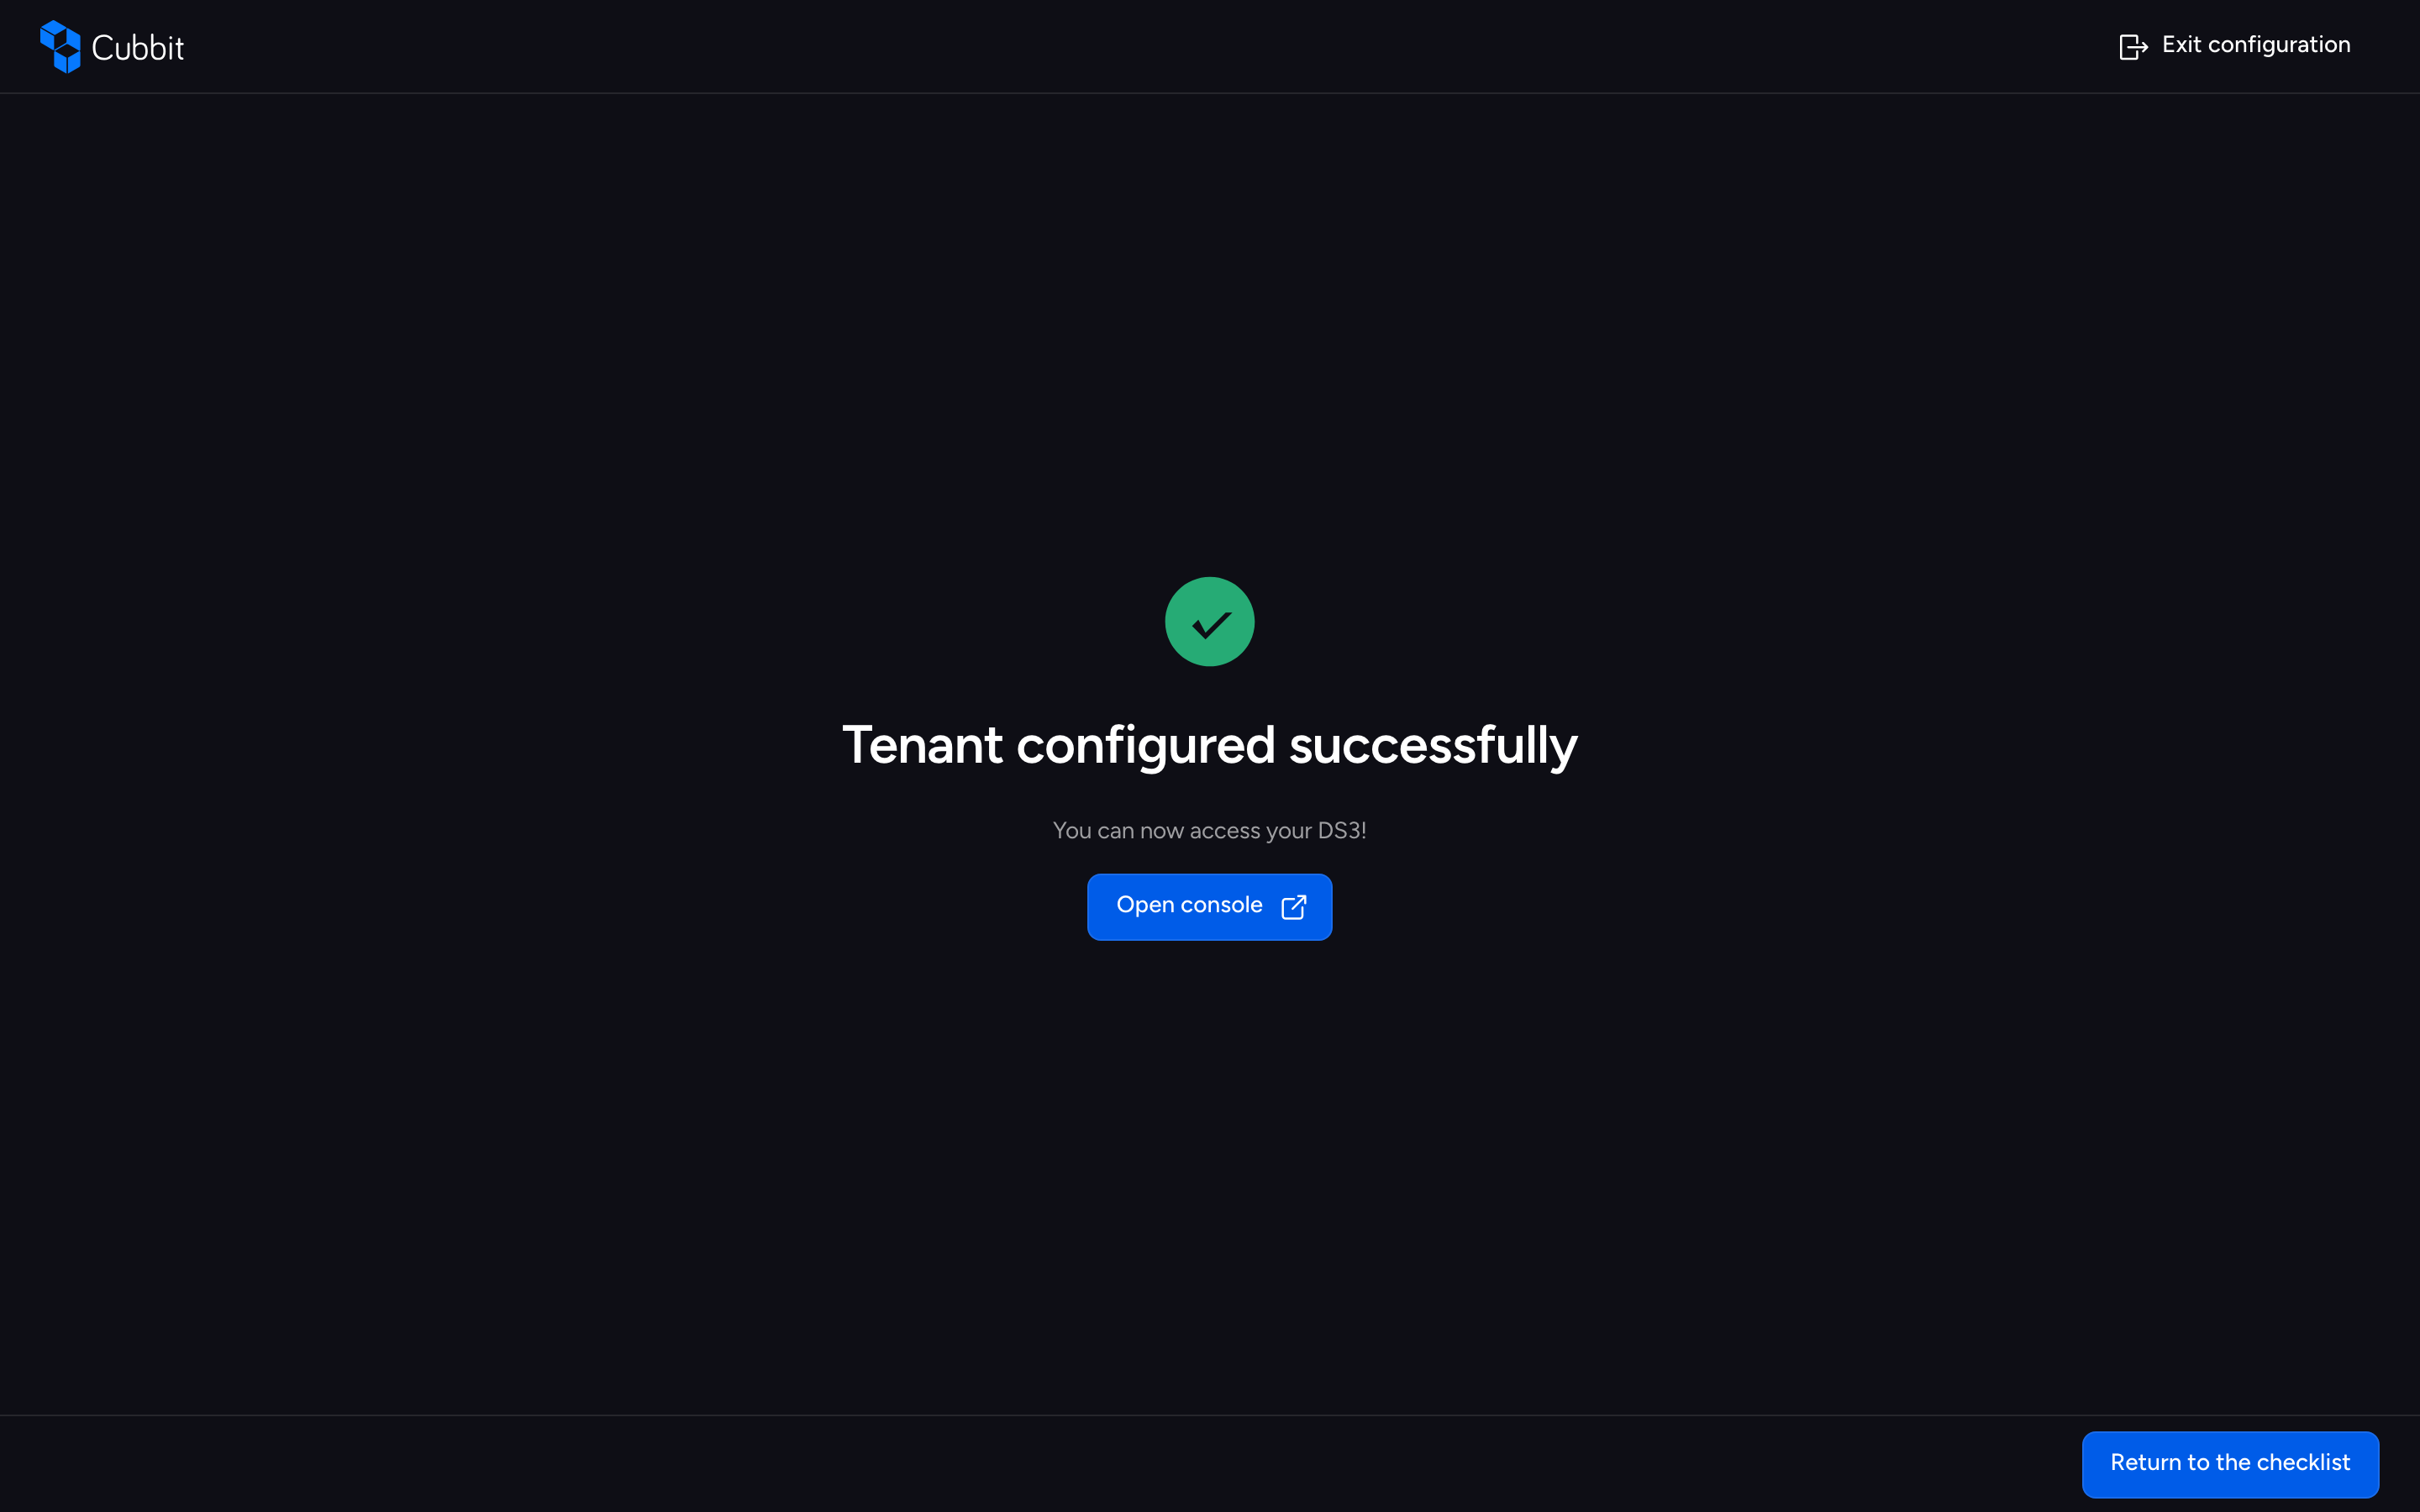
When everything is verified, the completion screen confirms the tenant is configured: Open console opens the DS3 console for the tenant, and Return to the checklist goes back to the onboarding checklist (which refreshes to show the tenant step as done).
Refreshing or Leaving Mid-Flow
- Continue is gated on each step's live verification: DNS and TLS steps enable it only once every record or certificate on that step reports a good status, refreshed through Check status.
- Back navigates between the steps (TLS back to Gateway DNS, Gateway DNS back to Domain DNS, Domain DNS back to the success screen) without re-creating anything.
- A page refresh mid-flow restores the step you were on: the in-progress setup is persisted client-side (sessionStorage) for 2 hours, and the already-created tenant is never lost. If the persisted entry has expired or is unreadable, the wizard returns to the tenant creation form; the tenant created so far is kept, and you can also finish its DNS and TLS configuration from the tenant's Connections page (see the Tenant Connections DNS and TLS guide). If the saved setup exists but its connection can't be loaded, the wizard clears the saved setup, shows the restore error, and returns you to the checklist.
How This Differs from the Regular Tenant Flow
The regular (non-wizard) tenant creation runs from the Tenants page as a 3-segment overlay: base information, Select Domains (multiple domains, each with an optional subdomain, plus an "Add new domain" drawer), and Select Gateways (multiple gateways), followed by a success screen that hands manual gateways off to the tenant connections page. The wizard creates a tenant from exactly one domain and one gateway in a single merged segment, and folds the DNS record and TLS certificate setup directly into the flow instead of deferring it.
For the full DNS record and TLS certificate reference (also used for managing connections later), see the Tenant Connections DNS and TLS guide. For the regular flow, see the Tenant Creation guide.
Step 6 - Create your IAM Users
This step invites the colleagues who will share access to the organization. You can add users one by one with the interactive form or upload a CSV file for bulk creation; users are staged before you confirm with Add users. On success, Return to the checklist brings you back to the wizard.
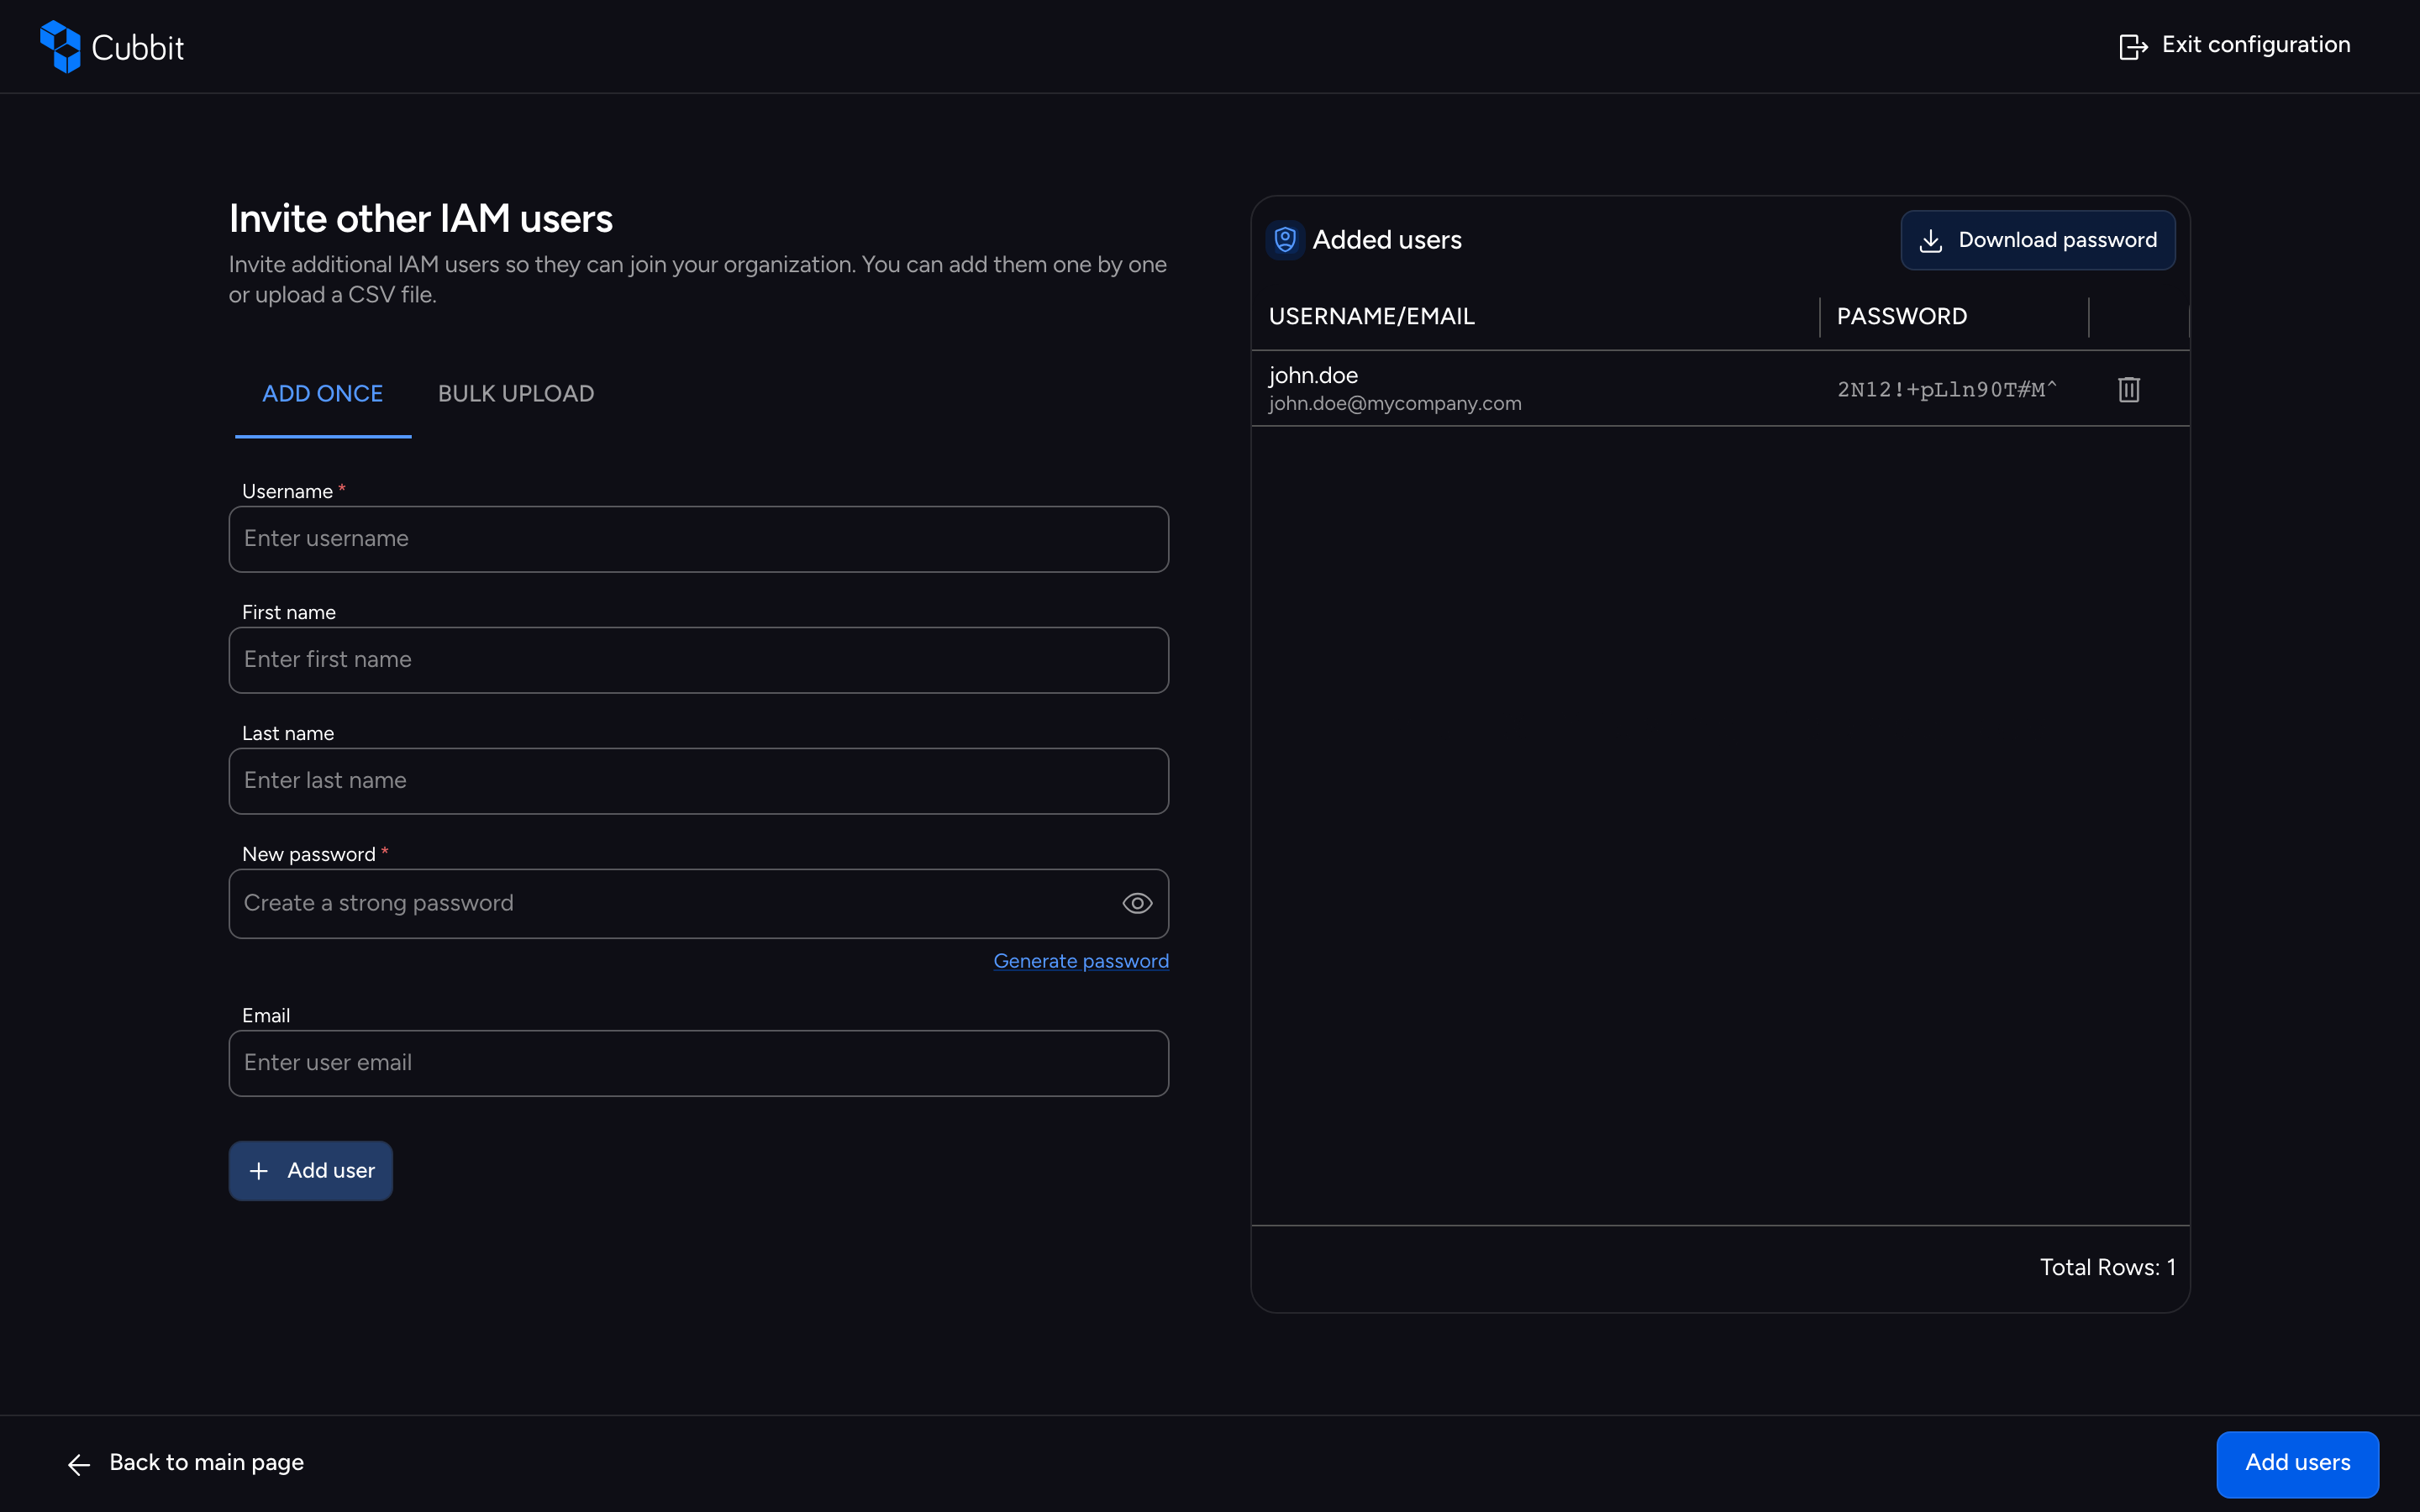
The step completes as soon as the organization contains at least one invited IAM user. For the full walkthrough (user details, settings, and API keys), see the Users management; invited users sign in as described in the Sign In Guide.
When every checklist task is complete, the wizard marks each step as Done and offers Start exploring the Composer to head to the dashboard:
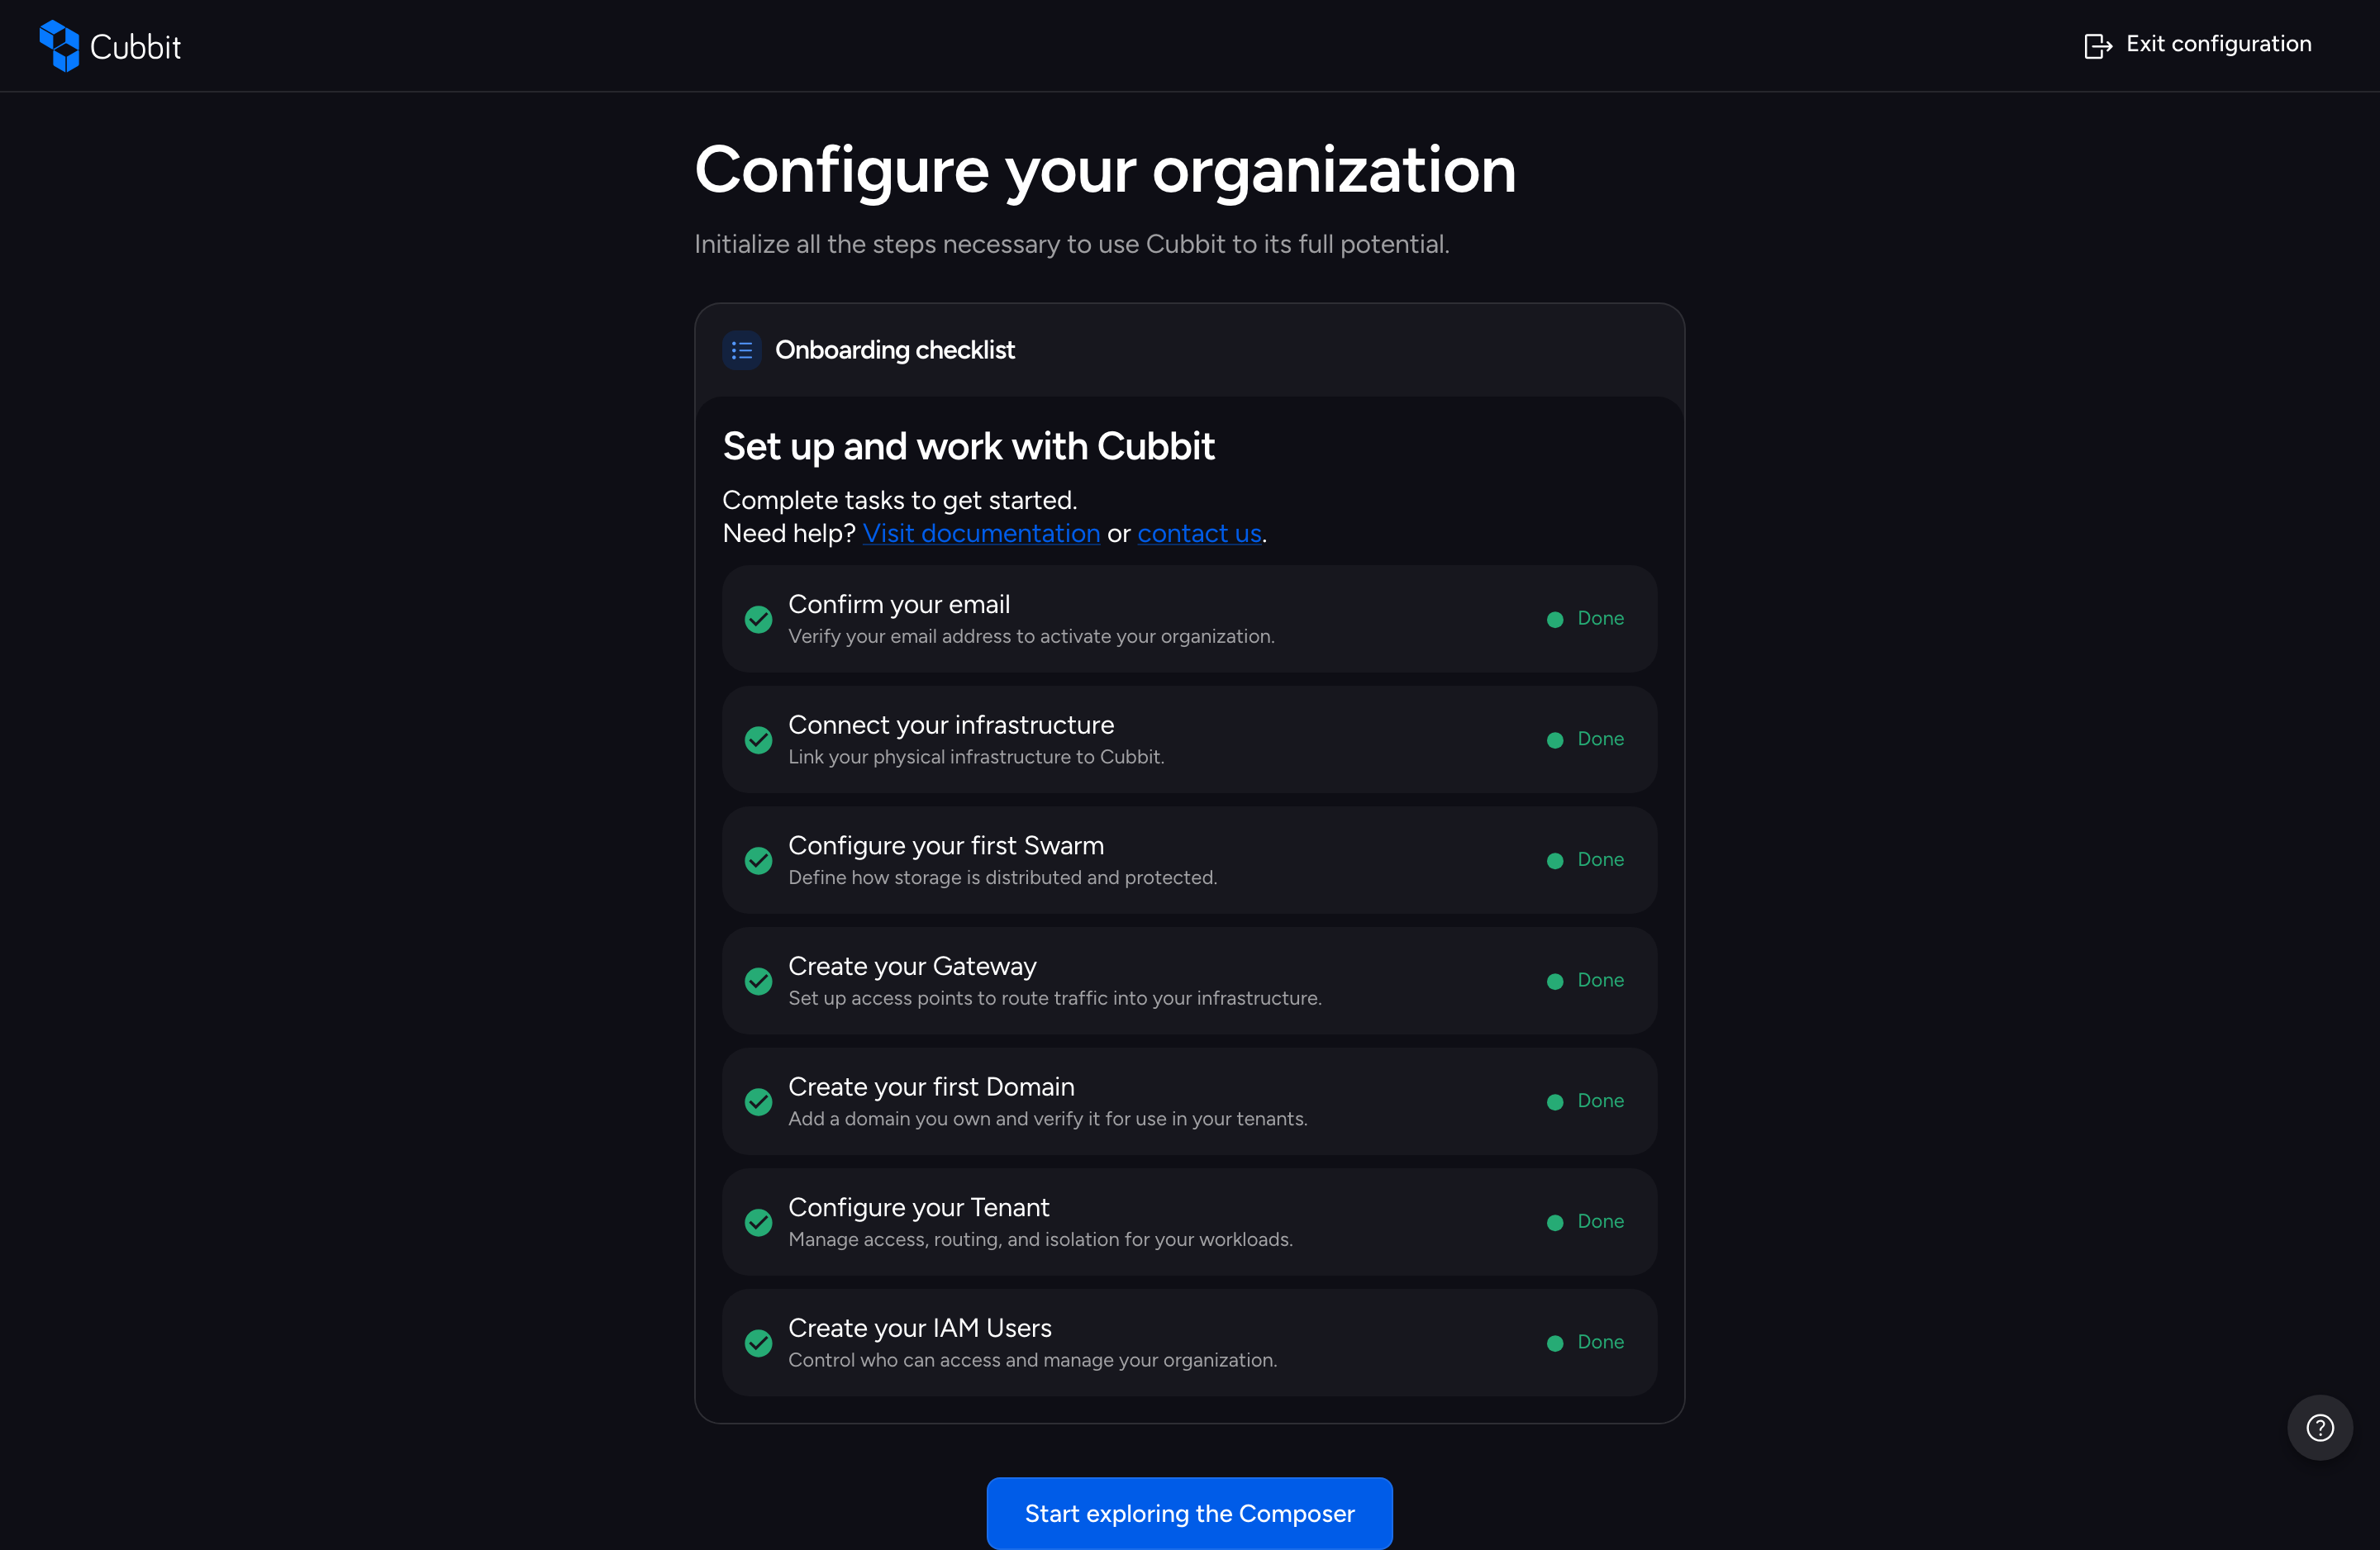
Onboarding complete
You have finished the onboarding wizard. Every checklist task is marked Done, and your Composer environment is ready to use.
The remaining sections are reference material: Next Steps for post-onboarding tasks and Troubleshooting for issues.
Next Steps
- Manage your IAM users: follow the Users management for user settings and API keys
- Manage tenant connections: use the Tenant Connections DNS and TLS guide to inspect and maintain DNS records and certificates after onboarding
- Grow your infrastructure: add more locations, swarms, and gateways with the Add Infrastructure, Swarm Creation, and Gateway Creation guides
Troubleshooting
This section is support documentation, not an onboarding step. Use it if you encounter an issue during or after setup.
Common Errors
| Error | Cause | Fix |
|---|---|---|
| "Waiting for cluster connection…" never resolves | The setup command was not run on the cluster, or the cluster cannot reach the platform | Re-run the setup command with the correct kubectl context (see the Add Infrastructure guide); the monitor screen updates by itself, no refresh needed |
| Domain verification fails ("Verification failed. Check DNS configuration and try again.") | The _cubbit-challenge TXT record is missing or DNS has not propagated | Add the TXT record at your DNS provider and retry after propagation |
| "A swarm with the same name already exists." | Name conflict with an existing Swarm | Choose a different name |
| "A Tenant with the same slug already exists in this organization." | Slug conflict with an existing tenant | Choose a different name or slug (pattern: ^[a-z0-9]([a-z0-9-]*[a-z])?$) |
| "There are validation errors in the form" | Field validation failed (slug format, missing required fields) | Review the highlighted fields and correct the input |
| "You don't have permission to create a tenant." | Your account lacks the required permissions | Contact your organization administrator to grant access |
| DNS records stuck on a failed status after Check status | Records missing, wrong values, or DNS not yet propagated | Compare the created records with the values shown on the step and retry Check status; see the Tenant Connections DNS and TLS guide for status meanings |
| "We couldn't restore your tenant configuration. Please start again." | The saved mid-flow setup could not be restored (for example, the tenant's connection could not be loaded) | The tenant created so far is kept — the segment cannot be restarted; complete its DNS and TLS configuration from the tenant's Connections page (see the Tenant Connections DNS and TLS guide) |
| "No gateway available" after tenant creation | The tenant has no gateway connected, so its DNS and TLS cannot be completed | The tenant is kept. Clicking Start again clears the saved setup and returns you to the checklist |