Migrate a legacy Gateway
A legacy Gateway is installed by the standalone installer on its own machines, where it runs a small Kubernetes cluster. The installer creates one Gateway for one Tenant and one domain; some installations add a custom ingress, so the same Gateway also serves other Tenants. Composer now runs Gateways as Kubernetes workloads inside a cluster connected to the organization, so the Gateway is recreated as a Composer-managed Gateway and then re-attached to the Tenant connections.
The cluster does not change: the procedure removes the legacy Gateway and the namespaces it
created from that cluster, keeping the cubbit namespace, then connects the same cluster to the
organization and deploys the new Gateway on it. One kubeconfig is enough for the whole runbook,
because steps 0 to 7 all target the same cluster.
The Tenant data does not move: buckets and objects stay where they are, and this procedure only replaces the Gateway that exposes them.
Uninstalling the legacy Gateway takes the Tenant offline: the console and the S3 endpoint of that domain stop serving until the new Gateway is running and its certificate is uploaded. Plan a maintenance window and notify the Tenant's users.
Scope
- Migrate one Gateway at a time. A Gateway is installed for one Tenant and one domain; when a custom ingress makes it serve other Tenants too, step 6 is repeated for each of those Tenants.
- You need the parameters used to install the legacy Gateway (Tenant name and ID, domain, Gateway ID and secret), the cluster that runs it and will host the new Gateway, and the TLS certificate currently used for the domain.
- Nothing is deleted from the Tenant data. The legacy Gateway and the Kubernetes Gateway are two ways to expose the same buckets, and a canary object proves it.
- The legacy Gateway stays as a separate record in the organization, so the new Gateway needs its own name and slug (step 5).
Before you start
kubectlis installed on the workstation you use, and the kubeconfig of the cluster that runs the legacy Gateway is exported (KUBECONFIG). The new Gateway is deployed on the same cluster, so you do not switch context during the procedure. If Kubernetes is reinstalled on those machines as part of the migration, re-exportKUBECONFIGafterwards, because the file path can change.- You have the legacy installer parameters and the Gateway secret at hand. If you do not, step 0 recovers each value from the legacy management portal or from the cluster while the old Gateway is still installed: the new Composer does not display them.
- You have an S3 client and the credentials of the Tenant served by the Gateway. Step 0 uploads a canary object and the verification downloads it again.
- You have the certificate files for the domain,
fullchain.pemandprivkey.pem, or you can extract them from the cluster while the legacy Gateway is installed. If the certificate is expired or does not cover the domain, issue a new one before you start: see the Domain & TLS (recommended) section of How to install DS3 Gateway. - You scheduled the maintenance window.
Step 0 - Canary, cluster backup and installer parameters
Before you touch the Gateway, upload one object whose checksum you keep. At the end of the procedure you download it again and compare the checksum: it proves that the new Gateway serves exactly the same bytes as the legacy one.
Create a dedicated bucket for the migration, create a file with random content, record its checksum and upload it:
# bucket names are unique per tenant, so <bucket> must be a new name
aws --endpoint-url https://<s3-endpoint> s3 mb s3://<bucket>

head -c 1048576 /dev/urandom > canary.bin
sha256sum canary.bin | tee canary.sha256
aws --endpoint-url https://<s3-endpoint> s3 cp canary.bin s3://<bucket>/migration-canary/canary.bin
Do not write into a bucket the Tenant already uses: a dedicated bucket keeps the canary
recognisable and lets you delete it with aws s3 rb --force once the migration is verified.
Download the object once and compare the two digests. This is the baseline: if the S3 endpoint, the credentials or the bucket are wrong you find out now, before the maintenance window.
aws --endpoint-url https://<s3-endpoint> s3 cp s3://<bucket>/migration-canary/canary.bin canary-before.bin
sha256sum canary.bin canary-before.bin
The two hashes must be identical. The final check compares the object served by the new Gateway
against canary.sha256.
Random content is intentional: it cannot be compressed or deduplicated, so the check covers
what the Gateway actually stores and returns. Keep canary.sha256: it is the reference for
the final check. Any S3 client works (aws, s3cmd, rclone); the commands here use the
AWS CLI as an example.
This step is mandatory. Without the canary you cannot prove, after the migration, that the data served by the new Gateway is bit-identical to the data served by the legacy one.
Back up ConfigMaps, Secrets and Ingress
The clean-up in step 2 removes the legacy namespaces. Save the ConfigMaps, Secrets and Ingress they contain while the cluster is still untouched: the manifests themselves are regenerated if you reinstall the Gateway, but the deployed TLS certificates, any manual override and the exact state of the cluster before the migration are not, and they are what you inspect or restore if the uninstall has to be reverted or investigated.
Run the commands from the workstation that has the kubeconfig of the cluster:
mkdir -p gateway-backup

kubectl get configmap,secret,ingress -n cubbit --ignore-not-found -o yaml \
  > gateway-backup/cubbit-cm-secret-ingress.yaml
kubectl get configmap,secret,ingress -n nginx --ignore-not-found -o yaml \
  > gateway-backup/nginx-cm-secret-ingress.yaml
kubectl get configmap,secret,ingress -n init --ignore-not-found -o yaml \
  > gateway-backup/init-cm-secret-ingress.yaml
Check that each dump contains objects and not just the empty list header:
grep -c '^kind:' gateway-backup/*.yaml || true
wc -l gateway-backup/*.yaml
Empty dumps are accepted: they mean the namespace does not exist in this cluster. The namespaces that the legacy installation created must be in the backup.
The dumps contain the Gateway secret and the TLS private keys in clear text, under the
data and stringData fields of the Secret objects. Keep gateway-backup/ on an encrypted
disk, never share it, and delete it once the migration is verified.
Recover the installer parameters
The uninstaller in step 1 needs the six values used at install time, and it needs them exact: it deletes the resources by the names it rebuilds from those values. The installer keeps no configuration file on disk, so recover the values from the objects the installer created. Until step 2 removes the namespaces, all six are readable from the cluster:
export KUBECONFIG="$HOME/.kube/kubeconfig-<cluster-name>.yaml"

# gateway ID, gateway secret and coordinator domain
kubectl -n cubbit get deployment diplomat -o yaml \
  | grep -E 'GATEWAY_(ID|SECRET)|COMPOSER_HUB_SERVICE_ADDRESS'

# tenant name, tenant ID, domain and coordinator domain
kubectl -n cubbit get ingress -o yaml \
  | grep -E 'x-cbt-tenant-(id|name)|cors-allow-origin|- host:'
| Uninstaller flag | Where the value comes from |
|---|---|
--gateway-id | The GATEWAY_ID environment variable of the diplomat deployment in the cubbit namespace (the topology-push CronJob carries the same value). |
--gateway-secret | GATEWAY_SECRET in the same deployment and CronJob, where it is stored in clear text. |
--tenant-id | Annotation x-cbt-tenant-id of the console.<domain> and s3.<domain> Ingresses. |
--tenant-name | Annotation x-cbt-tenant-name of the same Ingresses. It is also the suffix of the cert-console-<tenant-name>, cert-gw-<tenant-name> and cert-gw-wc-<tenant-name> Secrets (kubectl -n cubbit get secret). |
--domain | The host: of the same Ingresses, without the console. or s3. prefix. |
--coordinator-domain | COMPOSER_HUB_SERVICE_ADDRESS=https://api.<coordinator-domain>/composer-hub in the diplomat deployment, or the cors-allow-origin annotation of the Ingresses, without the leading https://*. and the trailing slash. |
If a lookup returns nothing, the namespace does not exist, so check the kube context before assuming the Gateway was already uninstalled.
Recover the certificate from the cluster
The installer keeps the TLS material of the domain in the cubbit namespace, one Secret per
endpoint: cert-console-<tenant-name> for the console, cert-gw-<tenant-name> for the S3
endpoint and cert-gw-wc-<tenant-name> for the wildcard S3 hostnames. If you do not have
fullchain.pem and privkey.pem, extract them from the cluster while the legacy Gateway is
still installed.
List the certificates and check which domain each one covers:
kubectl -n cubbit get secret | grep '^cert-'

for secret in $(kubectl -n cubbit get secret -o name | grep '/cert-'); do
  echo "== ${secret#secret/}"
  kubectl -n cubbit get "$secret" -o jsonpath='{.data.tls\.crt}' \
    | base64 -d | openssl x509 -noout -subject -ext subjectAltName
done
Use the Secret whose subjectAltName lists console.<domain>, s3.<domain> and
*.s3.<domain>, and write the two files the new Gateway needs:
kubectl -n cubbit get secret cert-gw-<tenant-name> -o jsonpath='{.data.tls\.crt}' \
  | base64 -d > fullchain.pem
kubectl -n cubbit get secret cert-gw-<tenant-name> -o jsonpath='{.data.tls\.key}' \
  | base64 -d > privkey.pem
tls.crt already contains the full chain, so it is the fullchain.pem the Composer expects.
Do this before step 2: deleting the namespaces removes the Secrets that hold the certificate.
Step 1 - Uninstall the legacy Gateway
Run this step only inside the scheduled maintenance window. The Tenant is offline from the end of the uninstaller until the new certificate is uploaded in step 7.
Run the uninstaller with the same parameters used for the installation:
curl -fSsL https://installer.s3.cubbit.eu/gateway/installer.sh | bash -s -- \
  --uninstall --yes \
  --tenant-name <tenant-name> \
  --tenant-id <tenant-id> \
  --domain <domain> \
  --coordinator-domain <coordinator-domain> \
  --gateway-id <gateway-id> \
  --gateway-secret <gateway-secret>
--uninstall removes the Gateway workloads and --yes makes the command non-interactive. Keep
the values identical to the original installation, otherwise the uninstaller looks for the wrong
resources.
Run the uninstall once, with the values of the Tenant the Gateway was installed for. The other Tenants that reach the Gateway through a custom ingress need no uninstall: the new Gateway is attached to their connections in step 6.
From this point the Tenant is offline: the domain serves nothing until the new certificate is uploaded in step 7, so continue with steps 3 to 7 without interruption.
Verify that the Gateway no longer serves the domain: the console and the S3 endpoint of
<domain> are unreachable, and no Gateway pod is left running in the cubbit namespace. The
leftover namespaces are removed in step 2.
Step 2 - Clean up the cluster
Remove the namespaces left behind by the legacy installation. Their ConfigMaps, Secrets and
Ingress are already in gateway-backup/ from step 0, so nothing is lost here:
kubectl delete namespace nginx --ignore-not-found
kubectl delete namespace init --ignore-not-found
Do not delete the cubbit namespace: it also hosts the swarm operators and the agents when the
swarm was already migrated on this cluster. Delete only the Ingress objects that the legacy
Gateway left behind, so that the domain is free again for the new Gateway:
for ingress in $(kubectl -n cubbit get ingress -o name); do
  kubectl -n cubbit delete "$ingress"
done
Confirm that the namespace has no Ingress left:
kubectl -n cubbit get ingress
Remove the legacy gateway ConfigMaps from cubbit
These steps remove the ConfigMaps left by the legacy private gateway installation. If they are left in place, the new gateway installation fails or its offloader pods crash-loop.
The legacy installation leaves these ConfigMaps in cubbit:
foundation-configproxy-configoffloader-configoffloader-init-scriptoffloader-operator-cmgateway-operator-cmgods3-configgods3-configmap-envswebapp-configmap-envs
Delete the ones still present:
kubectl -n cubbit get configmap -l 'app.kubernetes.io/managed-by!=operator-inventory' -o name \
  | grep -E '/(foundation-config|proxy-config|offloader-config|offloader-init-script|offloader-operator-cm|gateway-operator-cm|gods3-config|gods3-configmap-envs|webapp-configmap-envs)$' \
  | xargs -r -n1 kubectl -n cubbit delete
Delete these Secrets as well:
kubectl -n cubbit delete secret composer-hub-secret gods3-application-secret --ignore-not-found
Every deleted object is in the step 0 backup: see Rollback to restore it.
The commands above target only the gateway ConfigMaps, they do not touch the ConfigMaps used by the swarm or by the agents on the same cluster.
Step 3 - Open the Composer UI
Open the Composer at https://composer.cubbit.eu and sign in as an Organization owner. The Composer shows the organization, its clusters, its Gateways and its Tenants.
Step 4 - Connect the cluster
Open Infrastructure in the Composer and look for the cluster that runs the legacy Gateway.
- The cluster is listed and connected. This is the case when the swarm on the cluster was already migrated: the cluster is already part of the organization and its manager operator is running, so skip this step and continue with step 5.
- The cluster is not listed. It is not connected to the organization yet: follow the rest of this step to connect it.
To connect the cluster, use the command the Composer generates; do not write it by hand. From the infrastructure area of the Composer, open Add new location, select physical location and copy the one-time connect command shown in the modal.
Run the command copied from the modal on a machine with admin kubectl access to the cluster
cleaned in step 2.
The command installs the manager operator on the cluster, announces the cluster to Composer —
which binds it to the organization so that Gateways can be deployed on it — and installs the
node-scanner profile. See the
Add an infrastructure location guide
for details and additional flags (for example --connect-kubeconfig-path for a dedicated
kubeconfig).
Confirm that the cluster appears in the infrastructure list as connected before you continue. A cluster that is not connected cannot host a Gateway.
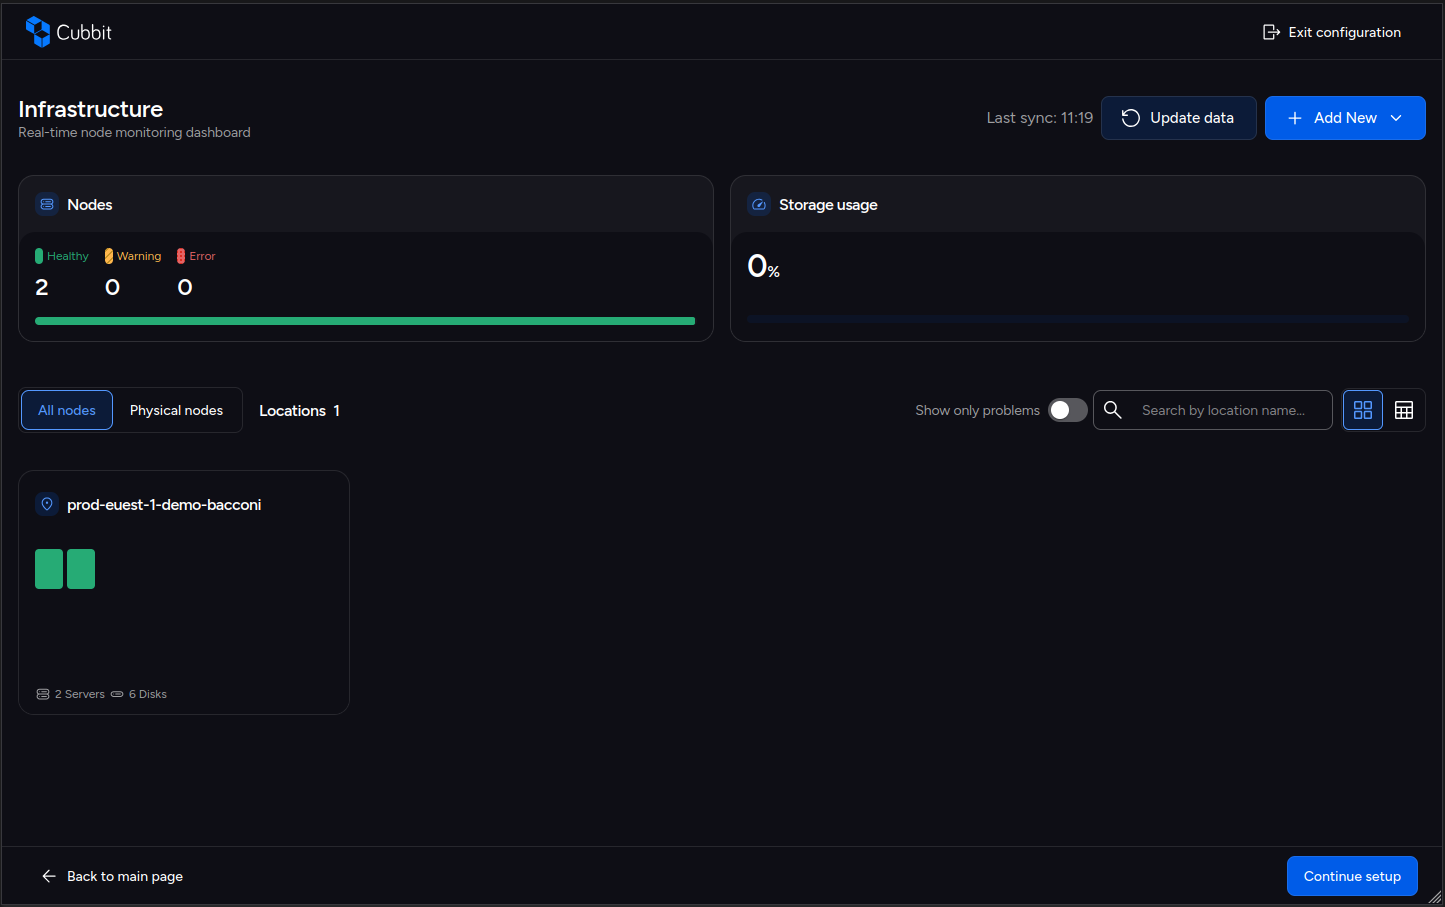
Step 5 - Create the Gateway on the cluster
Create a new Gateway and select the cluster connected in step 4. The Gateway being replaced still
exists in the organization, and Gateway slugs are unique per organization while that record is
alive, so the new Gateway cannot reuse the legacy name: the creation is rejected as a duplicate.
Use a distinct name that keeps the pair recognizable, for example <legacy-gateway-name>-k8s.
The domain is not part of the Gateway: it is bound to the Gateway in step 6, through the Tenant connection.
Wait until the Gateway is reported as ready: Composer creates the ingress, the offloader and the Gateway workloads on the cluster.
If the offloader pods crash-loop instead of becoming ready, the Offloader resource is typically
missing its foundationConfigMap: follow
Offloader pods crash-loop in Troubleshooting.
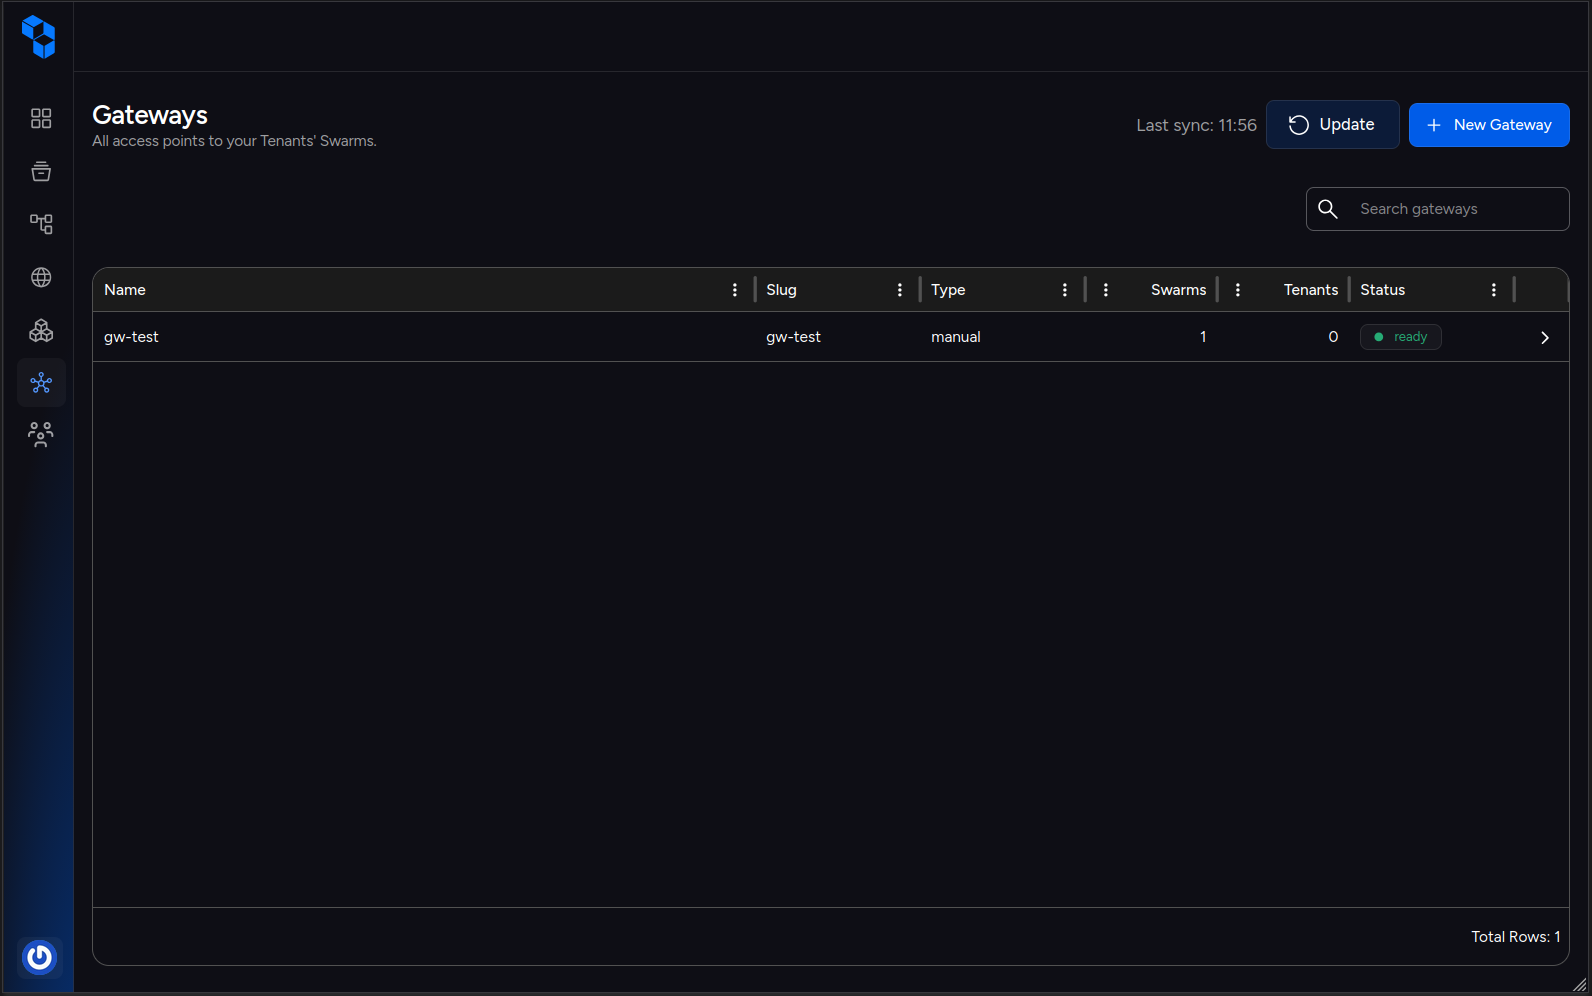
Step 6 - Add the Gateway to the existing Tenant connection
Open the Tenant, go to its connections and open the connection of the domain. Add the Gateway created in step 5 to the connection.
The connection now lists both the new Gateway and the resources that serve the domain. This is what routes the Tenant traffic to the Kubernetes Gateway.
The connection is configured here only for the certificate and the A record of the domain, both
reused from the existing configuration and verified in the Verify the migration section. The
record and the certificate of the Gateway address are not configured here: that part is postponed
and is not part of this migration.
If a custom ingress made the legacy Gateway serve other Tenants as well, repeat this step for each of those Tenants: every Tenant keeps its own connection, and the new Gateway must be added to all of them before that Tenant is served again.
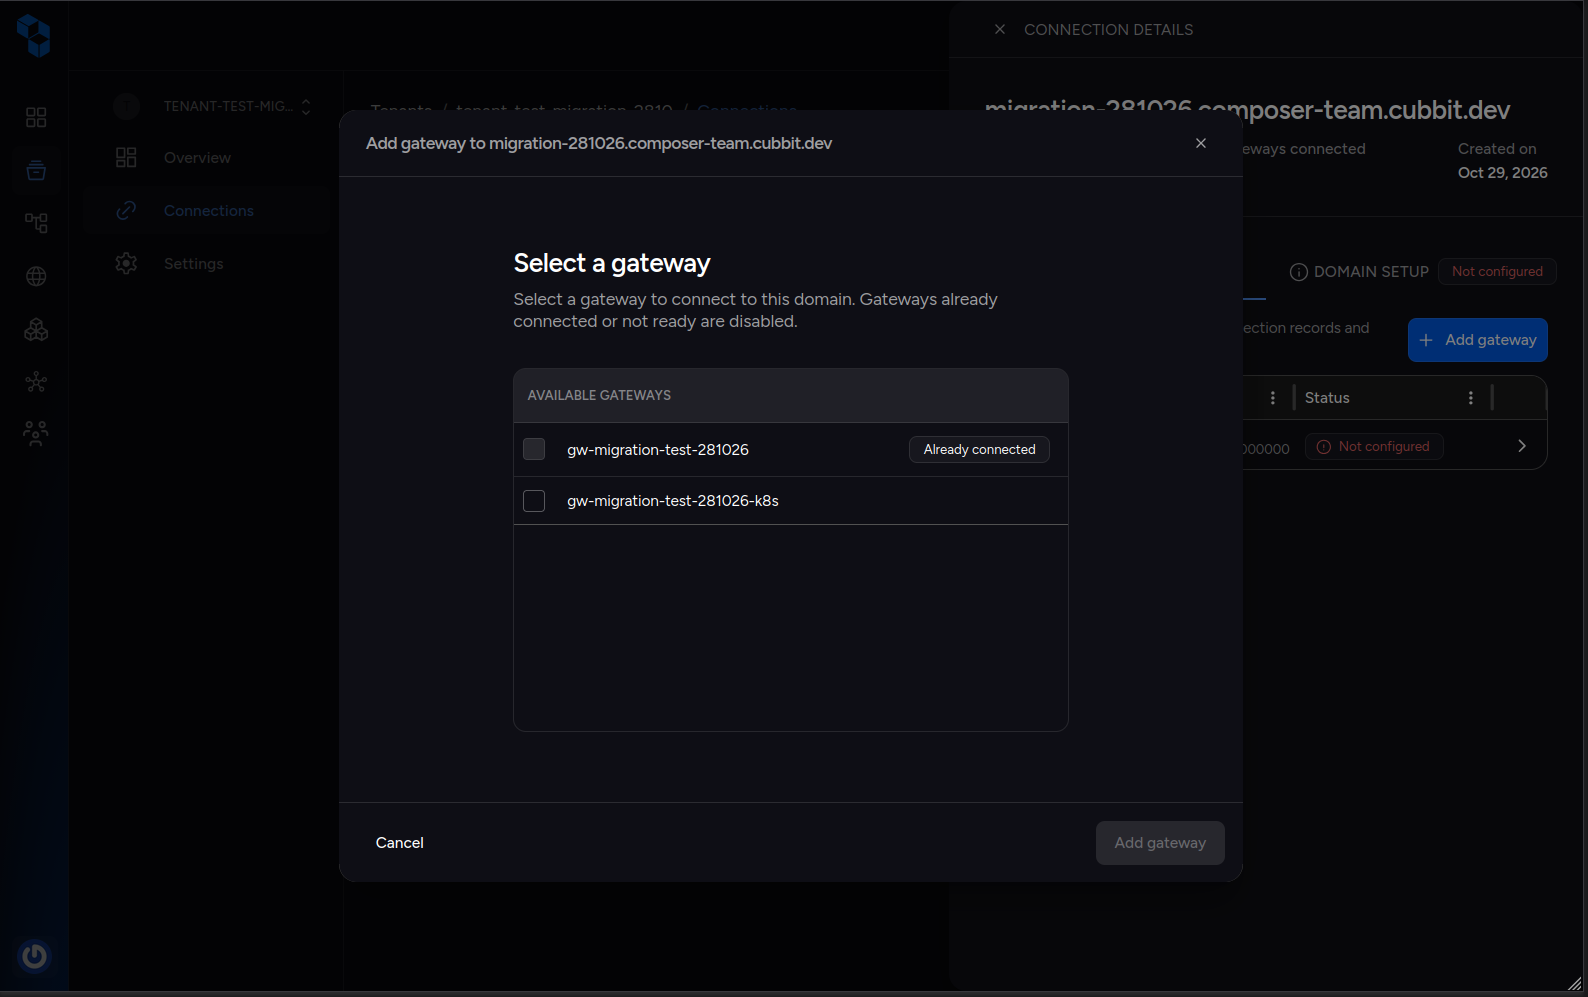
Step 7 - Upload the existing certificate
Open the connection you just updated in step 6:
- In the Composer sidebar, open Tenants and select the Tenant of the domain.
- Open Connections in the Tenant menu: the page lists one row per domain.
- Click the row of the domain being migrated to open the Connection details drawer.
- In the drawer, select the Domain tab, since the certificate is configured for the main domain of the connection.
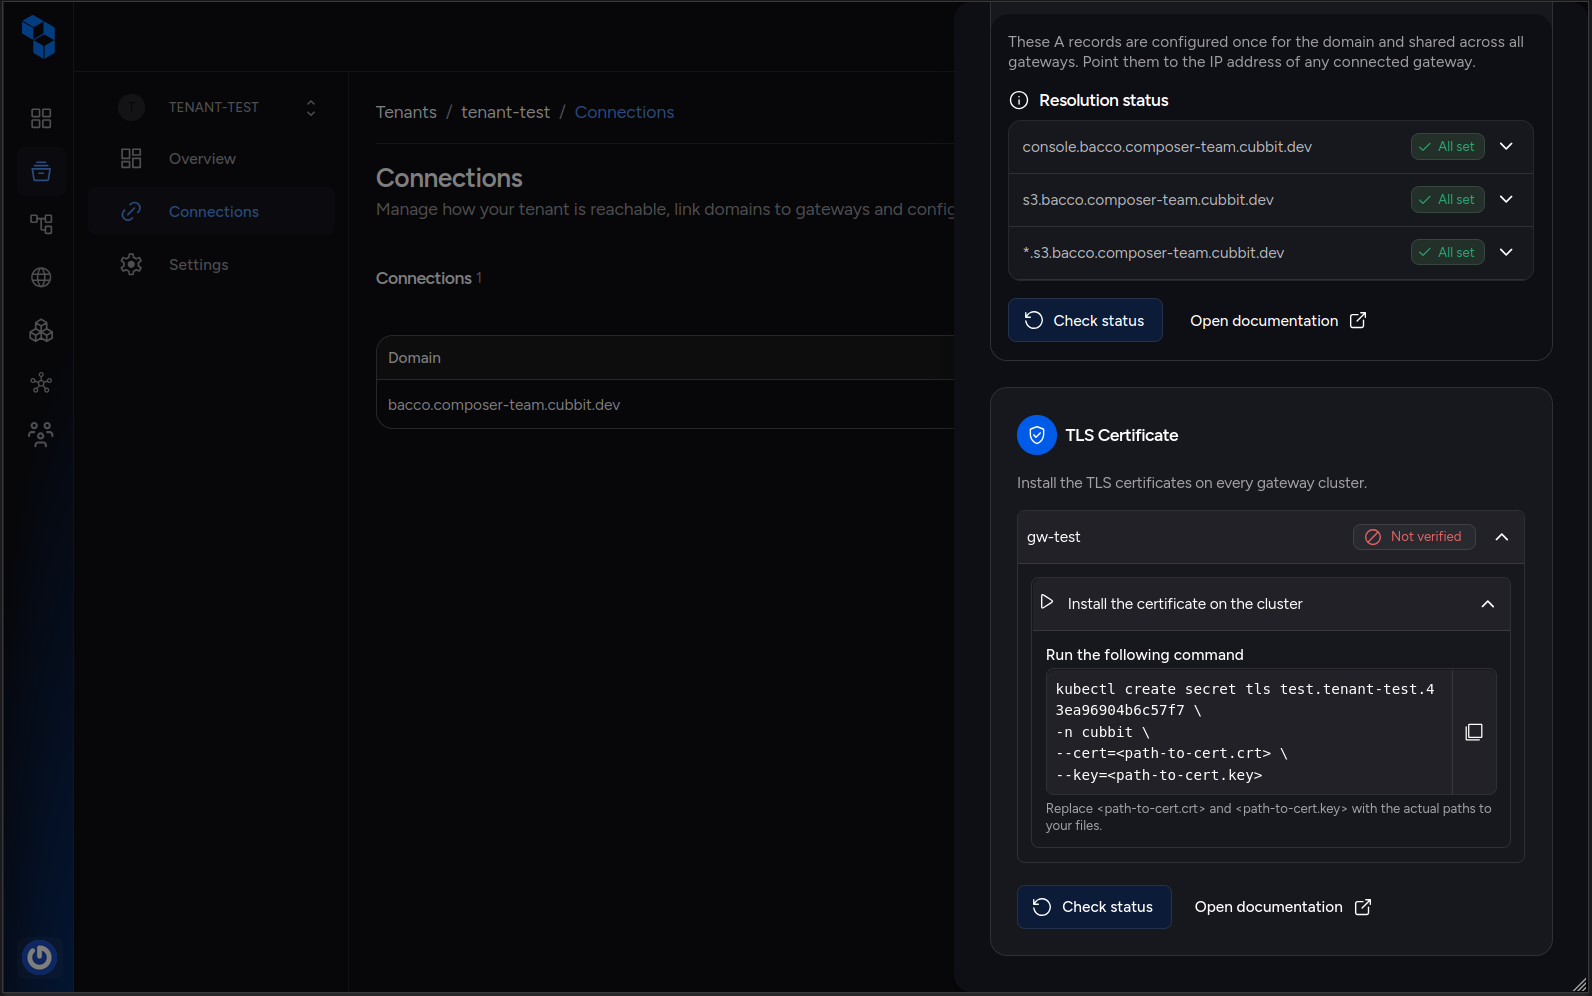
- Scroll to the TLS Certificate card and expand the Gateway created in step 5, then the Install the certificate on the cluster section.
The Run the following command block renders the exact kubectl command for the
certificate, with a copy button next to it. Copy it instead of writing it by hand, because
the secret name is generated from the organization, the Tenant and the connection.
The command has this shape:
kubectl create secret tls <organization>.<tenant>.<connection> \
  -n cubbit \
  --cert=/path/to/fullchain.pem \
  --key=/path/to/privkey.pem
To replace a certificate that is already installed, use the update command shown in the
Composer, which pipes kubectl create secret tls --dry-run=client -o yaml into
kubectl apply -f -.
If the certificate is expired, about to expire or does not cover the domain, issue a new one first, following the Domain & TLS (recommended) section of How to install DS3 Gateway.
After uploading the certificate, the Check status verification of the connection is expected to fail on the DNS record and the certificate. This is normal: while the legacy Gateway is still listed in the connection, the connection cannot be verified. The failure is resolved in step 8, when the legacy Gateway record is deleted from the connection.
Step 8 - Delete the legacy Gateway
The connection lists the new Gateway next to the record of the legacy one. Composer verifies every Gateway of the connection, and while that record is there the connection stays unverified even with a correct DNS and a valid certificate.
Before you delete it, open the console and the S3 endpoint of <domain> and confirm that both
answer: they serve through the new Gateway. Check this first, because the delete cannot be undone.
Then delete it from the legacy management portal:
- Open the legacy management portal with an account that has the
delete_gatewaycapability. - Open Tenants, select the Tenant, then Settings → Gateways.
- Open the legacy Gateway, the one that is offline, and click Delete. The dialog asks for your password, and for the TFA code when it is enabled.
- Back in the Composer, open the connection and press Check status.
After the delete, the secret of the legacy Gateway is no longer accepted: every request signed with it is rejected by the backend.
The rollback is no longer possible after this step: a deleted Gateway cannot be added back to the connection, as described in Rollback.
Verify the migration
Canary check, mandatory:
aws --endpoint-url https://<s3-endpoint> s3 cp s3://<bucket>/migration-canary/canary.bin canary-after.bin
sha256sum canary-after.bin
cat canary.sha256
The two checksums must be identical. A different checksum means the new Gateway is not serving the original data: stop and contact support@cubbit.io before routing real traffic to it.
Then check the rest of the migration:
- In the Composer, the connection reports the certificate as valid and the Gateway as ready.
- The console of
<domain>answers again, and the S3 endpoint of<domain>accepts the credentials of the Tenant. - Read a few objects and upload a new one with the S3 client you already use.
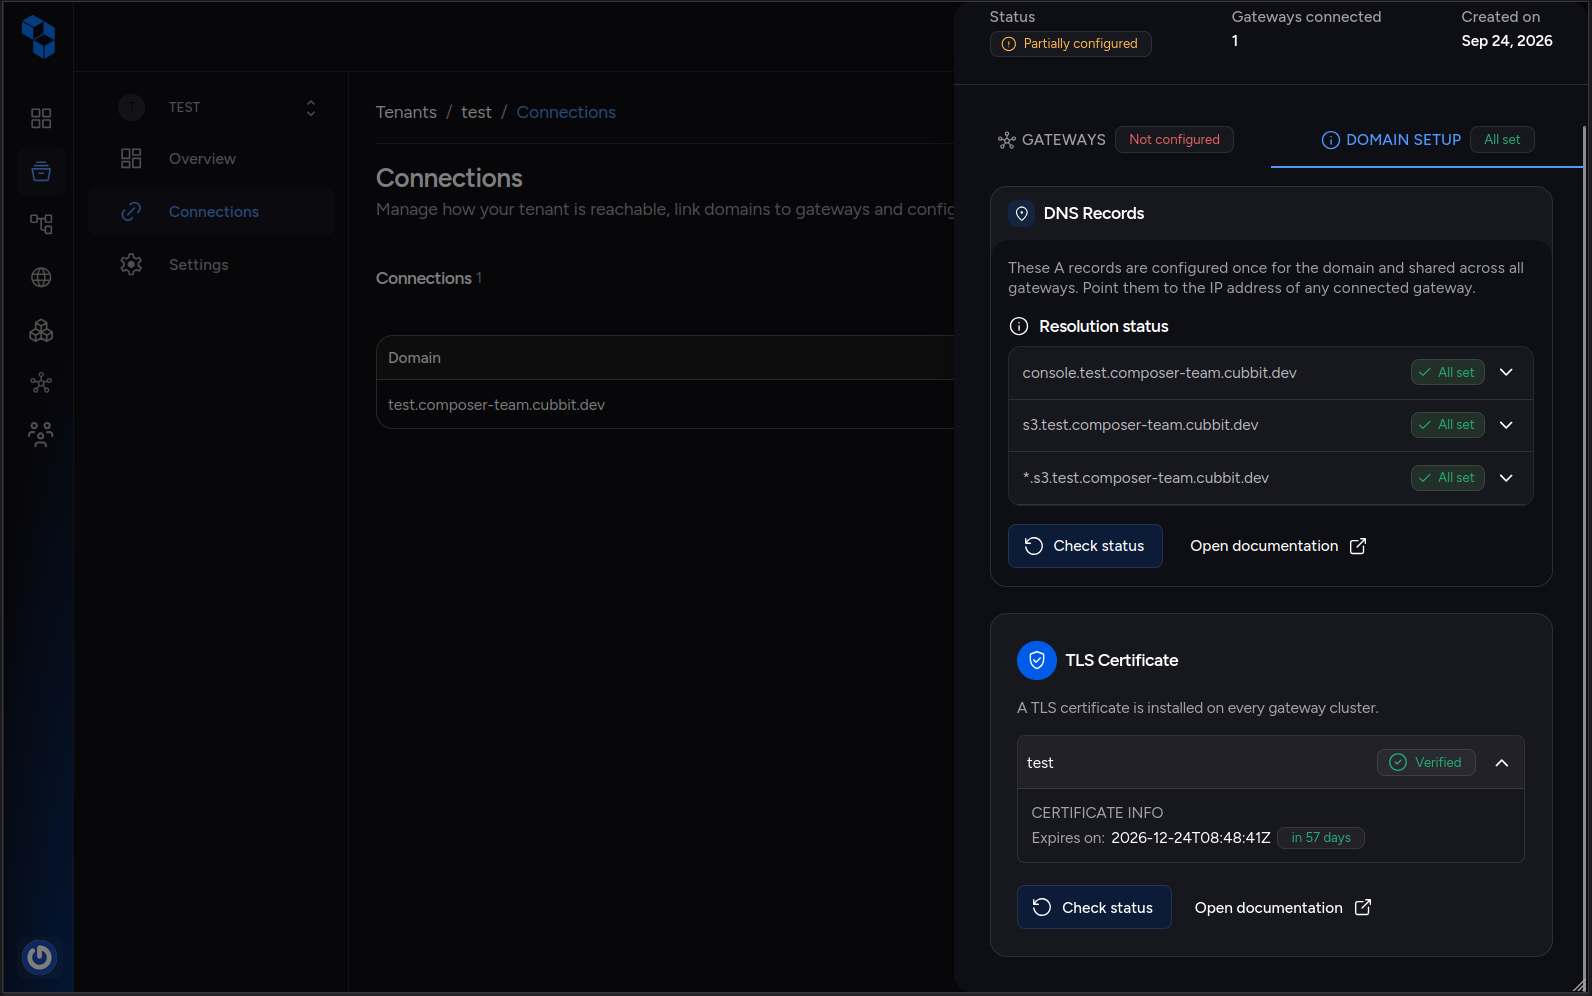
If the console or the S3 endpoint does not answer, check the Gateway status in the
Composer and the pods in the cubbit namespace before contacting support:
export KUBECONFIG="$HOME/.kube/kubeconfig-<cluster-name>.yaml"
kubectl get pods -n cubbit
If you restarted the legacy Gateway during a rollback and then completed the migration, remove the
legacy workloads again with the --uninstall command of step 1: leaving the legacy Gateway running
for the same Tenant and domain is not supported.
Troubleshooting
Offloader pods crash-loop
If the S3 endpoint returns SlowDown, or the console or the S3 endpoint stops answering, check the
offloader:
kubectl -n cubbit get offloader
kubectl -n cubbit get pods | grep offlo
kubectl -n cubbit logs <offlo-pod> --previous --tail=20   # last crash
An offloader pod that exits with failed to open config file: open /opt/config/foundation.json: no such file or directory, and an Offloader with READY=False, mean the Offloader was created
without its foundationConfigMap. This can happen when the legacy gateway ConfigMaps were not
removed in step 2: the leftovers can also make the gateway creation fail in the Composer with an
already exists and was not created by Operator Inventory error.
Exactly one Offloader should exist for the gateway being migrated. If a stale Offloader from a failed attempt is listed, delete it before retrying, then run:
kubectl -n cubbit get offloader
CR=$(kubectl -n cubbit get offloader -o jsonpath='{.items[0].metadata.name}')
kubectl -n cubbit get offloader "$CR" -o jsonpath='{.spec.foundationConfigMap}{"\n"}'   # want: foundation-config
kubectl -n cubbit get ds -o name | grep offlo \
  | xargs -r -I{} kubectl -n cubbit get {} \
      -o jsonpath='{range .spec.template.spec.containers[0].volumeMounts[*]}{.mountPath}{"\n"}{end}' \
  | grep '/opt/config/foundation.json'
kubectl -n cubbit get offloader
If the field is empty or the mount is missing, set it with the following patch and wait for the operator to reconcile:
kubectl -n cubbit patch offloader "$CR" --type merge \
  -p '{"spec":{"foundationConfigMap":"foundation-config"}}'
kubectl -n cubbit get offloader "$CR" -w
The offloader is ready when its READY column is True and every pod of the offlo-ds-*
DaemonSets is Running.
Rollback
Before the new Gateway is created, going back takes one command: run the installer again with the
same parameters recovered in step 0, without --uninstall. The installer recreates the namespaces,
the workloads and the Ingress, so the rollback needs the certificate files that were in ./cert at
install time. The Tenant data is never touched, so the legacy Gateway serves the same buckets.
If Kubernetes was reinstalled on those machines, the cluster is empty and the installer has to
recreate everything from the parameters and the certificate files. Keep gateway-backup/ in that
case: it is the only record of the exact objects the legacy installation had running.
If the legacy gateway ConfigMaps, Secrets or Ingresses deleted in step 2 have to be restored, re-apply the step 0 backup, which restores all three kinds:
kubectl apply -f gateway-backup/cubbit-cm-secret-ingress.yaml
This rollback is possible only until step 8 deletes the legacy Gateway: once that record is gone it cannot be added back to the connection, and the migration has no way back.
After the new Gateway is created, the rollback has to undo it as well, in this order:
- Delete the new Gateway from the Gateways list in the Composer, so that its workloads and its Ingress are removed from the cluster.
- Run the installer again with the parameters recovered in step 0, without
--uninstall. - Add the legacy Gateway back to the Tenant connection, in place of the new Gateway.
- Upload the certificate of the domain again, as in step 7.
Deleting the new Gateway removes its workloads and its Ingress from the cluster: the domain stays offline until the installer runs again.