Migrate a legacy Swarm
This guide moves a Cubbit Swarm from the legacy Ansible and Docker deployment to a Kubernetes (k3s) deployment managed by Composer. Each nexus of the Swarm is migrated separately: you install k3s on the same bare-metal nodes, connect the cluster to Composer, collect the mapping between the existing agents and the physical disks, and run the migration wizard. The data disks are reused as they are.
The migration runs nexus by nexus and each nexus has downtime: its agents are stopped before Composer redeploys them on Kubernetes. Data disks are reused as-is and are never reformatted. Do not run mkfs, mount, umount or edit /etc/fstab on the disks mounted under /mnt/cubbit. How the downtime affects downloads and uploads is described in Maintenance window and service impact.
Scope
A Swarm is made of one or more nexuses, and each nexus is a group of nodes with its own disks. Composer migrates one nexus at a time, and each nexus gets its own Kubernetes cluster: the nodes you pass to the setup script are the nodes of that nexus only.
Steps 0 to 2 are done once: remove the broken agents, confirm access to Composer, and install and configure the CLI. Steps 3 to 8 are repeated for every nexus of the Swarm: install the cluster on that nexus's nodes, connect it, collect that nexus's mapping, then run the wizard step for that nexus.
The Swarm keeps serving traffic from the nexuses you are not migrating, and it is marked as non-legacy only after every nexus has been migrated.
Maintenance window and service impact
Read this section before you start: it tells you what your users experience during the migration and how to schedule it.
Migrating a nexus stops its agents and redeploys them on Kubernetes, so that nexus does not serve data while the operation runs. Uploads stop in both topologies described below, so in both cases you schedule a maintenance window before you begin.
| Swarm topology | Download | Upload |
|---|---|---|
| Single nexus (single location) | Stops | Stops |
| Several nexuses with n+k redundancy | Keeps working, served by the other locations | Stops |
Plan the migration accordingly:
- Single nexus (single location). Downloads and uploads both stop. Schedule a maintenance window as a full data-path outage, notify your users, and stop backup or synchronization jobs that read from or write to the Swarm.
- Several nexuses (n+k). Downloads keep working, served by the nexuses that are not migrating: the location under migration does not serve data, and the data stays available through the others. Uploads stop, so schedule a maintenance window as well: clients cannot write to the Swarm until the migrated nexus is back, and uploads in flight fail and must be retried by the client.
- Coordinator operations are not affected: Composer, the Composer API and object listing keep working. Only the data path described above is interrupted.
- Downloads and uploads work again once the migration of the nexus is completed and its agents run on Kubernetes. Verify the nexus before you start the next one, as described in Step 8.
Schedule a maintenance window in both cases, run the migration outside peak hours, and migrate one nexus at a time when the Swarm has several.
Before you start
The migration reuses the machines that run the legacy Docker agents today. No new hardware is needed, and the data does not move.
Checklist:
- Ubuntu is installed on every node. The cluster setup script supports Ubuntu only.
- You have SSH key-based access to every node, as
rootor as a user with passwordlesssudo. The Ansible playbook usually creates acubbituser with passwordlesssudo. - Ensure
kubectlis installed on the machine you will use to run the commands. The cluster verification in Step 3 and the connection in Step 4 use it, and thekubectl cubbitinstaller exits if it is missing. See Install kubectl. - Every node has a unique hostname (
hostname -fon each machine must differ). Duplicate hostnames break the node mapping in Step 5. - The data disks created by the Ansible playbook are still formatted and mounted under
/mnt/cubbit/disk-*. - The following ports are reachable. Cubbit does not manage your firewalls or security groups, so open them yourself.
| Port | Protocol | Scope | Purpose |
|---|---|---|---|
6443 | TCP | workers and migration machine to the control plane | k3s API server |
10250 | TCP | between all nodes | kubelet API |
8472 | UDP | between all nodes | flannel VXLAN |
443 | TCP | outbound from all nodes | k3s installer, image pulls, downloads |
22 | TCP | migration machine to all nodes | SSH access used by the setup script |
Verify SSH access and disk mounts before proceeding:
ssh -i <path-to-key> <ssh-user>@<node-ip> 'sudo -n true && echo ok'
ssh -i <path-to-key> <ssh-user>@<node-ip> 'hostname; findmnt -rn -o TARGET,SOURCE,FSTYPE | grep /mnt/cubbit'
Ports 80 and 443 do not need inbound access: the setup script disables Traefik.
Step 0 - Remove broken agents
We strongly discourage migrating a Swarm that contains broken agents or disks. Doing so may prevent you from performing recovery after the migration. If you have a broken disk and still wish to proceed, contact support before migrating to avoid potential inconvenience.
Do this first. Any agent that is broken or dead and no longer reports must be deleted before you migrate the nexus. The migration requires a complete mapping for every agent of the nexus, and an agent that no longer reports cannot be mapped to a node and a disk.
Delete the agent from the legacy Swarm management interface:
- Sign in with your Composer user account.
- Open Swarm, then select the Swarm.
- Open the nexus, then the node.
- Open the agent and click Delete.
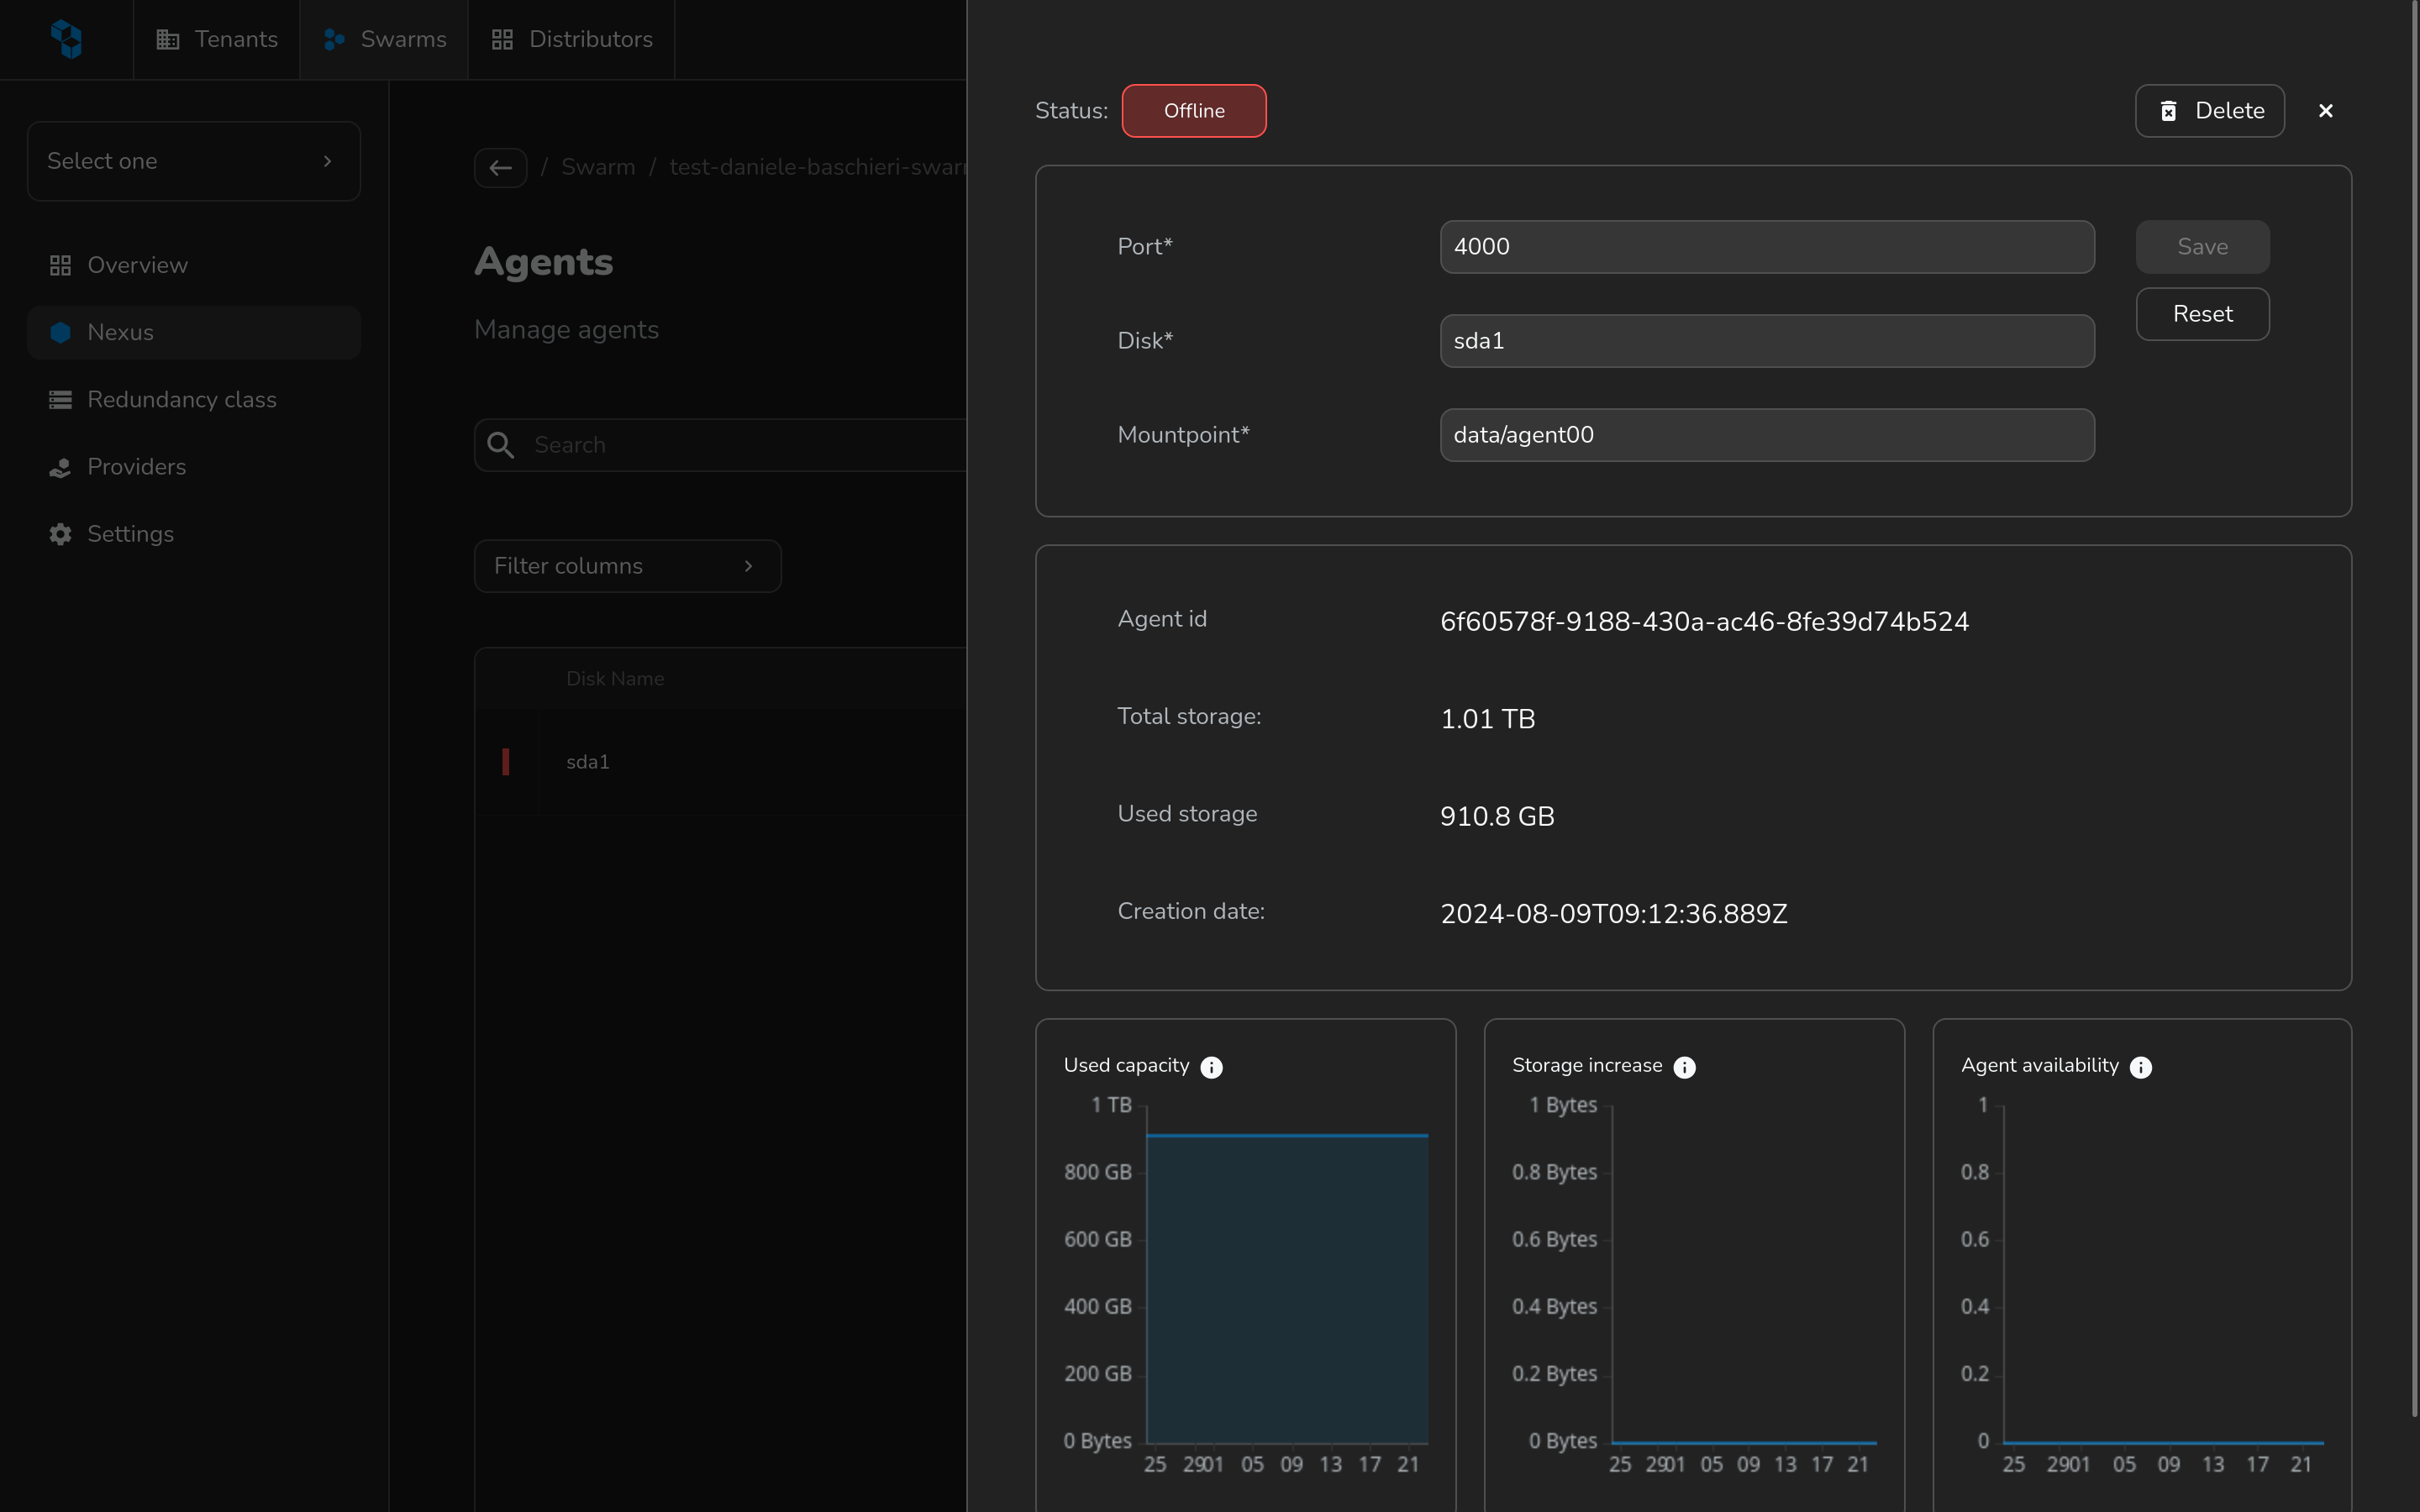
The legacy Swarm management interface refuses to delete an agent that is still online. This is intended and cannot be forced:
- If the interface still shows the agent as online, wait for its heartbeat to expire and retry the deletion.
- If the agent stays online, contact support@cubbit.io. The migration cannot proceed while the agent is online and will be rejected with "agents still online".
Do not stop the legacy Docker stack to force the heartbeat to expire before you reach Step 7.
Step 1 - Confirm your account was migrated and open Composer
Cubbit migrates legacy accounts to the organization model. Before migrating the Swarm you must receive access to the new Composer at https://composer.cubbit.eu.
-
Open https://composer.cubbit.eu in a browser and sign in, or sign in from the CLI with
ds3-composer auth login --profile <profile>(see Step 2). -
Confirm that Composer shows your organization and its Swarms.
-
Confirm that the Swarm you are migrating is listed.
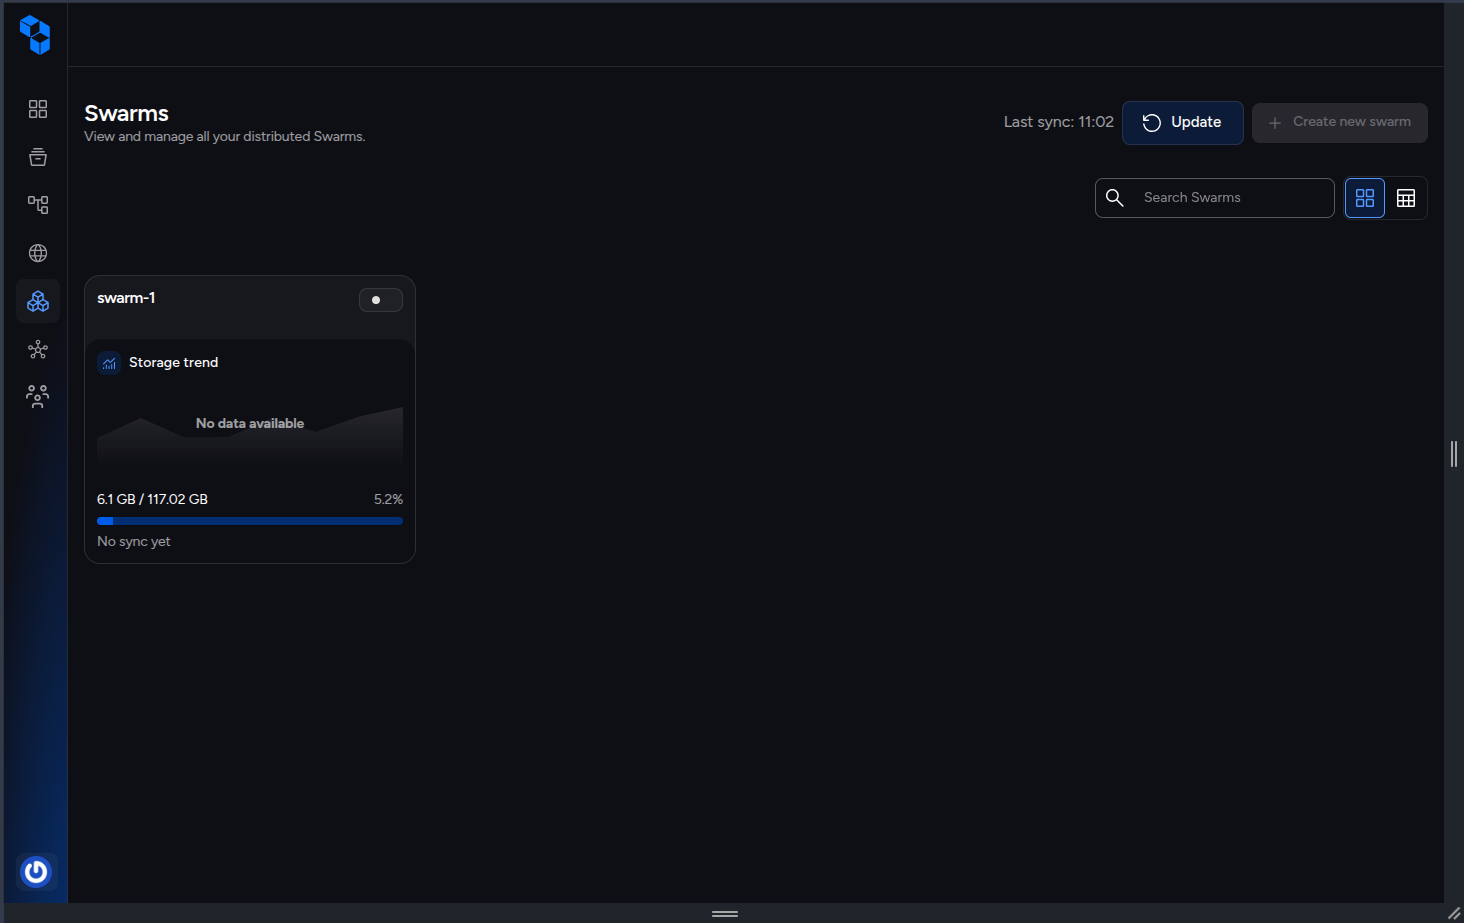
If you cannot sign in, or the Swarm is missing, stop here and contact support@cubbit.io. Do not install Kubernetes on nodes that are not attached to a reachable organization.
Step 2 - Install and configure the CLI
The Composer CLI (ds3-composer) is distributed as a separate binary. Install a specific release (v2.0.0) and keep the same version for the whole migration.
Install the binary
There are two installation modes. Pick one of them, not both: they install the same ds3-composer executable.
Whichever mode you choose:
- The version must be 2.0.0 or newer.
- Every command in this guide is written as
ds3-composer, whatever mode you installed it with. - Check the result with
ds3-composer version.
Mode 1 - prebuilt binary (recommended)
Download the asset for your platform from the composer-cli releases page, choosing the 2.0.0 release or the matching prerelease build, then install it:
# after downloading the asset for your platform
chmod +x ds3-composer
sudo mv ds3-composer /usr/local/bin/ds3-composer
ds3-composer version
Mode 2 - go install
Use this mode if you need a custom build and you are familiar with the Go toolchain. You need Go 1.24 or newer on the machine where you run the migration:
go install github.com/cubbit/composer-cli@latest
ds3-composer version
go install compiles the CLI and writes the binary to $(go env GOPATH)/bin, which is usually not in PATH yet. Either add it, or copy the binary:
export PATH="$PATH:$(go env GOPATH)/bin"
ds3-composer version
The module path installs the latest version, so confirm that ds3-composer version reports 2.0.0 or newer before you continue.
Configure a profile
Create a profile that points at your Composer environment:
ds3-composer auth login --profile <profile>
The command opens a browser-based login and stores the API key and organization ID in the profile.
For non-production environments, pass the endpoint file:
ds3-composer auth login --profile <profile> --endpoints <path-to-endpoints.toml>
Verify the profile:
ds3-composer config view
The profile must point at the deployment that owns the cluster. The mapping script in Step 5 reads the cluster topology through this profile.
kubectl cubbit is a different tool. The ds3-composer CLI manages organizations and infrastructure through the Composer API; the kubectl cubbit plugin manages the Kubernetes cluster itself. You install the plugin in Step 4. See Install kubectl.
Step 3 - Install Kubernetes on the nexus nodes
Every node of the nexus joins a single k3s cluster: the first node passed to --nodes becomes the control plane, the others join as workers. The script works over SSH with k3sup.
Download the setup script:
curl -fsSL -o k8s-multinode-cluster-setup.sh \
  https://download.operator.cubbit.eu/download/k8s-multinode-cluster-setup.sh
chmod +x k8s-multinode-cluster-setup.sh
Run the manual preflight on every node:
ssh -i <path-to-key> <ssh-user>@<node-ip> '
  hostname
  swapon --show
  systemctl is-active docker containerd 2>/dev/null || true
  findmnt -rn -o TARGET,SOURCE,FSTYPE | grep /mnt/cubbit || true
'
Read the output line by line: it describes the node, and the cluster setup script repeats the same checks and prints a warning when it finds a known risk.
hostname: the node name, which k3s uses as the Kubernetes node name.swapon --show: the swap devices in use. An empty output is the common case, since k3s recommends running without swap.systemctl is-active docker containerd: the container runtimes.dockerisactivewhile the legacy agents still run in Docker, andcontainerdisinactiveorunknown, because k3s ships its own containerd.findmntlines: one line per mounted data disk, in theTARGET SOURCE FSTYPEorder, for example/mnt/cubbit/disk-1 /dev/sdb1 ext4.
Create the cluster:
./k8s-multinode-cluster-setup.sh \
  --nodes <control-plane-ip>,<worker-ip-1>,<worker-ip-2> \
  --context <nexus-name> \
  --ssh-key <path-to-key>
The script creates the cubbit namespace and writes the kubeconfig to $HOME/.kube/kubeconfig-<nexus-name>.yaml. Verify the result:
export KUBECONFIG="$HOME/.kube/kubeconfig-<nexus-name>.yaml"
kubectl config use-context <nexus-name>
kubectl get nodes -o wide
kubectl get namespace cubbit
Every expected node must be present and Ready, and the cubbit namespace must exist. Check the node names and IPs, not only the total count.
Docker is left running on purpose, so the legacy agents keep serving traffic until Step 7. k3s uses its own containerd socket and does not replace the Docker runtime.
Step 4 - Connect the cluster to Composer
This step is mandatory and must happen between the cluster installation and the mapping. The mapping is validated against the inventory of the clusters connected to your organization, and the agents are deployed on this cluster. Without a connected cluster the wizard rejects the mapping and cannot start the migration.
First, point your shell at the cluster you created in Step 3. The connection command must run with this kubeconfig exported; otherwise it targets the wrong cluster or fails:
export KUBECONFIG="$HOME/.kube/kubeconfig-<nexus-name>.yaml"
kubectl config use-context <nexus-name>
kubectl get nodes
Then get the connection command. Do not build it by hand: Composer generates it for your organization, with the installer and the credentials already filled in. Use one of these two places:
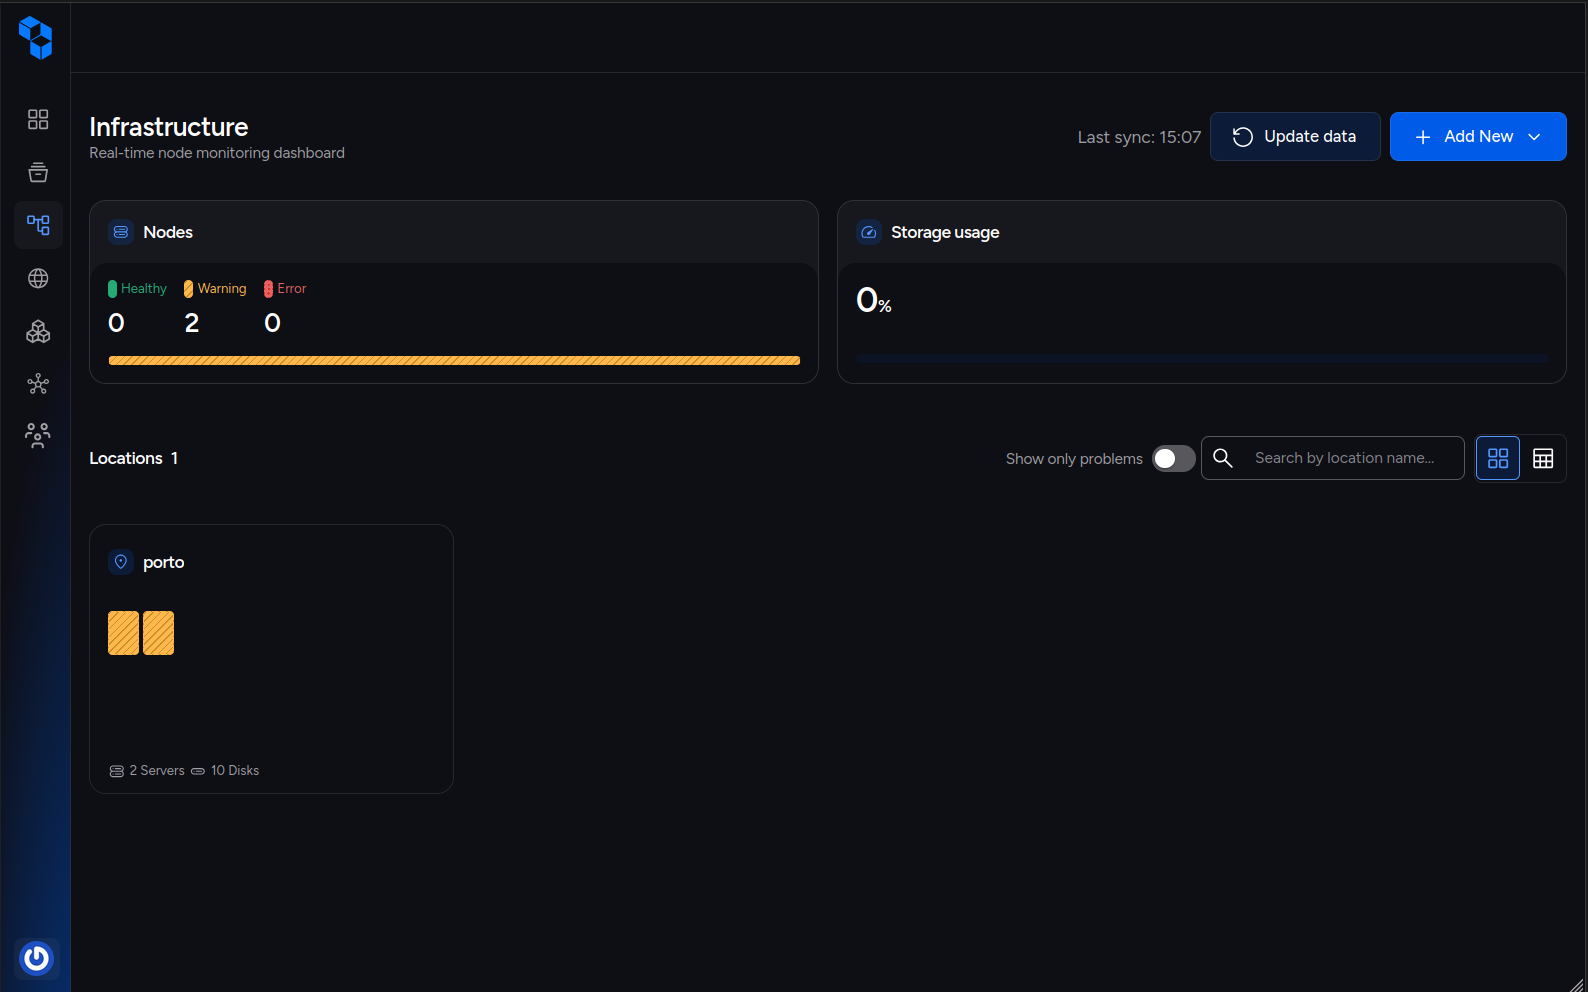
- Composer: open Infrastructure, click Add New, choose Physical Location, and copy the command shown in the dialog;
- the CLI, using the profile you configured in Step 2:
ds3-composer operator generate-connect-command --profile <profile>
The generated command has this shape. The API key and the organization ID are yours; the placeholders below are not valid values:
curl -fsSL https://download.operator.cubbit.eu/install-kubectl-plugin.sh | bash && kubectl cubbit cluster-connect --api-key=<api-key> --org-id=<organization-id>
Run the copied command in the same shell, the one where KUBECONFIG is exported. Add --cluster-name <cluster-name> to give the location a recognizable name, and --yes to run without prompts.
The plugin installs the manager components in the cubbit namespace and registers the cluster with the Coordinator. Verify the installation and the registration:
kubectl get pods -n cubbit
kubectl get announces -A
Then open Infrastructure in Composer and confirm that the new location appears in the inventory, in the warning state. This is expected: the nodes are Ready, but their disks still hold the legacy data and are not assigned to the Swarm yet, so every node is counted as warning and none as healthy. A failed installation looks different, with the nodes in the error state.
Step 5 - Collect the agent and volume mapping
The mapping associates each legacy agent with the node and the physical volume where its data lives. Composer uses it to redeploy the agent on the cluster without touching the disk. Collect the values with the generate-swarm-mapping.sh script. A mapping entry needs three values:
| Value | Description |
|---|---|
public_key | Base64 of the first 32 bytes of the agent keypair stored on the disk. |
server_id | The infrastructure node ID (node_id) of the node that hosts the disk. |
volume_id | The physical volume ID (disk_uuid) of the disk. |
Download the script from the same download server as the cluster setup script:
curl -fsSL -o generate-swarm-mapping.sh \
  https://download.operator.cubbit.eu/download/generate-swarm-mapping.sh
chmod +x generate-swarm-mapping.sh
The script reads the cluster topology from the CLI, reads the public keys from every node over SSH, and writes the JSON body the API expects. It needs jq (jq-1.7, see jq download), the ds3-composer with the infrastructure command, and SSH access to the nodes.
Recover the nexus ID and the cluster ID
The commands in this step take --nexus-id and --cluster-id. Recover both values before you run the script:
--nexus-id: open the nexus in the legacy Swarm management interface (Swarm → select the Swarm → open the nexus). The ID is visible in the nexus panel of that page.--cluster-id: open Infrastructure in Composer, select the location connected in Step 4, and copy the ID from the location overview.
Use the IDs of that nexus only: each nexus is migrated with its own cluster and its own mapping, so when the Swarm has several nexuses you repeat this whole step for each of them with the corresponding pair of IDs.
Run it in dry-run mode first. It prints the SSH commands and hosts without executing anything:
./generate-swarm-mapping.sh \
  --cluster-id <cluster-id> \
  --nexus-id <nexus-id> \
  --ssh-key <path-to-key> \
  --ssh-user root \
  --cli ds3-composer \
  --dry-run
The output of the dry run is a preview of the commands the script would run, and the messages go to stderr:
[dry-run] ssh -n -i <path-to-key> root@<node-ip> "for p in '/mnt/cubbit/disk-1' '/mnt/cubbit/disk-2'; do head -c 32 "$p/config/keypair" | base64 -w0; echo; done"
Check the dry-run output
Read the dry-run output against the cluster before generating the file. The expected result is:
- One
[dry-run] sshline per node of the nexus, and no extra or missing node. - Every node is listed with the IP address you expect, the one used when the cluster was created.
- Every node lists exactly the disks it really hosts, as
/mnt/cubbit/disk-*paths, and the count matches the physical disks attached to that node. - The output ends with
[dry-run] nothing executed, no output written: no SSH session runs and no mapping file is created.
If the output does not match this expected result, do not generate the mapping file and do not continue with the wizard: nothing has been executed yet, so the cluster is still untouched. Check the node against the dry-run line first:
| Unexpected result | What to check |
|---|---|
| A node is missing | The --cluster-id and --nexus-id values: they must identify the cluster and the nexus created in Steps 3 and 4, and every node of the nexus must be Ready in kubectl get nodes. |
| An extra node appears | Same as above: the mapping must contain only the nodes of the nexus being migrated, not the whole Swarm. |
| Wrong node IP or address | The cluster inventory: compare against ds3-composer infrastructure location describe --cluster-id <cluster-id> --output json --profile <profile>. |
| A disk path is missing or unexpected | The node itself: run findmnt -rn -o TARGET,SOURCE,FSTYPE | grep /mnt/cubbit on it over SSH, and compare with the disks physically attached. A disk that is not mounted under /mnt/cubbit cannot be mapped. |
If the mismatch is with the cluster inventory (missing or extra nodes in Composer), reconnect the cluster or fix the node state and run the dry run again. If the mismatch is with the disks or you cannot explain the difference, stop and contact support@cubbit.io before generating the mapping: a wrong mapping associates agents with disks they do not own.
Generate the mapping file
When the dry-run output matches the expected result, run the script without --dry-run to generate the file:
./generate-swarm-mapping.sh \
  --cluster-id <cluster-id> \
  --nexus-id <nexus-id> \
  --ssh-key <path-to-key> \
  --ssh-user root \
  --profile <profile> \
  --cli ds3-composer \
  --out mapping.json
If the script fails for a missing or empty keypair, a node without IPs, or a disk count different from --disks, it aborts with a message naming the node and the path. Contact support@cubbit.io and do not proceed further with the migration.
Alternative: collect the keys and build the JSON by hand
Use this manual procedure only if you cannot run the script or it failed. Read the keys yourself, one SSH session per node:
ssh -i <path-to-key> <ssh-user>@<node-ip> \
  'for p in /mnt/cubbit/disk-1 /mnt/cubbit/disk-2; do head -c 32 "$p/config/keypair" | base64 -w0; echo; done'
The command prints one base64 line per disk, in the order of the paths. Match the first line to disk-1, the second to disk-2, and so on. Then build the JSON by hand, using the node_id and the disk_uuid returned by:
ds3-composer infrastructure location describe --cluster-id <cluster-id> --output json --profile <profile>
The output lists every node with its node_id, node_name and disks[] (disk_uuid, path, used, status). Keep the same JSON shape shown below.
Never invent server_id or volume_id values, and never copy them between disks. A volume mapped to the wrong disk makes Composer redeploy the agent on data it does not own. All the values should be verified and match the real existing configuration.
Mapping schema
This schema, which was automatically generated by the script, is accepted by Composer.
{
    "cluster_id": "<cluster-id>",
    "nexus_id": "<nexus-id>",
    "agents": [
        {
            "deployment_state": "unset",
            "hostname": "<node-name>",
            "public_key": "<base64-public-key>",
            "server_id": "<node-id>",
            "volume_id": "<disk-uuid>"
        }
    ]
}
cluster_id and nexus_id are mandatory UUIDs. Each agent entry requires public_key, server_id and volume_id; the same public key or the same volume cannot appear twice. hostname and deployment_state are written for readability and are not required by the API.
Step 6 - Open the Swarm migration wizard
-
Open https://composer.cubbit.eu and go to Swarms.
-
Select the Swarm you are migrating. The Swarm page shows the banner This swarm is still running on legacy infrastructure.
-
Click Start migration. After the migration starts, the same banner offers View migration status.
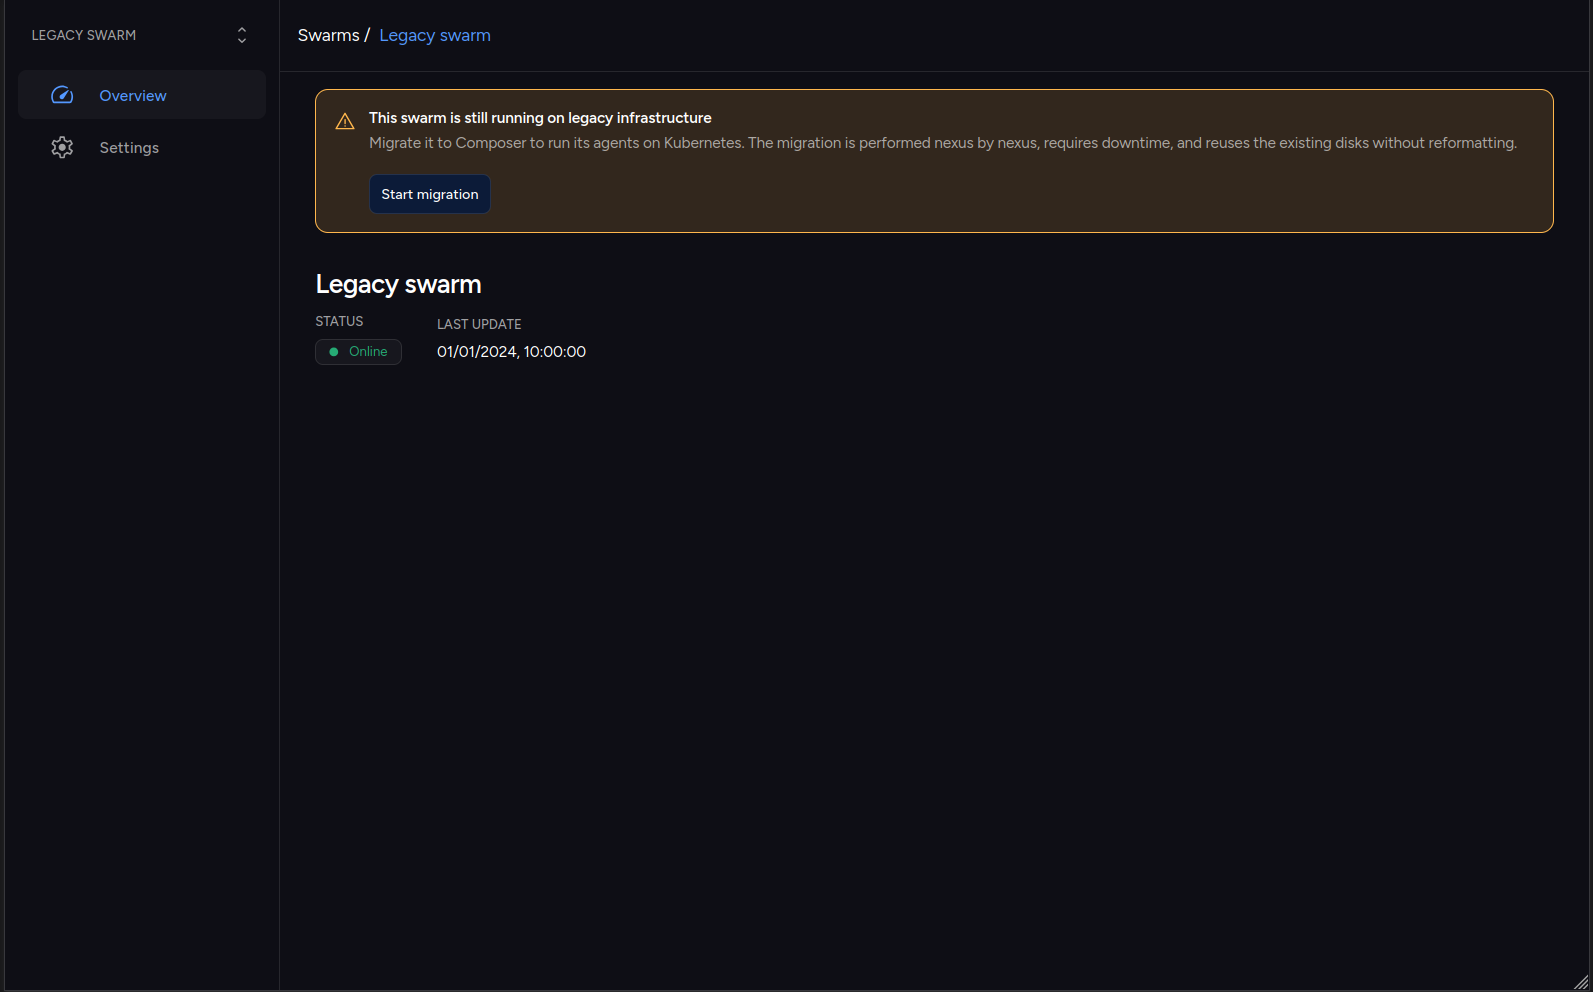
The first step is Gather the swarm mapping. Select one physical nexus to migrate. Only physical nexuses that still run legacy agents are eligible; a nexus that already runs Kubernetes-managed agents is not. Read the "Before you start" callout of the step and confirm that the prerequisites of this guide are satisfied.
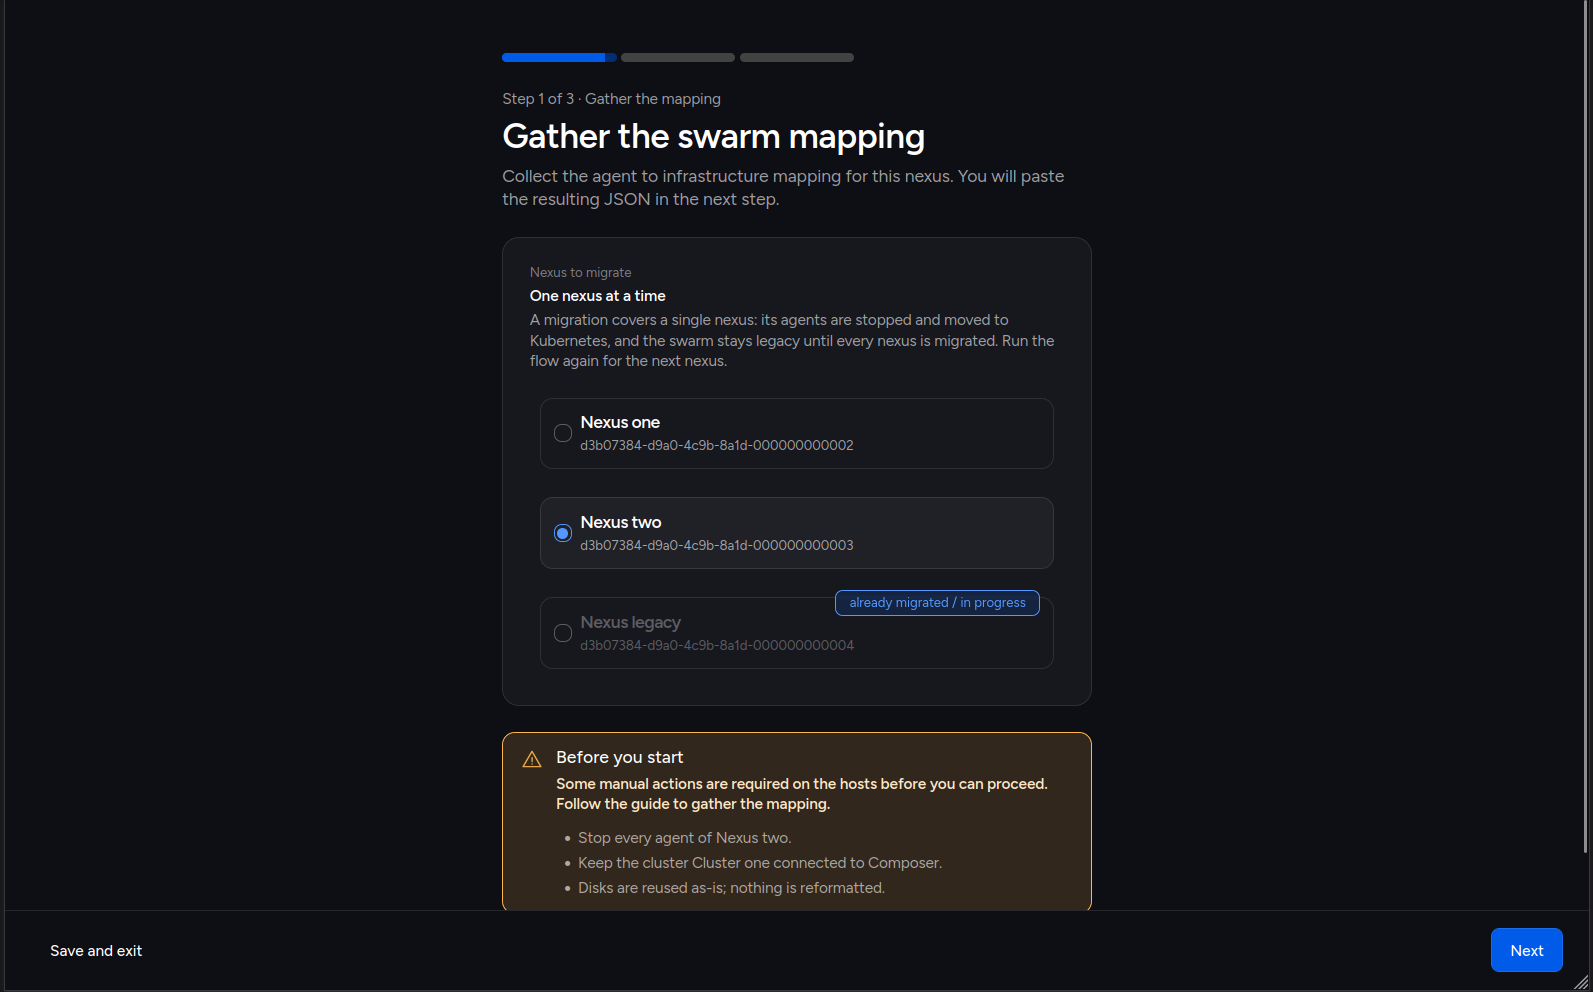
Migrate one nexus at a time, and restart from Step 3 for the next nexus: it needs its own cluster, its own connection and its own mapping. The other nexuses of the Swarm keep serving traffic while this one is migrated.
Step 7 - Legacy agents migration
Wizard step 1 - Map agents to cluster
The second step accepts the mapping file, or the JSON pasted directly. The limit is 10 MB.
The wizard validates cluster_id and nexus_id against the nexus you selected, then lists the parsed agents with their public key, server ID, volume ID and state. Check that the number of agents and the disks match what you collected.
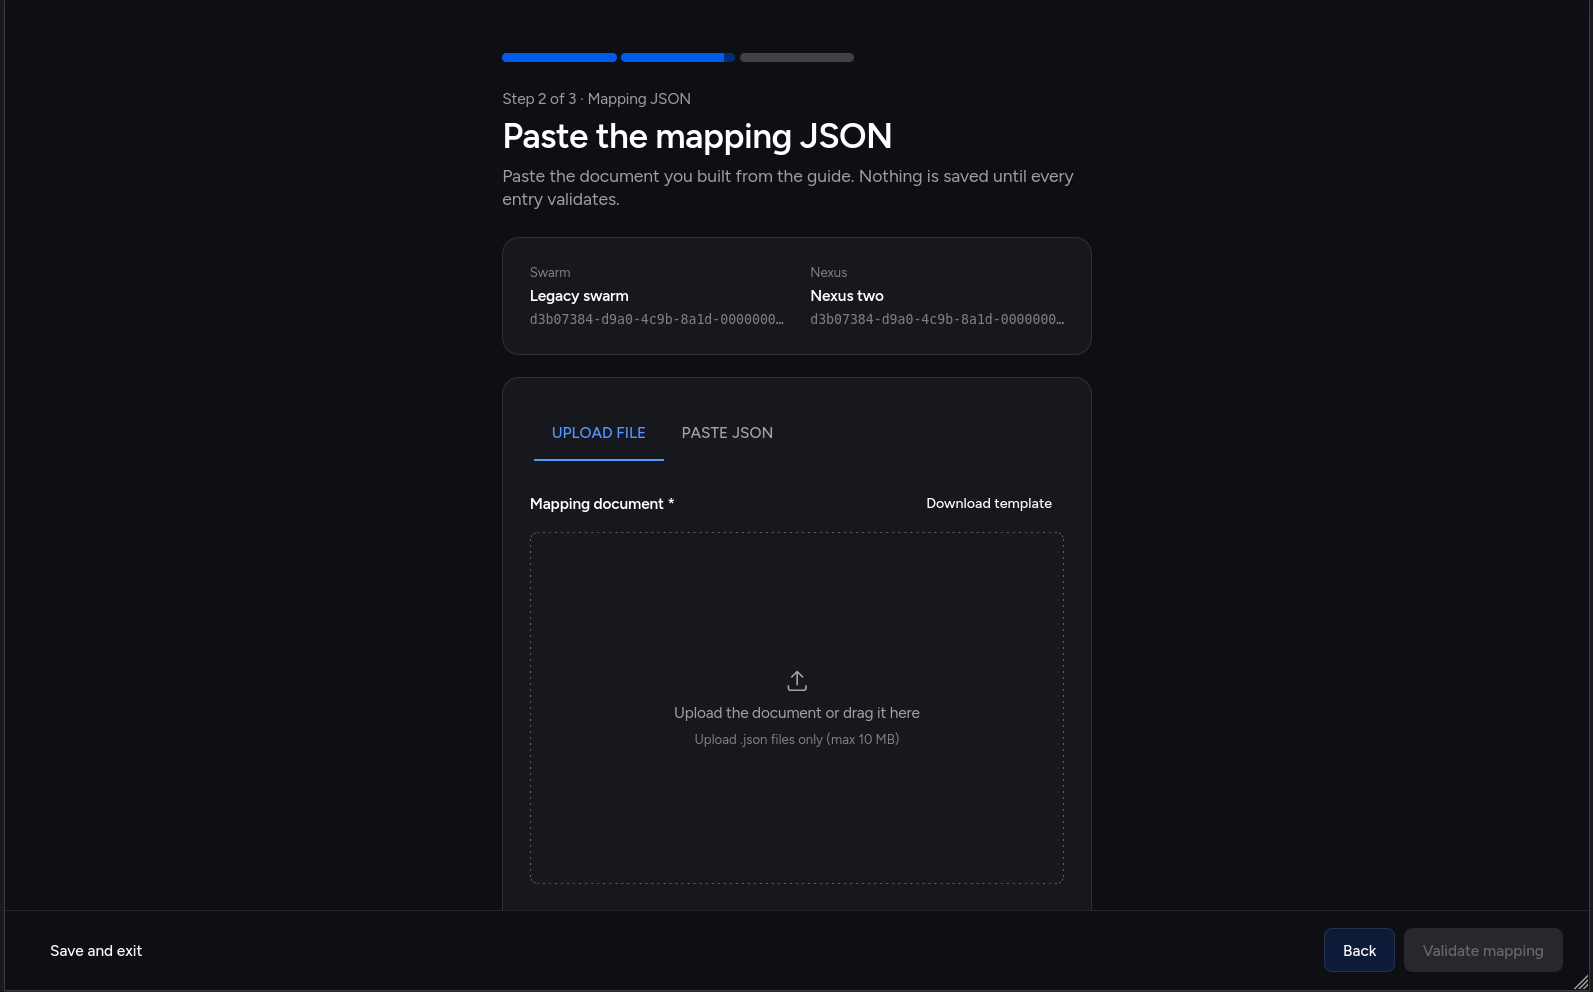
If an entry is rejected, the wizard reports the related public key and the reason. Fix the mapping and paste it again; nothing has been deployed yet.
Wizard step 2 - Start the migration
This step starts the downtime. The wizard shows a callout that the agents of the nexus will be stopped and redeployed on the cluster.
On every node of the nexus, stop the legacy Docker stack:
ssh -i <path-to-key> <ssh-user>@<node-ip>
cd /home/cubbit
docker compose down
If a node only has the legacy Compose v1 binary, run docker-compose down instead of docker compose down.
If the legacy stack was installed as a systemd unit, stop and disable it as well:
sudo systemctl stop docker-compose.service
sudo systemctl disable docker-compose.service
Confirm that no legacy container is left running:
docker ps
Then, in the wizard:
- Make sure you ran the stop command on every node of the nexus. A node you skipped still runs its legacy agent, and the migration is rejected while any agent is online.
- Tick I confirm all agents of this nexus are stopped.
- Check every node of the nexus in the legacy Swarm management interface: every agent must be offline.
- Click Start migration.
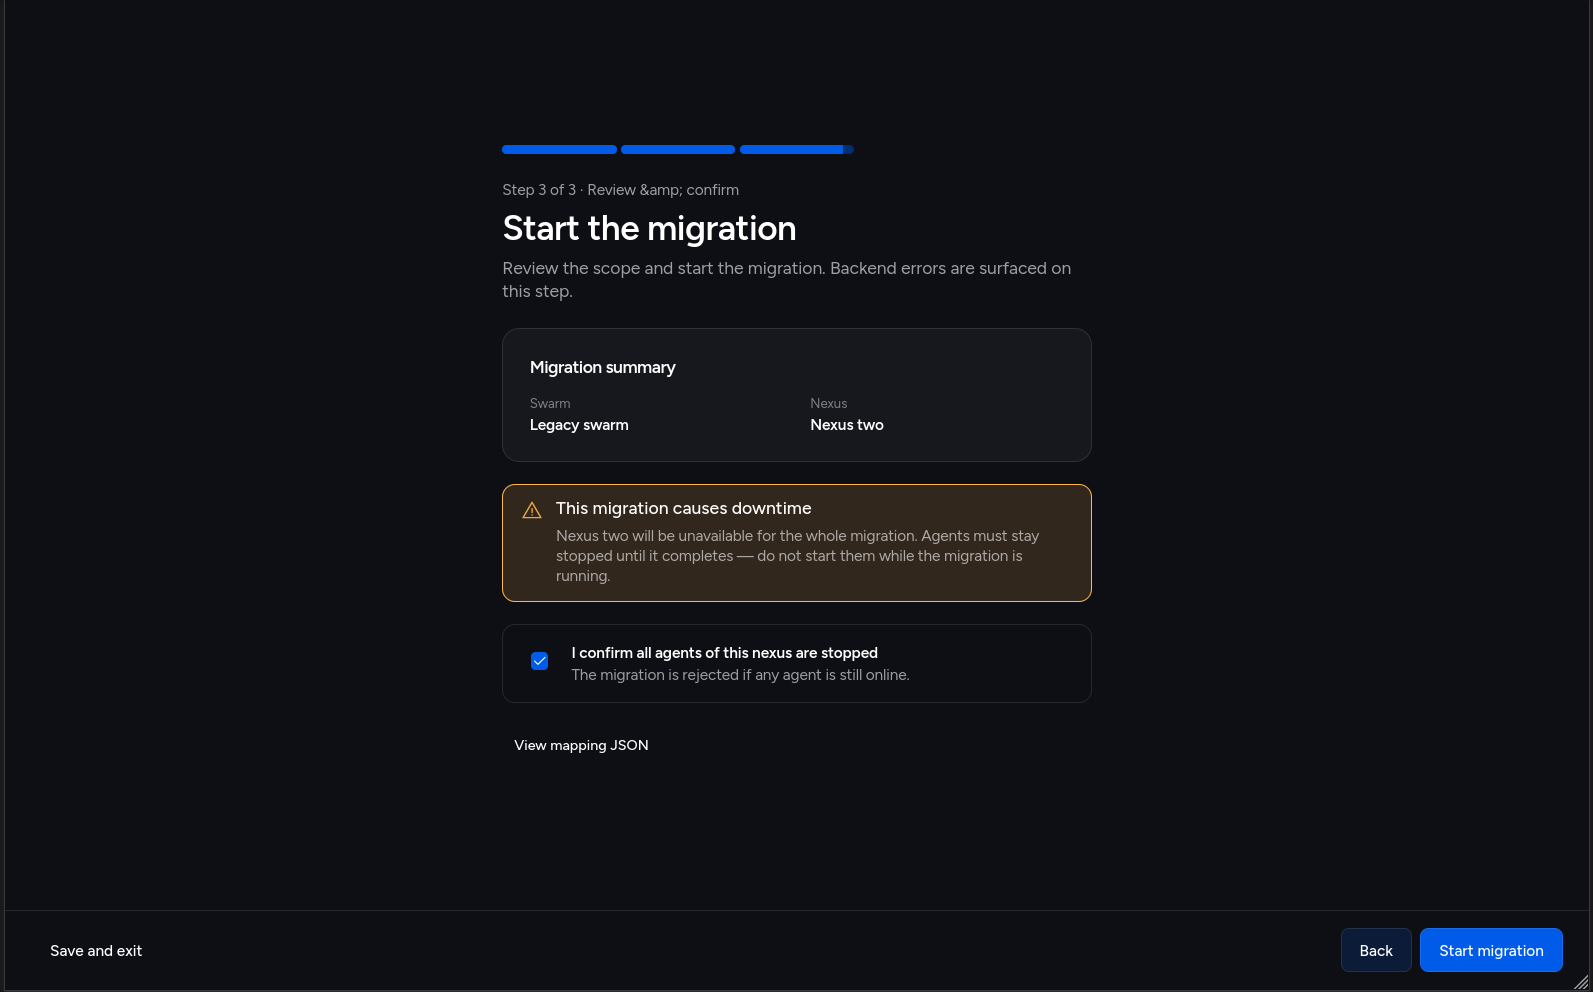
If the wizard still reports the agents as online, wait a few seconds after docker compose down and retry: the online state is updated from the agent heartbeats.
The migration is one-shot. If it fails, it cannot be retried from the wizard: contact support@cubbit.io before trying anything else. Migrate only one nexus at a time.
Step 8 - Verify the migration
Follow the progress in the wizard. The overall process moves from initializing to migrating_agents and then to completed, and every agent moves from waiting_to_be_migrated to migrating and then to migrated.
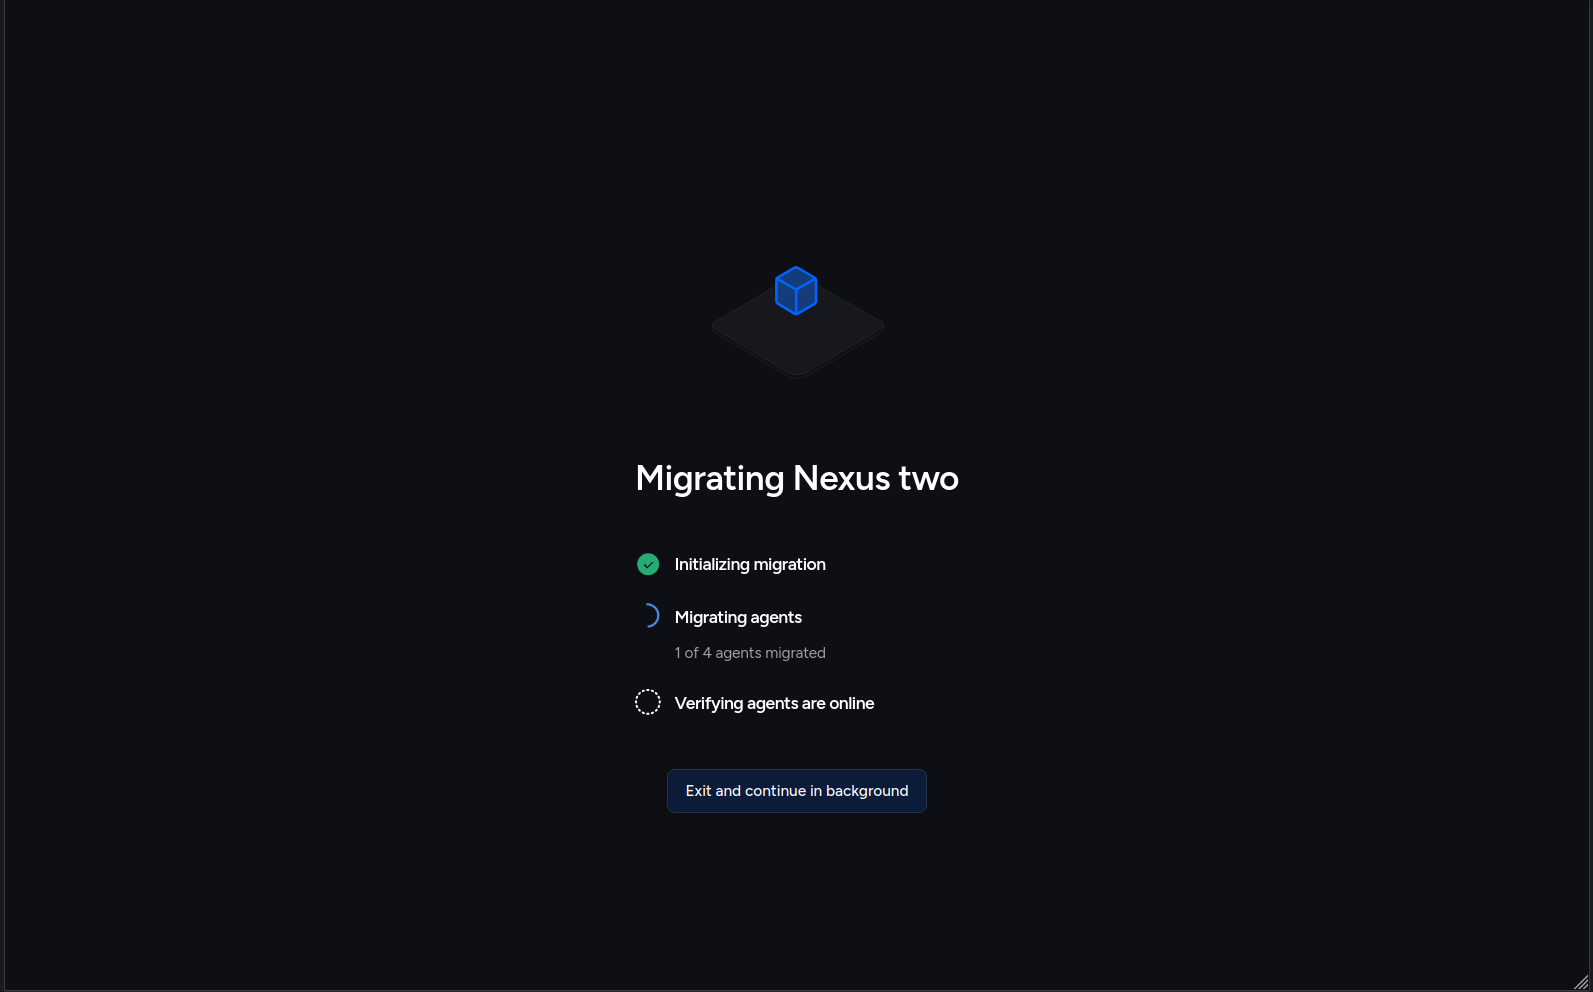
Verify the result on three levels.
Composer:
- The agents of the nexus are online and deployed on the cluster.
- The nodes of the location leave the warning state and become In Use (grey): the migrated agents own the disks again. The Nodes card at the top of the page counts them under Healthy, so grey tiles with a healthy counter is the expected result.
- The Swarm is marked as non-legacy and the migration banner disappears only after the last physical nexus is migrated: Composer clears the legacy flag when every physical nexus has all of its agents online and deployed. After an intermediate nexus the banner is still there, which is expected.
CLI:
export KUBECONFIG="$HOME/.kube/kubeconfig-<nexus-name>.yaml"
kubectl get pods -n cubbit
kubectl get nodes
ds3-composer infrastructure location describe --cluster-id <cluster-id> --output json --profile <profile>
Data path:
- Read a few objects of the nexus with the S3 client you already use. They must be the objects you could read before the migration.
- Upload a new object and read it back.
If your S3 client provides checksums, you can compare the checksum of an object you read before the migration with the same object read now. This is optional: the migration redeploys the agents on the existing disks and never formats or moves them.
If an object is unreadable or an agent does not become migrated, stop and contact support@cubbit.io. Do not restart the legacy Docker stack: it would run a second agent with the same identity and that controls the same disk.
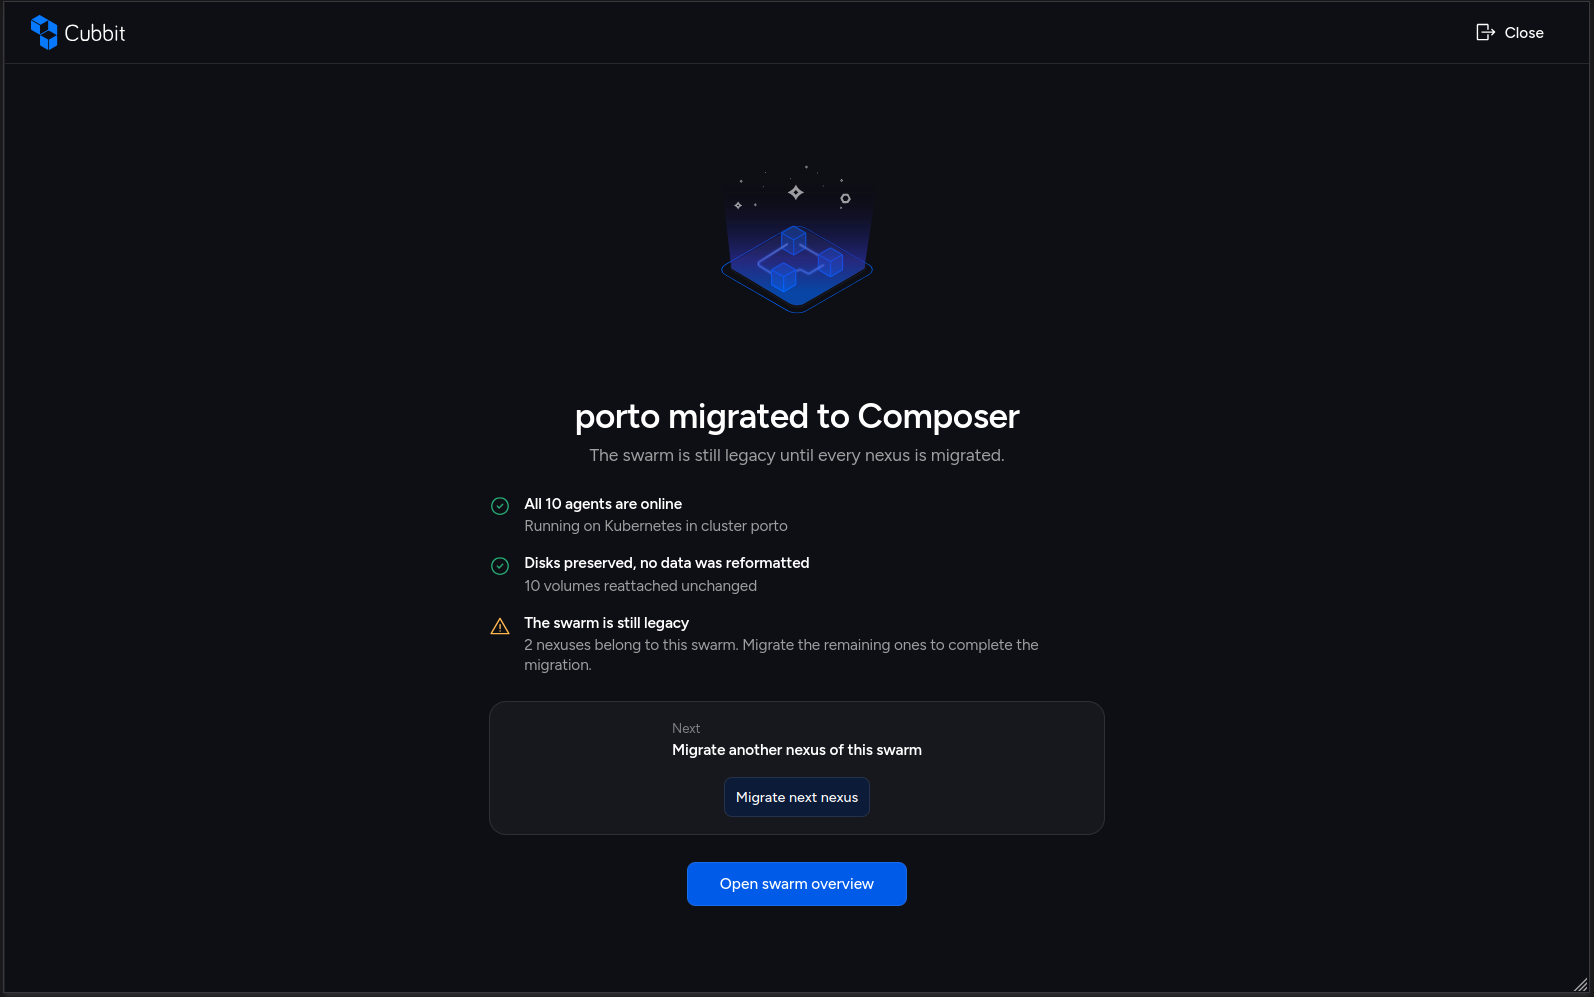
When the nexus is verified, return to the Swarm page and click Migrate next nexus for the remaining nexuses. The Swarm is marked as non-legacy only after every nexus is migrated. The result screen of a migrated nexus summarizes the outcome and offers Migrate next nexus:
Rollback and support
Before you press Start migration, the work is reversible:
- The k3s installation is removed with the setup script, using
--delete. - The Docker runtime is not modified, and the data disks are never touched by the setup script.
- You can restart the legacy agents with
docker compose up -din/home/cubbit. If Step 7 disabled the systemd unit, re-enable it as well, otherwise the legacy agents stay off after the next reboot:sudo systemctl enable --now docker-compose.service.
After the migration starts, the following is no longer reversible from your side:
- A started migration cannot be retried from the wizard, even if it fails. The record is one-shot by design.
- Redeploying the legacy stack on a migrated nexus runs a second process with the same agent identity, state directory and data disk.
To uninstall k3s from all nodes:
./k8s-multinode-cluster-setup.sh \
  --nodes <control-plane-ip>,<worker-ip-1>,<worker-ip-2> \
  --ssh-key <path-to-key> \
  --user cubbit \
  --delete
For anything that concerns the migration itself, contact support@cubbit.io with the Swarm ID, the nexus ID and the cluster ID.